
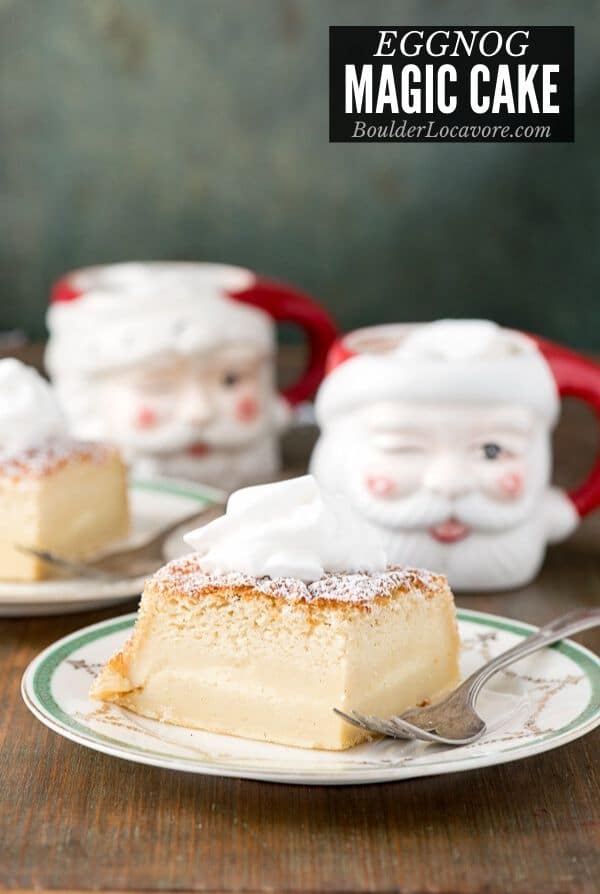
Magic Cake is an enchanting (and easy) dessert recipe! A simple batter transforms when cooked to make different layers! This eggnog cake version is perfect for the holidays.
Having a fun and unexpected holiday dessert recipe keeps your entertaining on top of its game!
There is no more enchanting recipe than Magic Cake!
Adding a classic eggnog flavor turns it into a perfect easy dessert recipe for the holidays.
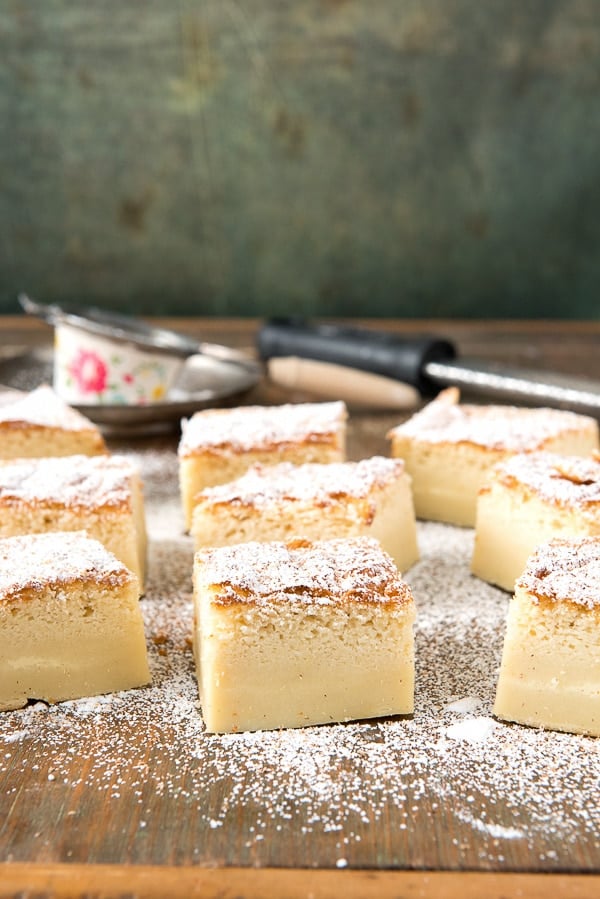
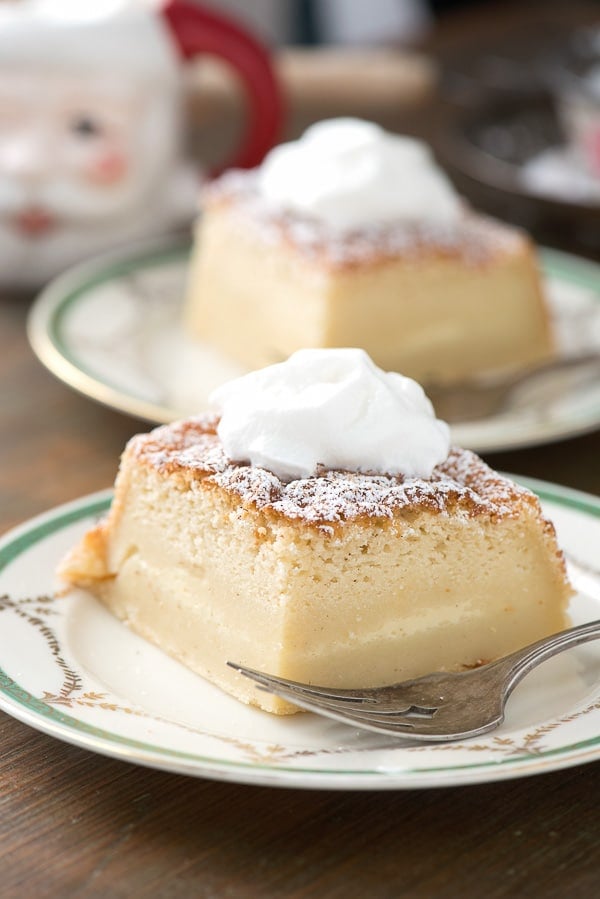
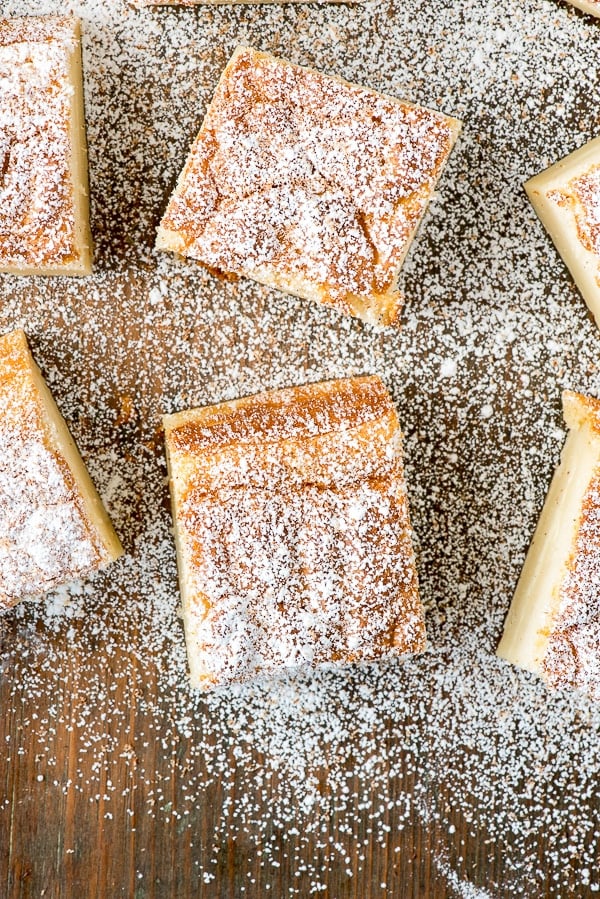
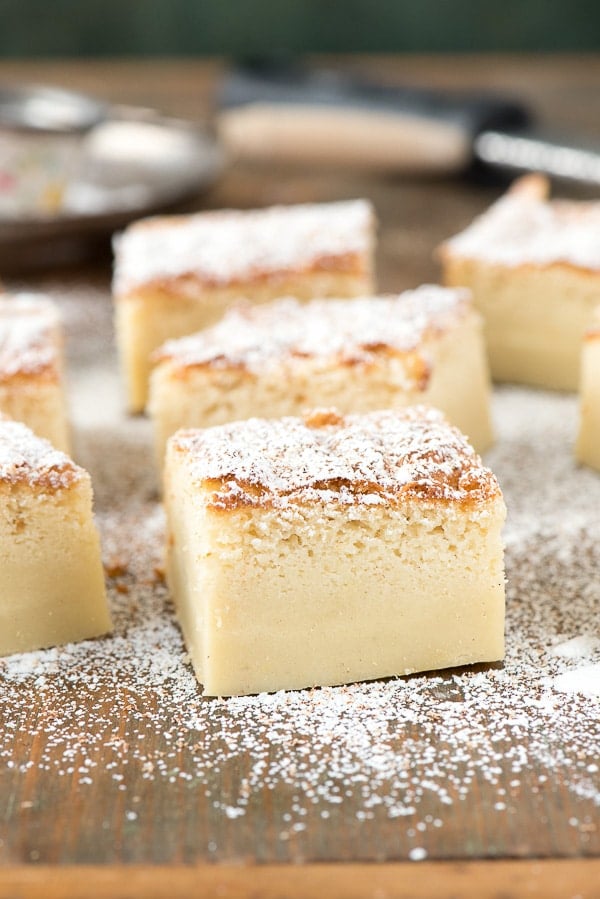
The most fun part is after the cake has fully cooled, cutting into it to see the magical layers that formed.
It's a bit of science in dessert form and one you'll love eating!
Jump to:
What IS Magic Cake?
Magic Cake starts with one batter and has three layers when it is done baking!
A thin crust, a custard layer and a lofty-cakey layer on top. And it happens without you doing anything!
It's cool to look at and it's cool to eat.
The magical part is how it goes from a watery 'I'm-sure-I-must-have-done-this-wrong' looking batter to the definitively layered end result.
Eggnog Magic Cake Ingredients
What's in this magical eggnog cake recipe? Nothing out of the ordinary!
All the ingredients are easy to find in grocery stores.
Prepared Eggnog. Store bought or homemade eggnog can be used. Eggnog, or Egg Nog (it’s the same thing) has a limited seasonal availability. In the United States it can usually be found in grocery stores from mid November through the first of the year.
There are many brands, dairy and non-dairy. This recipe is made with a dairy eggnog.
Unsalted Butter. Used for preparing the pan.
Confectioners' Sugar
Eggs
White Distilled Vinegar. Maybe a surprising ingredient for a sweet cake! The vinegar is used to stabilize the whipped egg whites so they keep they form. Adding the vinegar helps especially if baking at altitude. It does not negatively affect the flavor of the Magic Cake!
All Purpose Flour. This cake can be made with traditional All Purpose Flour or a gluten-free blend. I have used King Arthur’s Gluten-Free Blend. You can also use a measure-for-measure gluten-free flour blend.
Dark Rum. Three tablespoons of dark run are used in this eggnog cake recipe. It gives the flavor of traditional egg nog.
Whole nutmeg. To grate on top or ground nutmeg to sprinkle. Ground nutmeg can also be used.
Not an Eggnog Lover? Never fear!
The flavor is light and pleasing. Not overwhelming or strong.
You can also try these two recipes for other types of Magic Cake without eggnog:
Substitution
- If you do not want to add rum, substitute an additional 3 tablespoons of eggnog.
- If you like the flavor of rum but not the booze, add a splash of rum extract to the eggnog swap out above.
Chef Notes: What to Expect
Unlike any other recipe I’ve made, Magic Cake goes through some visual and textural changes that are worth noting.
My stomach always clenches when I haven’t made it for awhile because it’s very hard to believe the batter that goes into the oven could come out looking like a cake!
Please refer to the video at the bottom of the recipe card below to SEE what to expect!
We’ve added some Chef Notes in the recipe below regarding what you’ll experience!
How to Make Magic Cake – Step-by-Step
This recipe is not so different than regular cake recipes. Here are the main steps (refer to the recipe card at the bottom of the post for specifics):
STEP 1. Preparation
Preheat the oven to 325 degrees F. Grease an 8-inch by 8-inch square pan.
STEP 2. Make the batter
Warm the eggnog. It should be lukewarm (not cold, not hot) for the Magic Cake recipe.
Combine the egg whites and vinegar. Whip into stiff peaks.
In a small bowl mix together the egg yolks and sugar. Beat in the melted butter.
Gradually add the flour, beating while adding to combine with the batter.
Add the rum and vanilla to the eggnog. Drizzle into the batter while running the mixer to fully incorporate all the ingredients.
Chef’s Note: By the end of this step the batter will look REALLY watery and you’ll think you did something wrong. You haven’t! Every time I make Magic Cake I start to panic just a little bit around this step, thinking I over measured or forgot an ingredient.
Fold in the egg whites by hand and pour into the prepared pan.
Chef’s Note: When you have folded in the egg whites, it looks dreadful. Like a swampy mess of little bumps of egg white. Take a deep breath, know this is ‘normal’ for this recipe and keep going!
STEP 3. Bake
Bake 50-55 minutes and cool completely before serving.
Chef’s Note: Remarkably the cake comes out of the oven looking golden-brown and nothing like what you put into the oven.
Can I Double the Recipe In a Larger Pan?
I have only made Magic Cake in an 8-inch by 8-inch pan.
Baking is chemistry and this cake in particular has a very unique balance to the ingredients to achieve the outcome.
I have researched and not found any other Magic Cake recipes using a larger pan.
My recommendation: if you feel you will need more than on 8-inch by 8-inch pan will serve would be to make multiple cakes rather than doubling it in a larger pan.
More Holiday Recipes to Try
- The Best Eggnog Recipe: A Boozy Party Punch
- Sparkling Vodka Cranberry Punch
- Wassail: a Classic Holiday Drink
- Roasted Chestnuts
Recipe

Eggnog Magic Cake
Ingredients
- 2 cups prepared Eggnog lukewarm
- 4 Eggs room temperature and separated
- 1/8 teaspoon White Distilled Vinegar
- 1/2 cup (1 stick) Unsalted butter melted and cooled (cannot be hot) (plus some unmelted butter for preparing the pan)
- 1 ½ cups Confectioners' Sugar (plus some for dusting the top of the finished cake)
- 1 cup All Purpose Flour regular or or gluten-free measure-for-measure flour blend (I used King Arthur's Gluten-Free flour blend)
- 3 tablespoons Dark Rum (can be substituted for more eggnog if preferable)
- 1 teaspoon Vanilla Extract
- Whole nutmeg to grate on top or ground nutmeg to sprinkle
Instructions
- Preheat oven to 325 degrees. Butter an 8×8 inch baking pan and set aside.
- To warm the eggnog: place eggnog in microwave container and warm in 15 second increments until lukewarm (about 1 to 1 ¼ minutes)2 cups prepared Eggnog
- Combine the room temperature egg whites (4) and distilled white vinegar and whip eggs with a mixer on the highest speed until forming stiff peaks. Set aside (note: the vinegar helps stabilize the peaks which is a key to success especially at high altitude).1/8 teaspoon White Distilled Vinegar
- In a second bowl, mix together the egg yolks (4) and sugar until fully combined and sunny yellow! Add melted butter; mix on low speed until the mixture is fully combined.1 ½ cups Confectioners' Sugar, 1/2 cup (1 stick) Unsalted butter
- Add the flour very gradually to the batter while mixing, to allow the flour to integrate with the rest of the batter.1 cup All Purpose Flour
- Add the rum and vanilla to the warmed eggnog. While keeping the mixer running on low speed, trickle the eggnog mixture into the batter allowing it to incorporate with the batter. By trickling the eggnog, it has time to mix in easily. Note: by the end the batter will be very watery and should be so don’t worry!3 tablespoons Dark Rum, 1 teaspoon Vanilla Extract
- By hand, fold in egg whites one fourth at a time, stirring to combine with the liquid batter. There will be small lumps of egg white in the end and the batter will still be fairly liquid.
- Pour into the prepared pan and place in the preheated oven for 50-55 minutes. NOTE: The cake will have a browned top but may seem to have some movement when removing it from the oven which is normal.
- Allow to cool on a cooling rack for until completely cool (about 3 hours) OR allow to cool on the rack for 30 minutes, then cover with foil (shiny side out) and place in the refrigerator for at least an hour.Whole nutmeg to grate on top or ground nutmeg to sprinkle
- Cut, sprinkle with confectioner's sugar and freshly grated nutmeg; serve!
Video
Notes
Nutrition
Originally published: December 17, 2015
Magic Cake plus eggnog makes an enchanting eggnog cake perfect for holiday celebrating!
katerina says
Oh my, this is such a gorgeous cake!! Truly magical to watch it transform.
Nicole says
Eggnog stuff like cake and ice cream is my favorite! thanks for creating such a great recipe!
April says
I love magic cakes! This eggnog version was to die for!
Alison Forrester says
Delicious cake! The layers are fantastic and it truly is magic how it changes during baking.
Jyoti Behrani says
Incredible!! I made this eggnog cake to bring to my cousin’s house for holiday party. It was a huge hit. Thanks for sharing!
Angela says
What a fun recipe. I have never seen anything like it and it was fun to see the science of baking at work. Thanks for sharing this tasty cake recipe.
mtngrl84 says
8500ft. 50 minutes 325 degrees well it baked beautifully but when it cooled it sunk and shrank from all sides. Got about 5 small pieces. It’s delicious and the texture is incredible.
Toni Dash says
Do you normally adapt your baking recipes for your high altitude? We baked the cake at 5400 feet and it turned out perfectly as shown in the photos. However we do not test at higher altitudes.
Madu says
This was great! The only thing is that I followed exactly and my cake rose about an inch above the baking pan and then became super deflated! Was wondering how to fix that in the future!
Rebecca says
Is this to be served cold or room temperature?
Toni Dash says
It can be served either way!
Isabella says
Dear Toni,
Have a questions about melting butter. I read if you use microwave to melt butter, it breaks down & wont be the same and would ruin your baking? Should butter always be melted on stove?
Thanks Isabella
Toni Dash says
Hi Isabella. I have never heard that before! I did some searching and could not find anything that confirmed it either. I always melt my butter in the microwave and have never had an issue. I wonder if what you read was talking about softening butter in a microwave, not melting it?