

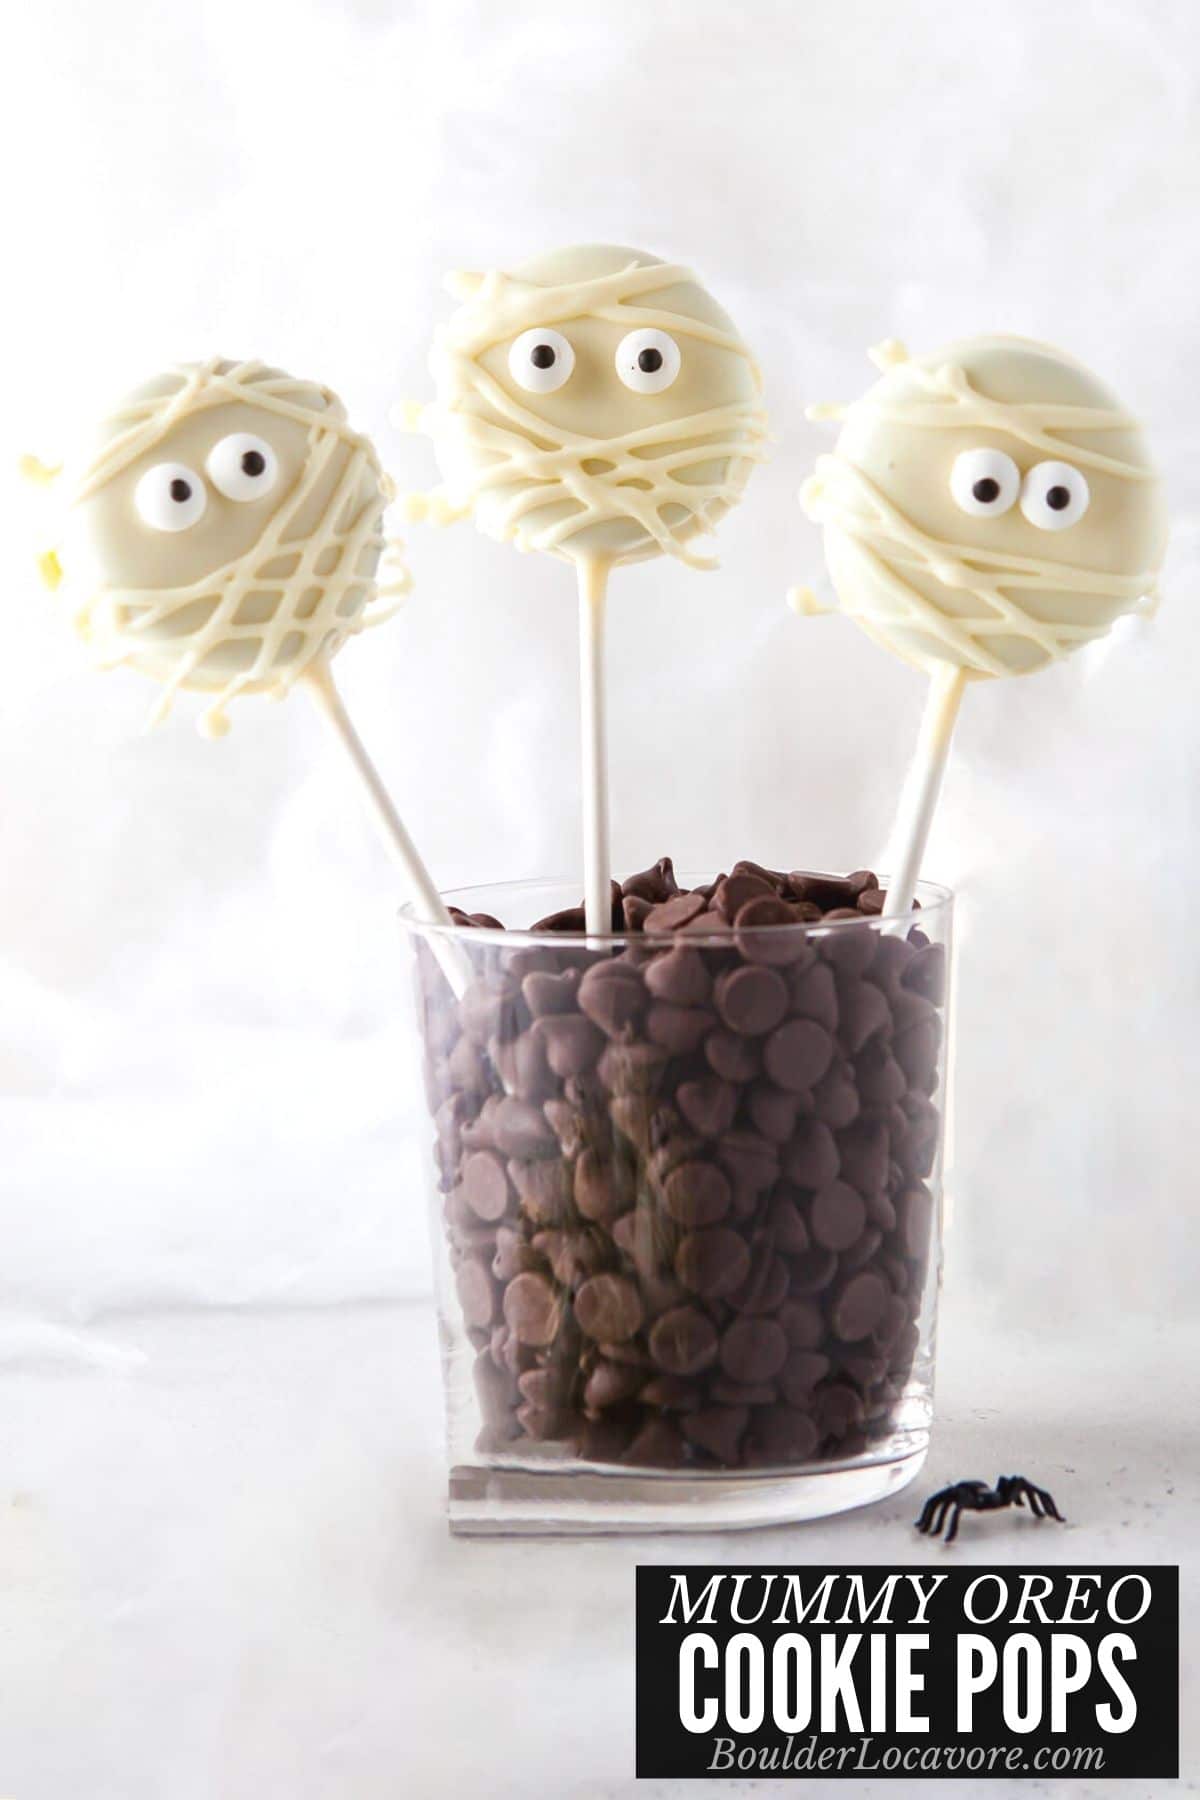
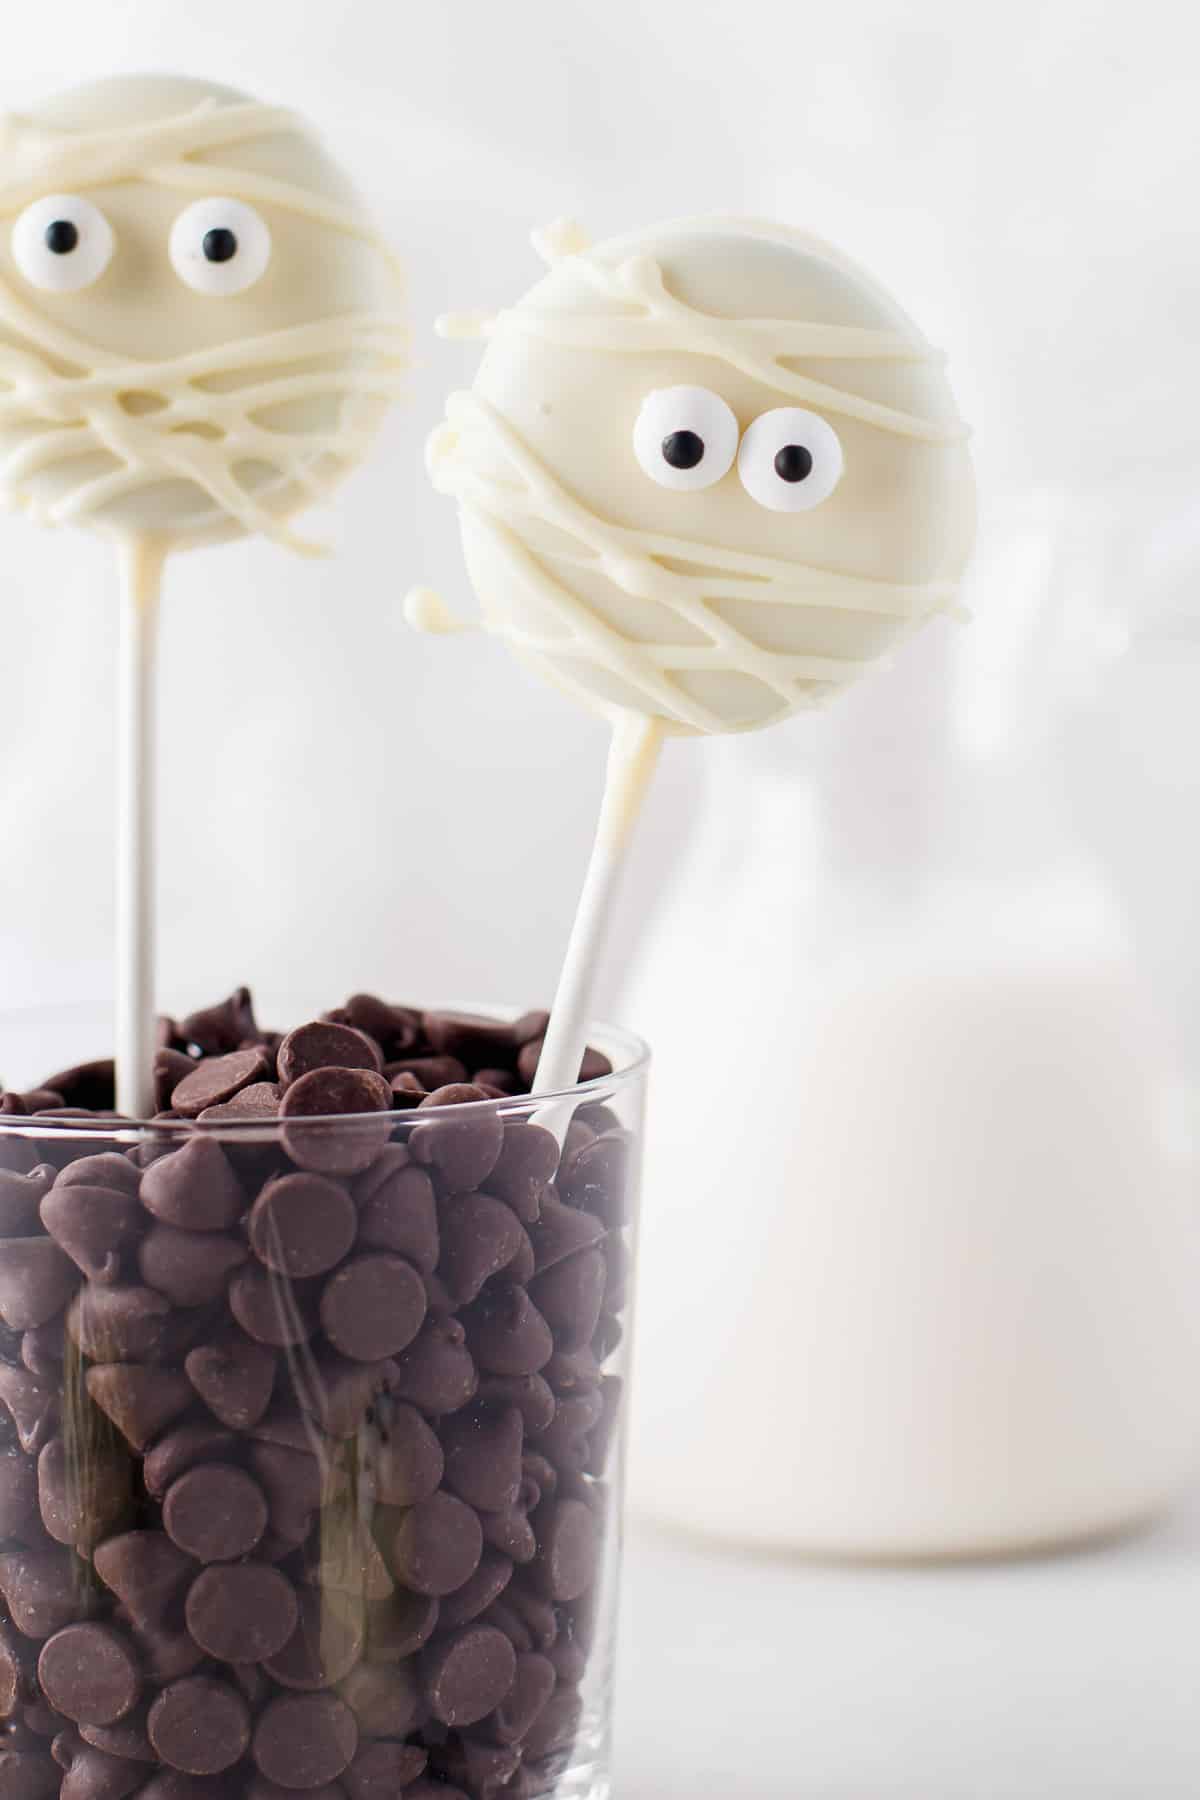
These adorable, easy no bake Mummy Oreo Cookie Pops will be the hit of any Halloween festivities! They are such a fun cookie project!
‘Easy’ is the absolute best way to do Halloween. These cookie pops fit that description and guarantee a good time!
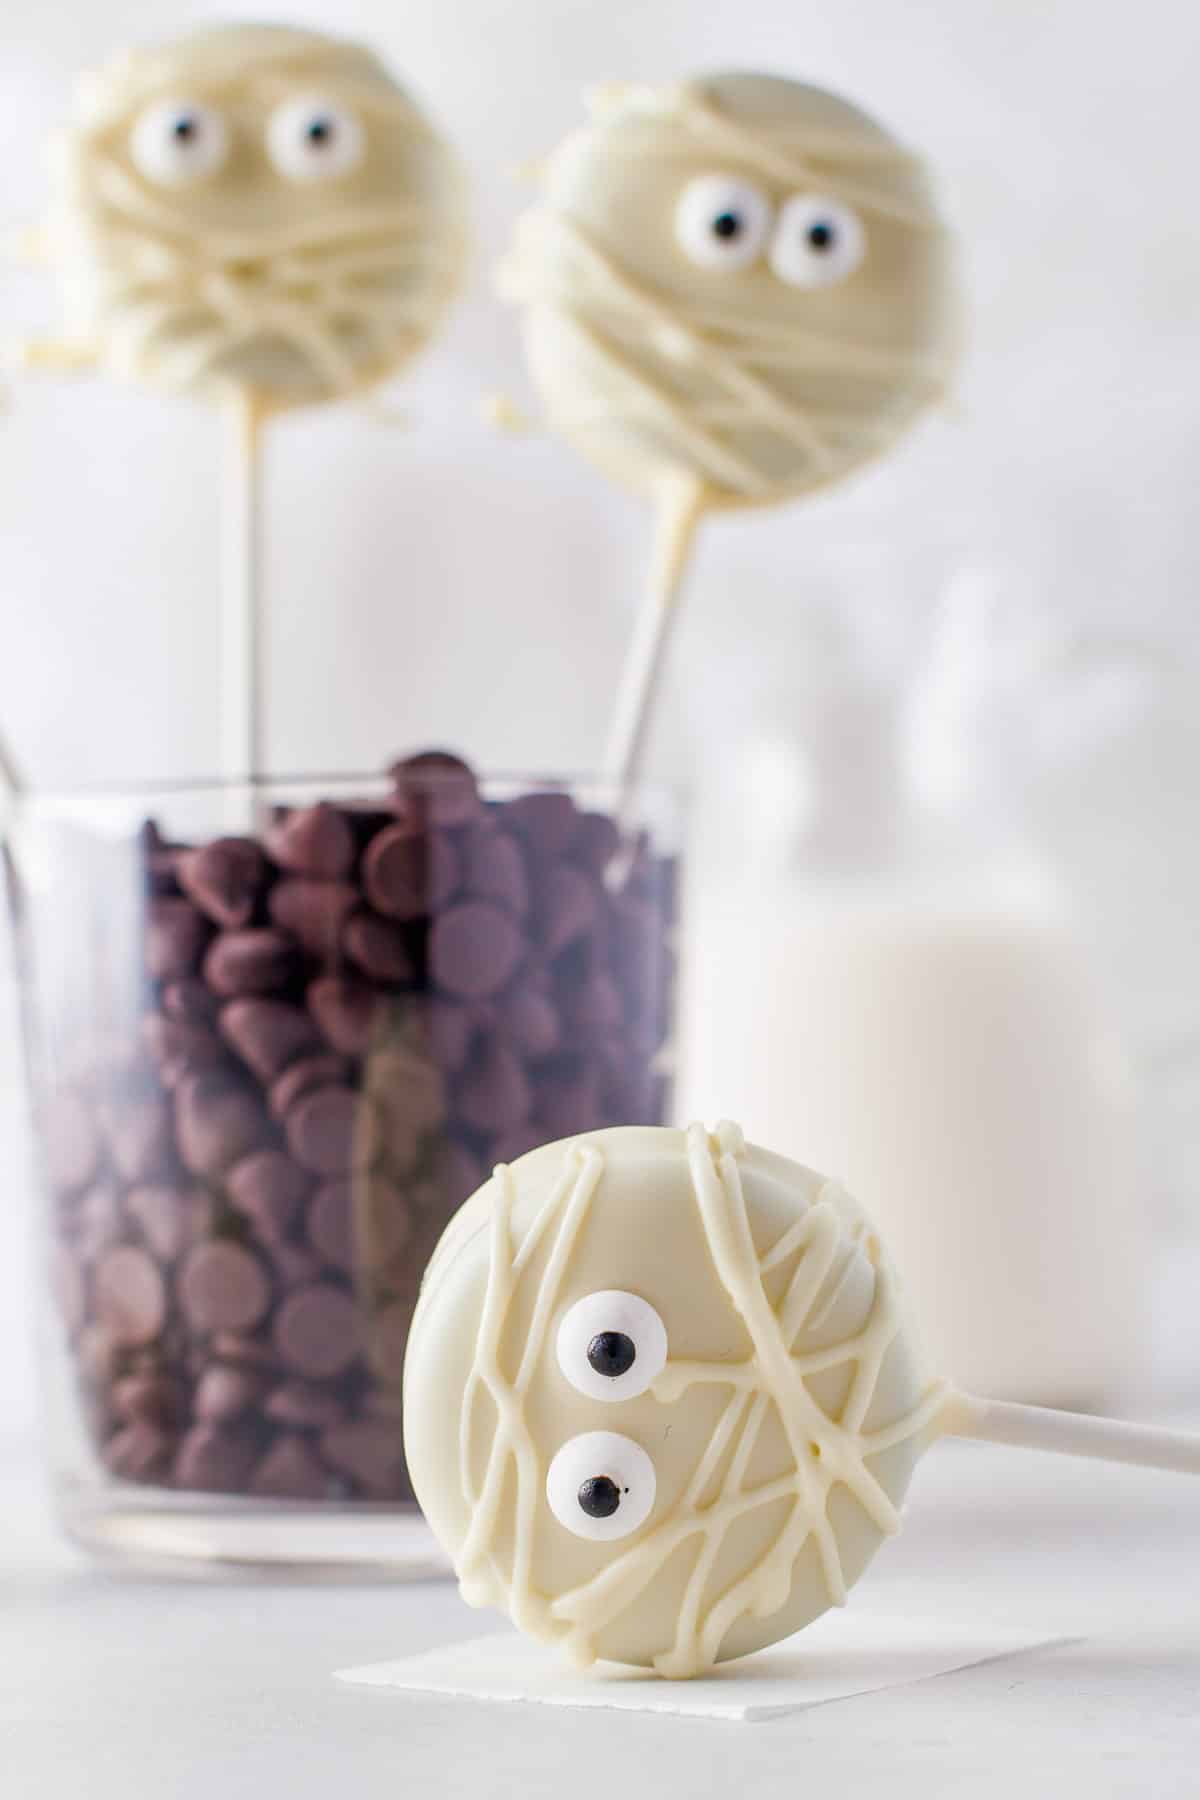
Double dipped Oreos complete with little eyes on top of each cookie and white chocolate mummy wraps!
It’s a delicious recipe that will delight young and old and make it a special occasion.
Can be made with regular or gluten-free Oreos!
Jump to:
Halloween Cookie Pops
No bake desserts are the way to go for Halloween. Unlike cake pops cookie pops, these at least, use store bought cookies.
Oreo cookie are used, disassembled, reassembled with a stick and dipped in melted chocolate.
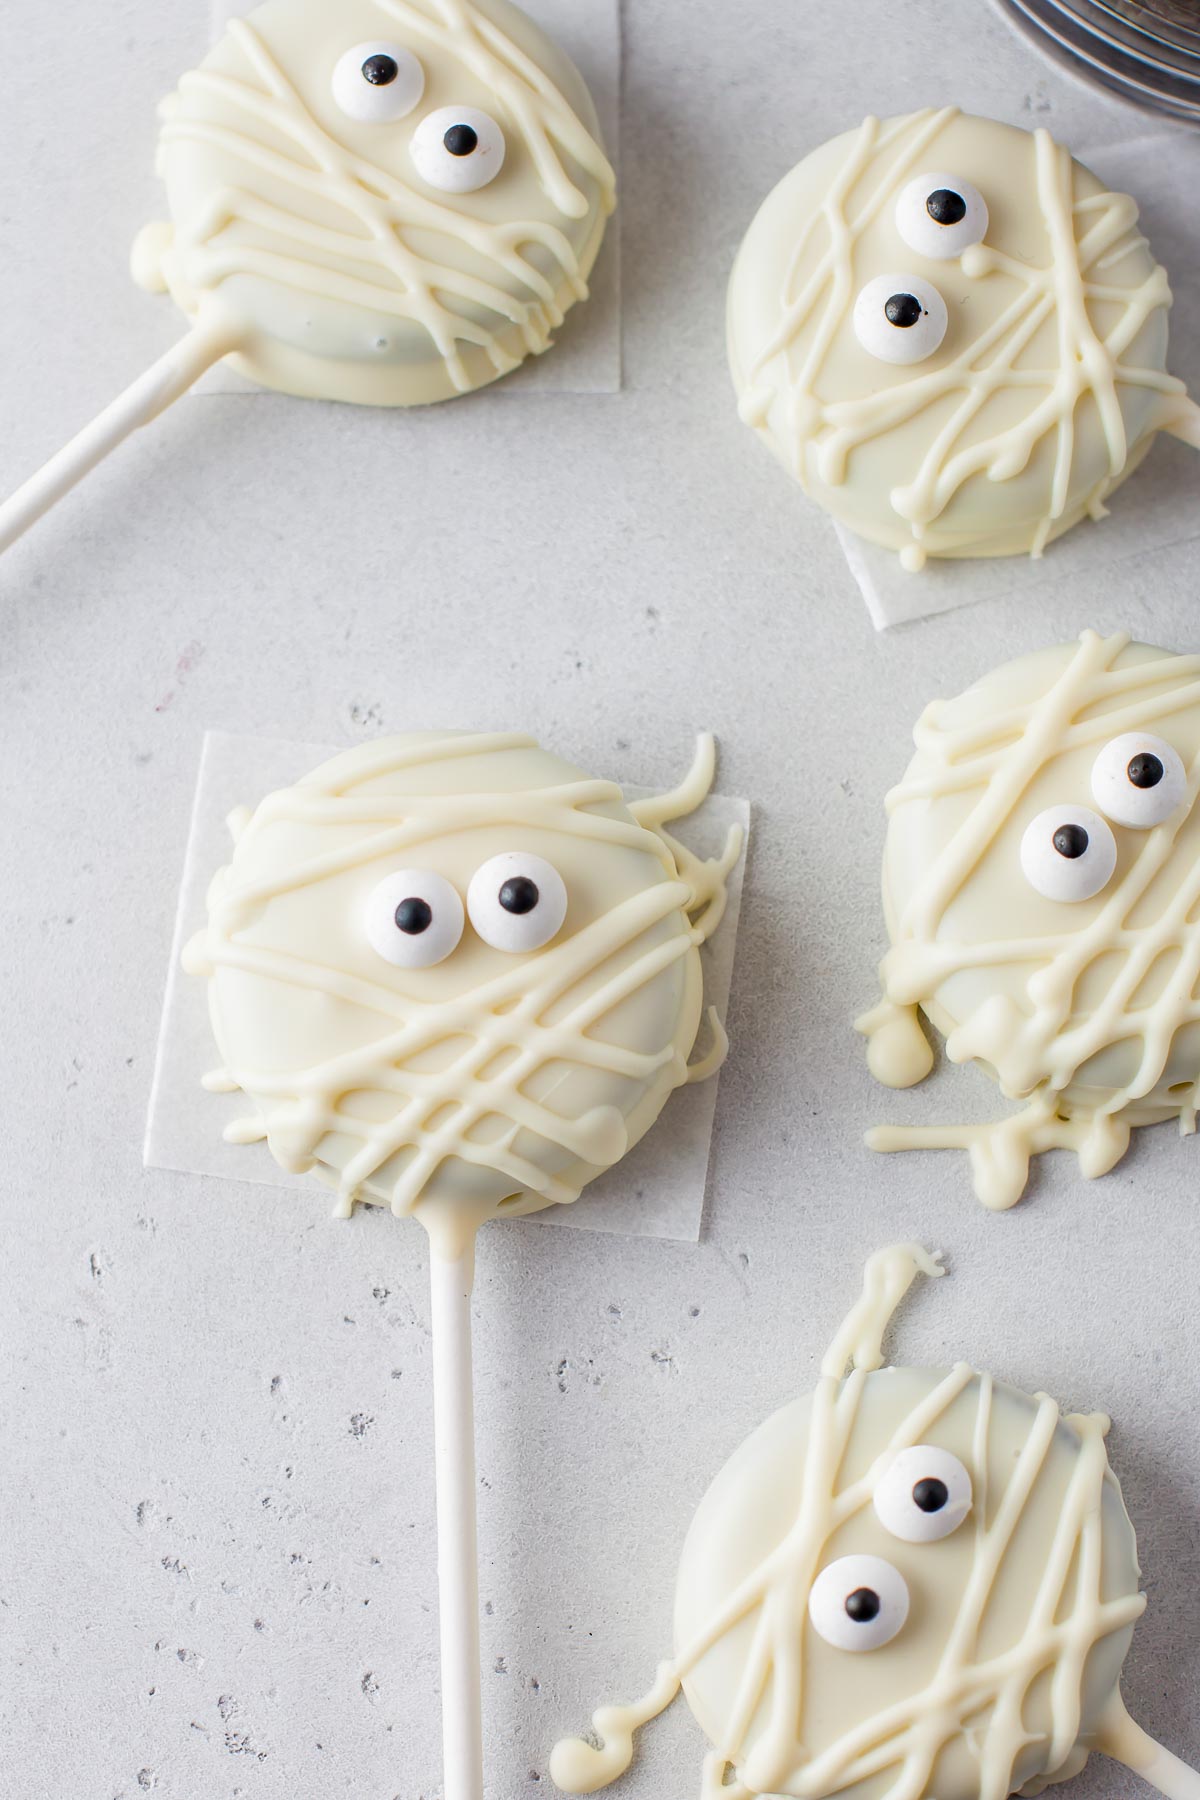
In the case of these Mummy Pops they are given eyes and some mummy wraps for good measure.
They are a perfect way to celebrate the holiday! Serve with our Mummy Cookies and Mummy Cherry Hand Pies for a full theme.
This recipe can be changed for different occasions. Think Valentine’s Day, Christmas, birthdays. Different colors of candy melts can be used too.
Recipe Ingredients + Notes
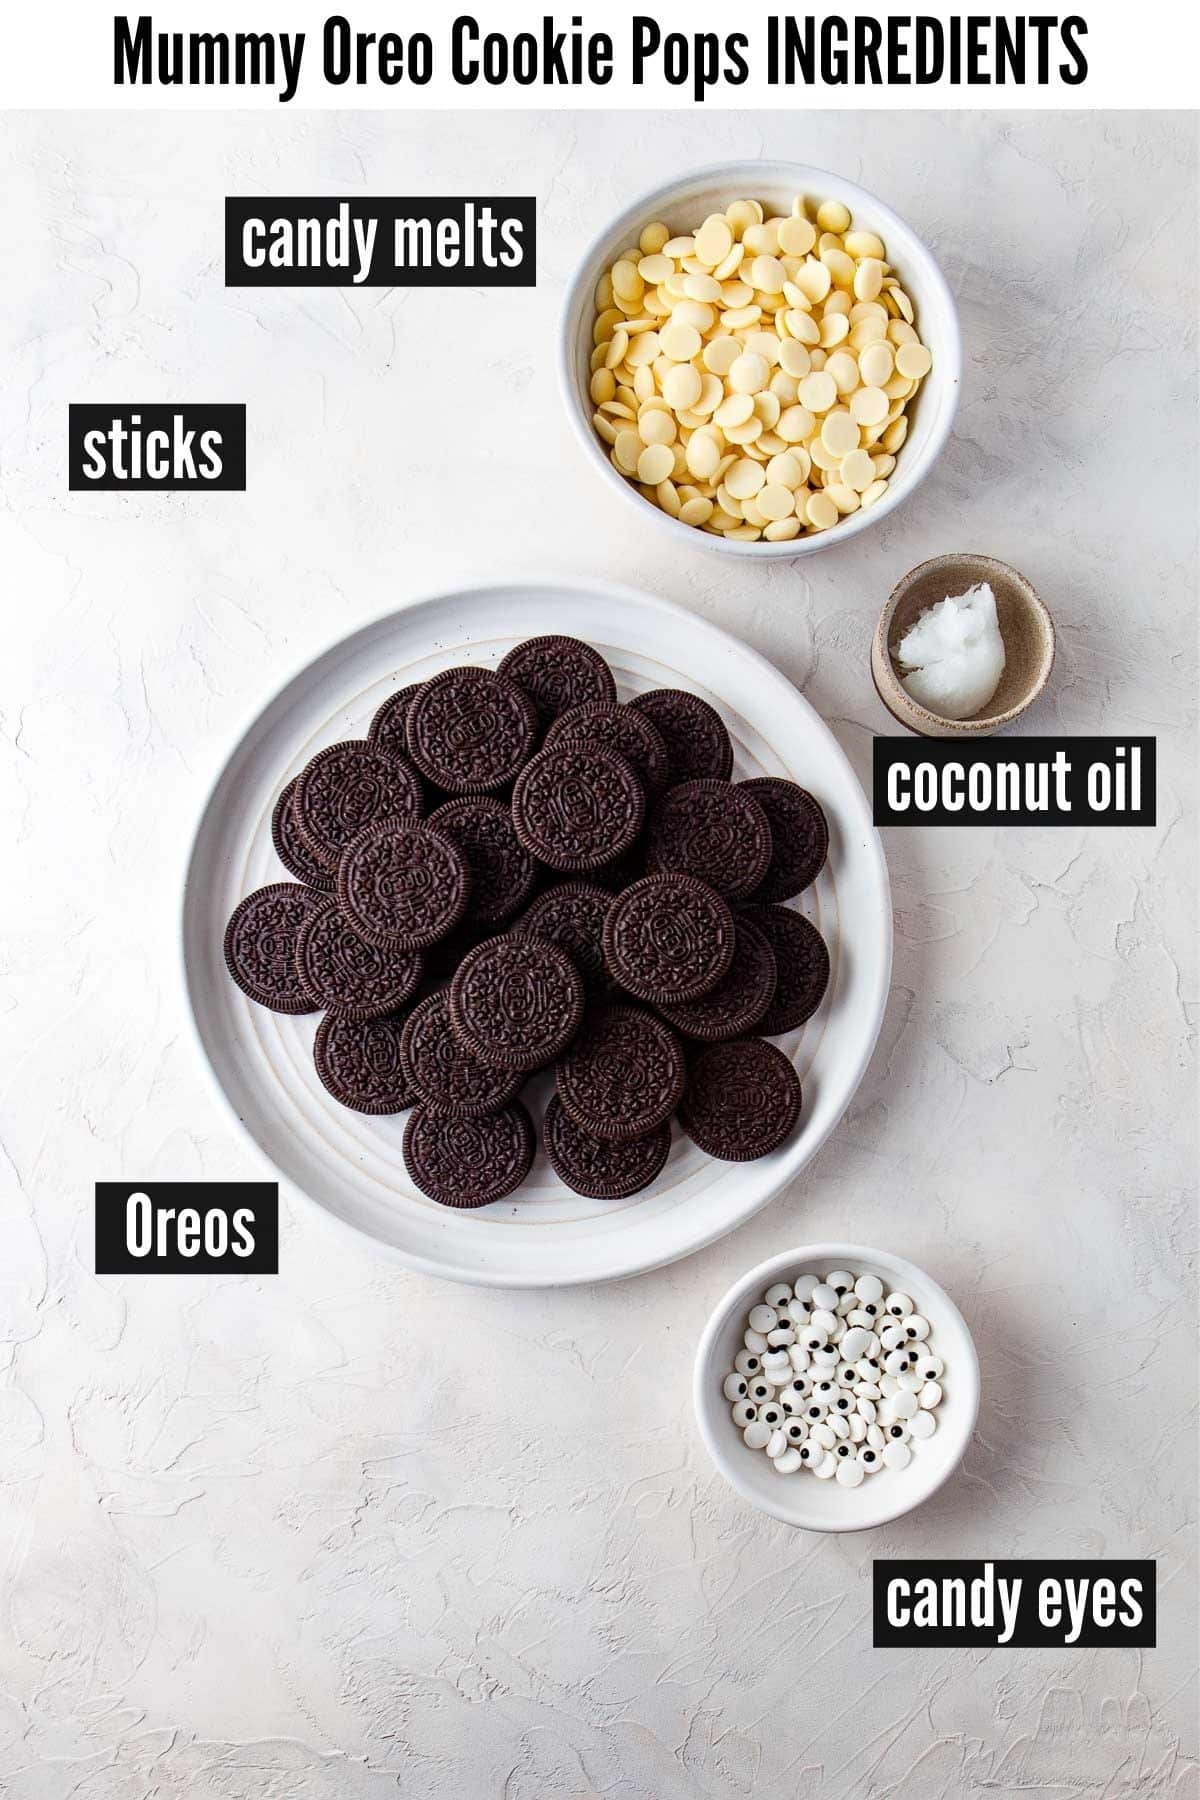
White Chocolate Candy Melts. There are multiple options for coating the Oreos and vanilla candy melts are the easiest. We use Ghirardelli melting wafers which work wonderfully and have a great authentic flavor.
Coconut oil or vegetable shortening. This is an optional ingredient used is the coating chocolate needs to be thinned.
Oreos. Any Oreos (regular or gluten-free) or sandwich cookies can be used.
Candy eyes. These can be found at baking supply stores, craft stores where baking supplies are sold or online.
Lollipop sticks or cake pop sticks. These are sold in packs where baking supplies are sold. A wooden stick used for popsicles may also be used instead of lollypop sticks if desired.
Piping bag or plastic Ziploc bag. This will be used to add the mummy wraps!
Parchment paper. The little mummies will sit on parchment to harden.
Variations
White chocolate chips. White chocolate can be very finicky. It can ‘seize’ when being melted meaning it dries out and is ruined if not melted correctly.
Adding some coconut oil or vegetable oil can help with this. But candy melts are much more forgiving and easier to work with.
Almond Bark. This is another coating option. It’s designed as a coating ingredients so melts well and hardens well. We prefer the flavor of the vanilla candy melts but almond bark will work too.
Double Stuff Oreos. This type of Oreos have double the filling so it’s possible to insert a stick without taking the Oreo apart.
- Gently insert the stick and drizzle some melted chocolate at the base of where the stick is inserted to secure it.
- Let it set before proceeding and double dipping the cookie.
NOTE: as of the original publication of the recipe they do not make a gluten-free version of this type of Oreo for those needing a gluten-free cookie.
Use them as a party favor! Place each one in a lollipop bag, tie closed and hand out at school parties or party favors for guests at a Halloween party.
How to make Mummy Cookie Pops – Step-by-Step
STEP 1. Preparation
Line a baking sheet with parchment paper.
STEP 2. Melt the chocolate
Melt the candy melts in the microwave per the package time and temperature instructions (usually lower temperature for 15 second intervals stirring in between; instructions may vary brand to brand).
Alternatively this can be done in a double boiler.
Take care not to overheat the chocolate or it will dry out.
STEP 3. Inserting the sticks
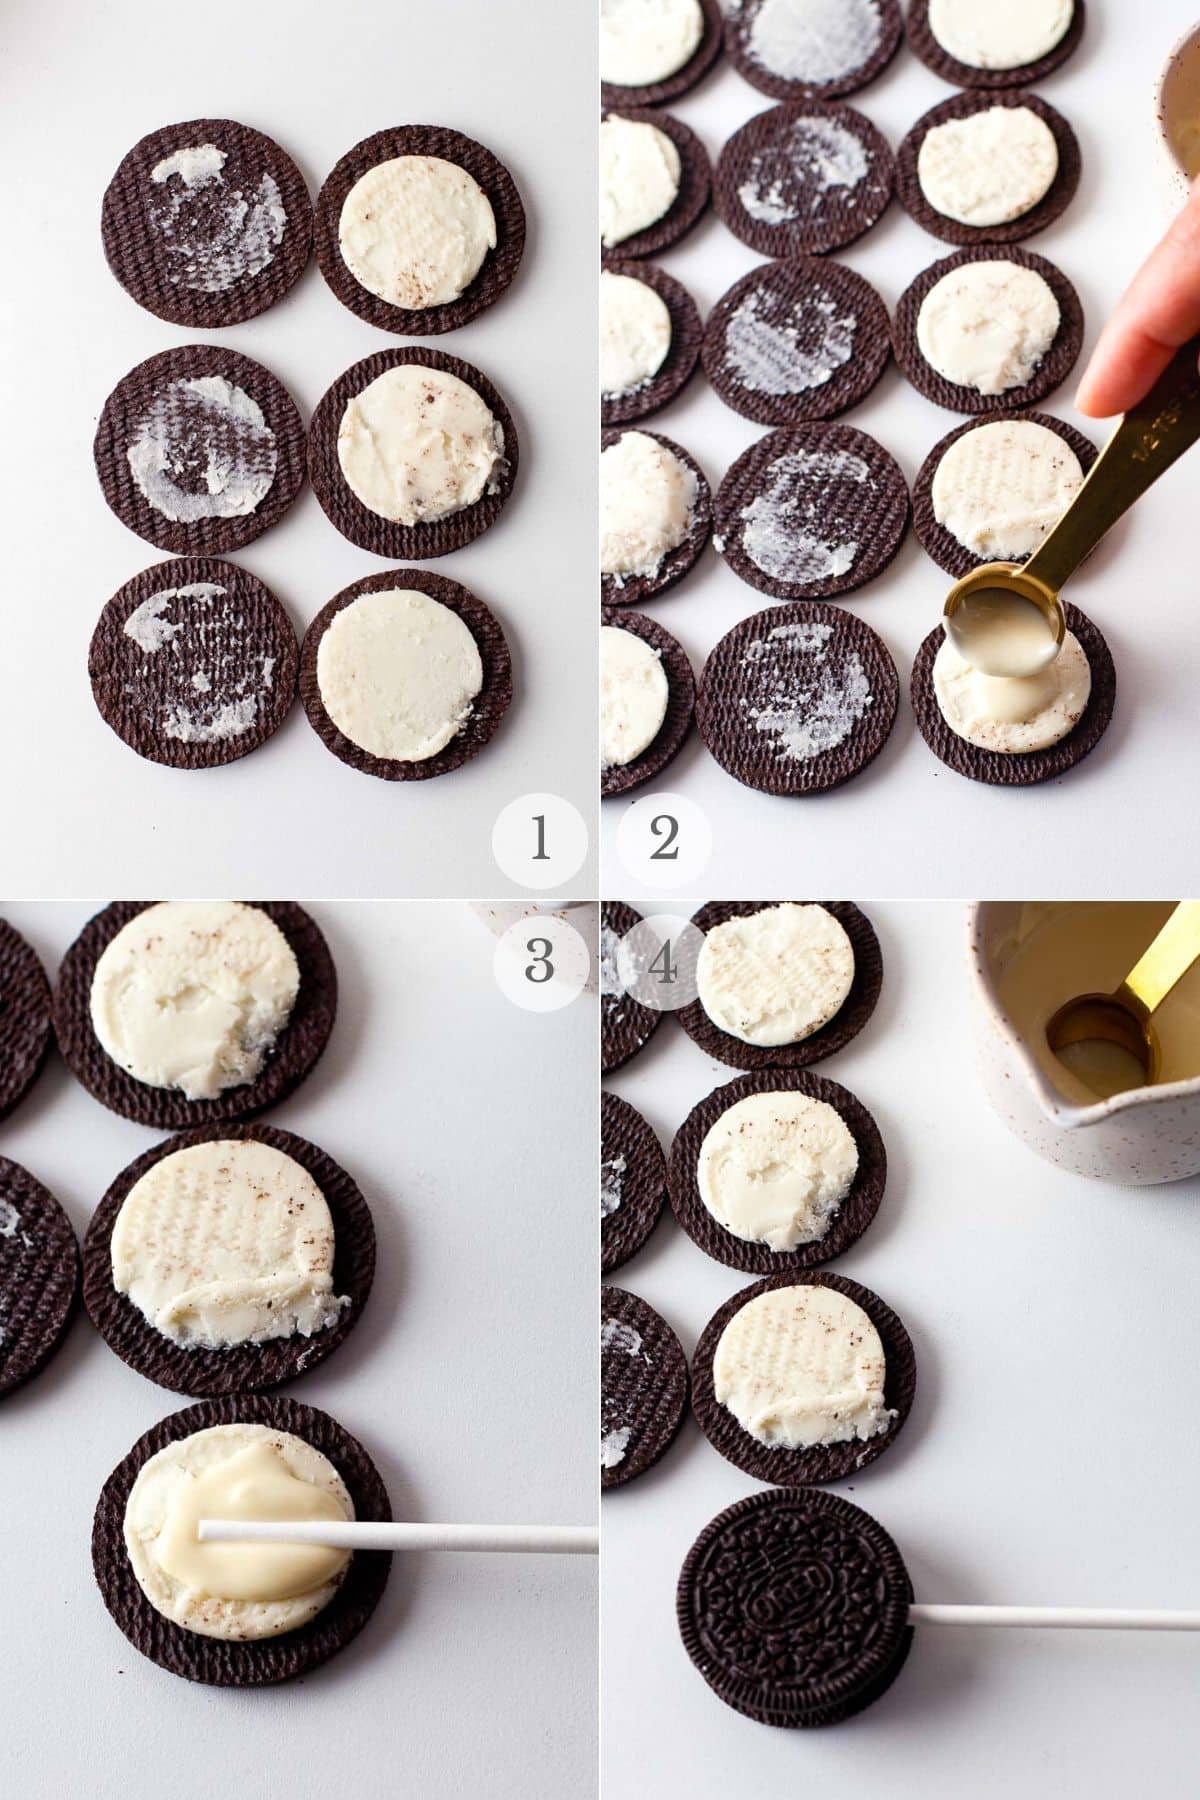
Gently twist the sandwich cookies apart, leaving the filling on one side and a cookie on the other (photo 1). Alternatively a small sharp knife can be used to gently run on top of the filling inside the cookie to free it.
Place one teaspoon of melted candy on one of the Oreo halves (photo 2). Place the lollipop stick in the chocolate (photo 3) and replace the opposite half of the Oreo to seal the cookie back together (photo 4). Place on the parchment paper to set completely.
STEP 4. Dipping the Oreos
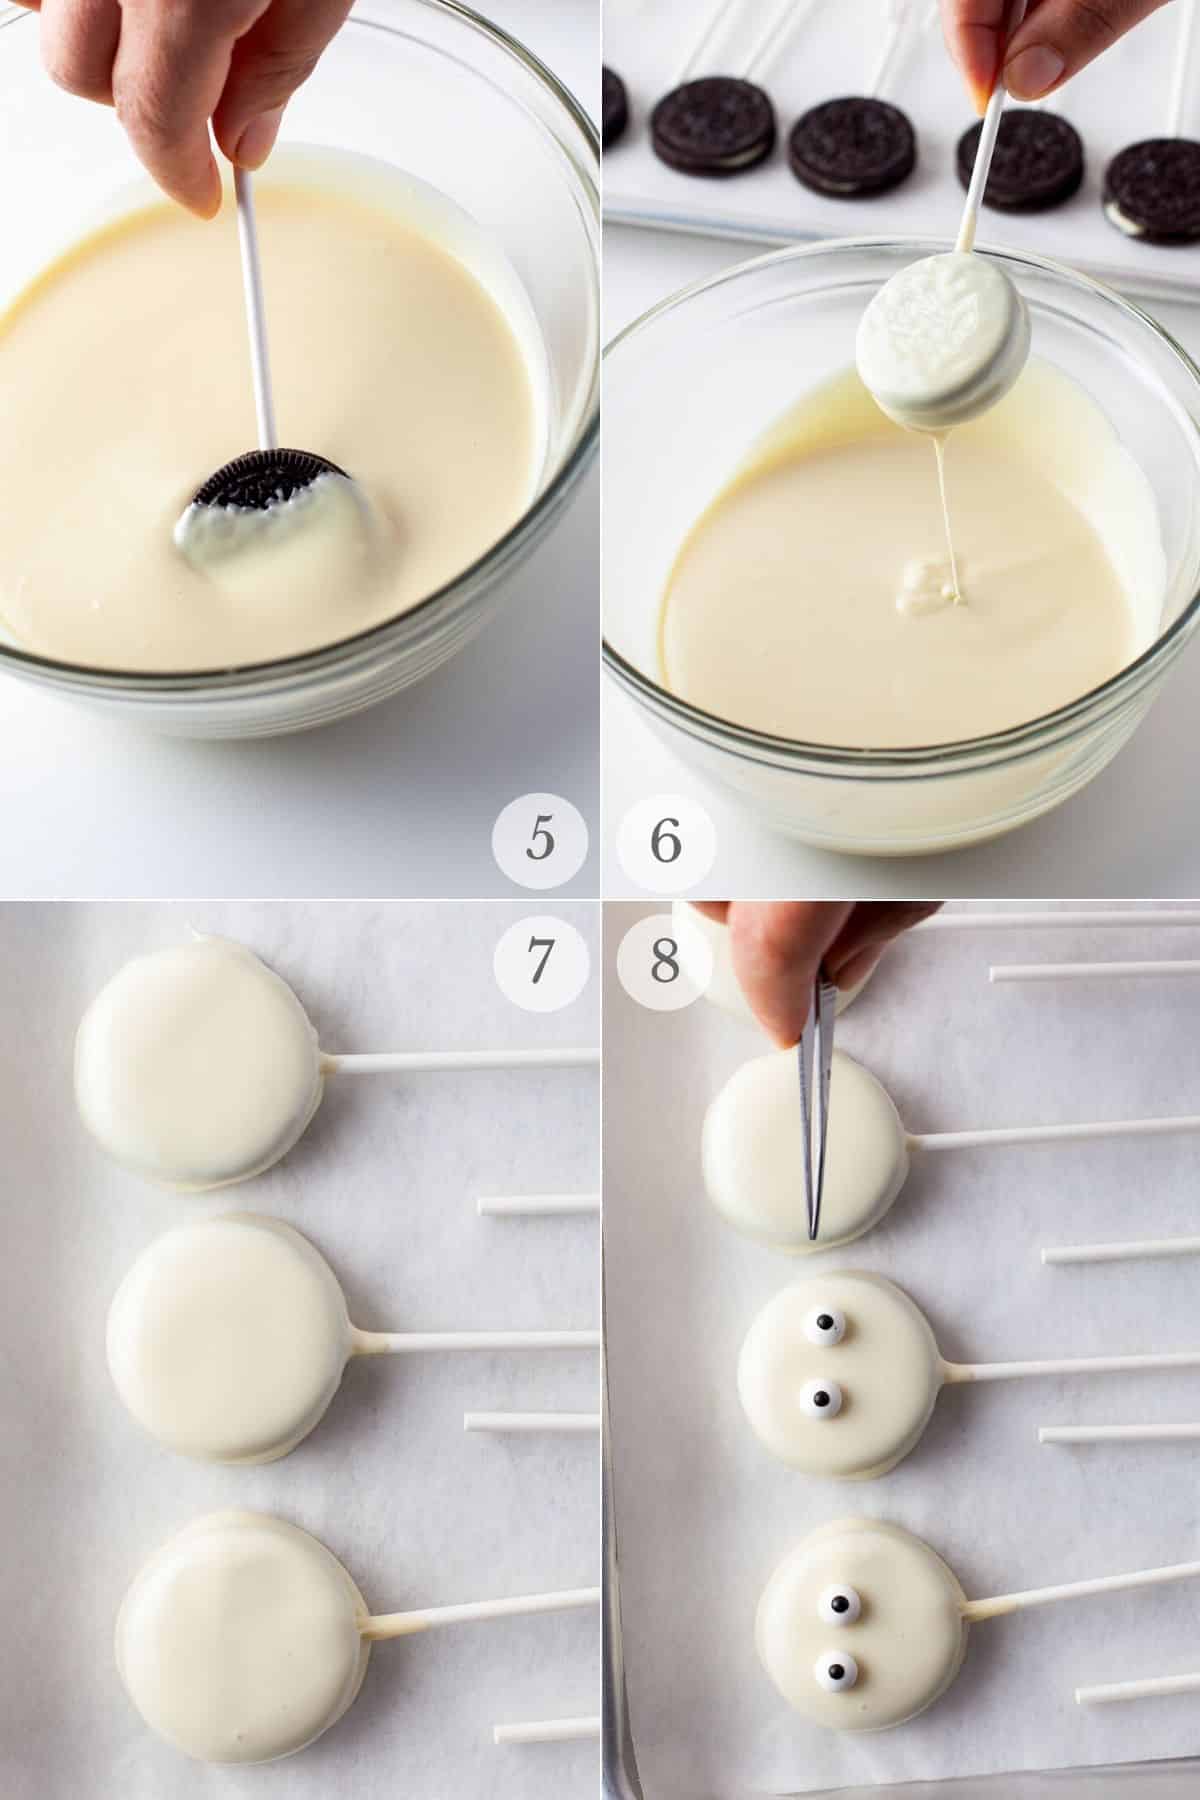
Once the Oreos have set with the stick inserted re-melt the chocolate as needed. NOTE: up to 1 tablespoon of coconut oil can be added to thin the chocolate for a thinner coating if needed.
Dip cookies one by one into the melted chocolate to fully coat, allowing any excess to drip back into the bowl (photos 5-6). Place on the parchment paper to set at room temperature (photo 7).
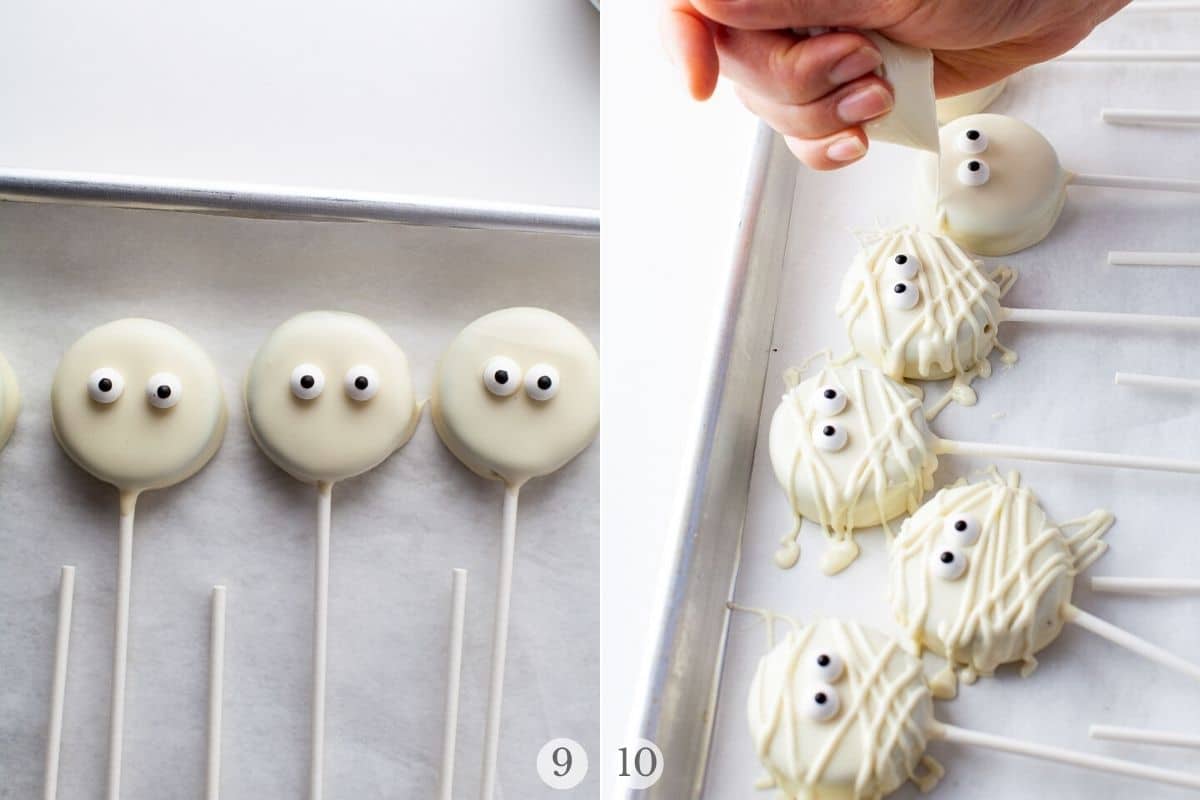
When the first coating has set, dip the Oreo for a second coating AND place 2 eyes on the top of the cookie (photo 8). Allow to set completely on the parchment paper.
Repeat for all Oreos.
STEP 5. Adding mummy wrapping
Add the remaining melted chocolate (re-melt if needed) to a piping bag or plastic Ziploc bag with the tip or corner snipped off.
Make lines of the chocolate across the Oreos to look like mummy wrapping. Allow to set.
Serving ideas
Fill a bowl with candy corns and the end of the sticks into the candy corn to display the cookie pops! It’s an easy way to serve them upright. Other small candies could also be used.
Or serve laying down on a large plate with a layer of candy corn underneath the cookie pops.
How to Store
Store in a single layer in an airtight container at room temperature. The pops can be layered by placing a sheet of parchment paper in between the single layers.
Do not store in direct sunlight or heat. Storing in the refrigerator can introduce moisture which will effect the outside of the cookies.
More recipes you’ll love!
Recipe

Mummy Oreo Cookie Pops
Ingredients
- 2 cups White (Vanilla) Candy Melts also called melting wafers
- 1 Tablespoon Coconut oil or vegetable oil optional; see Notes
- 15 Oreo cookies plus some extras in the case of breakage
- 30 Candy eyes
- 15 Lollipop Sticks
- Piping bag or a ziploc bag with a tiny whole in one of the edges
- Parchment paper
Instructions
- Line a large rimmed baking sheet with parchment paper.
- Melt the candy melts per the package instructions.
- Gently remove one of the cookies from the Oreo, leaving the filling on one side. Repeat for all the Oreos.
- Place 1 teaspoon of the melted chocolate on the filling, insert the lollipop stick and replace the other cookie on top. Set aside to allow the chocolate to harden and secure the Oreo with the stick. Repeat for all Oreos.
- Once they have set fully, individually dip the cookie into the melted chocolate (rewarm if it has begun to set), allowing excess chocolate to drip back into the bowl. Place on the prepared parchment baking sheet to set. Repeat for the other cookie pops.
- When the coating has set, repeat for a second dipping. Place back on the parchment and add two eyes to the top of the cookie. Allow to set completely.
- Add the rest of the melted chocolate into a piping bag or ziploc bag, and pipe mummy wraps over each cookie. Allow to set completely.
katerina says
WOW! These Mummy Oreo Cookie Pops are absolutely adorable! I am so making these again for Halloween!!
Audra Fox says
So adorable and super easy to make! Thank you!
Matt Taylor says
These mummy Oreo cookie pops are awesome and perfect for Halloween. They taste so good too! You can’t go wrong with chocolate-dipped Oreos!
Jennifer says
These are just too cute! I love the idea of using Oreos – tasty and so easy!
Lisa Huff says
So easy! And the cutest treat for Halloween for the kids! Although to be honest, I would totally eat one too!
Helen says
These are just SO CUTE! What a terrific idea for halloween.
Carrie Robinson says
These are the cutest!
Dannii says
These are super cute. I made them with my kids at the weekend.