

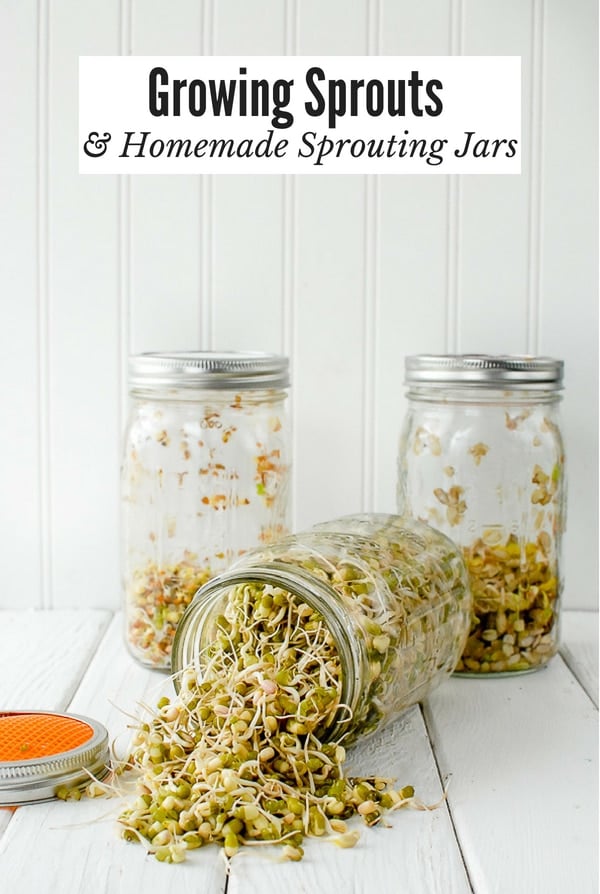
Sprouting seeds and beans at home is fast and easy. With this easy Growing Sprouts Guide and easy step-by-step Homemade Sprouting Jars tutorial you can be growing a variety of sprouts inexpensively in your own kitchen.
For anyone who loves picking up sprouts at the grocery store to add a fresh, crunchy bite to salads, sandwiches and other recipes, you’ll love growing them at home.
Most varieties only require a few days to grow and are very inexpensive!
This Growing Sprouts guide and instructions for making Homemade Sprouting Jars tutorial you’ll be set to have fresh sprouts whenever you want them!
Growing sprouts always brings back memories of my childhood when my mother sprouted her own seeds and legumes and made homemade yogurt.
It felt to be a cross between a frugal-DIY effort and a vestige of a more hippie-laden time.
Regardless of motivation it was standard practice in my household.
Jump to:
- Growing Sprouts is Fast and Easy!
- Growing Sprouts at Home: Sprouting 101 Guide
- Why Grow Sprouts?
- What to Sprout?
- Growing Sprouts: How To
- Buying Supplies to Make Homemade Sprouting Jars – a Fast and Easy Sprouting Solution
- How to Make Homemade Sprouting Jars – Step by Step Guide:
- Growing Sprouts – Step by Step:
- Are Homegrown Sprouts Safe to Eat?
- Recipe
Fast forward to now when home crafting of food has taken the place of the chic that purchasing everything held a mere decade ago.
Now if you are cool, you brew you own craft beer, make your own wine, make homemade vinegar, can the vegetables you've grown in your own community garden plot and cook from scratch whenever possible.
Growing Sprouts is Fast and Easy!
Realistically, that is more romantic than practical for most people.
However growing sprouts is something everyone can do. It seriously takes minutes a day with the sprouts coming to fruition over just a few days' time.
Sprouts and micro greens are commonplace at most markets, with the more exotic varieties such as sunflower sprouts no longer a surprise to see in most grocery stores.
Sprouts add a crunchy texture to a sandwich or salad and a nutrition packed source available on-the-cheap when spouting at home.
When this post was originally published, I married creating a growing sprouts guide with an easy home DIY project of making homemade sprouting jars from DIY Mason Jars, a book I reviewed.
Making homemade sprouting jars or sprouters, is inexpensive and fun.
They make great gifts without breaking the bank as well.
Growing Sprouts at Home: Sprouting 101 Guide
Why Grow Sprouts?
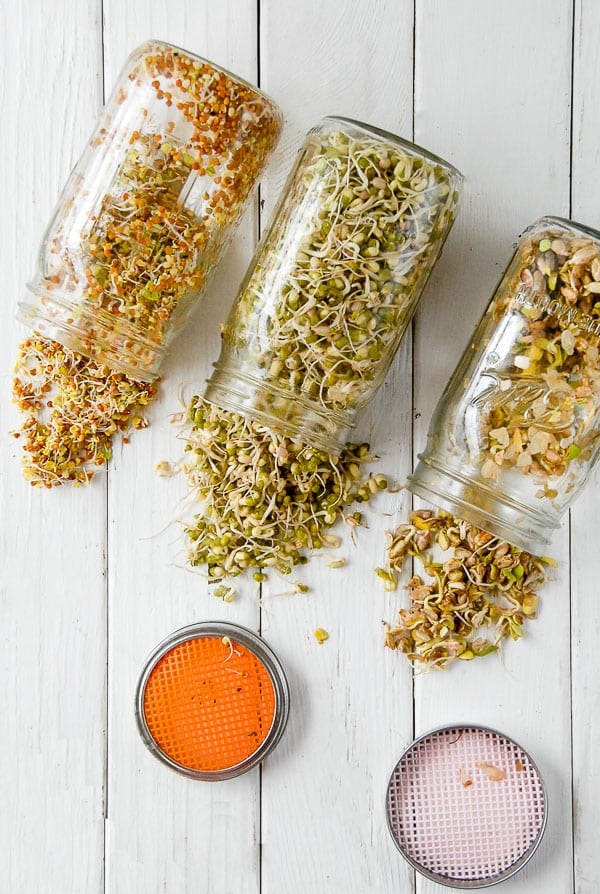
There are many varieties of seeds and legumes which can be sprouted offering a plethora of options for any dishes.
Sprouts contain a significant amount of nutrition in their tiny form offering the opportunity to boost a meal with their simple addition.
What to Sprout?
When choosing seeds to sprout purchase seeds designated for sprouting versus for planting to ensure they are edible.
I also have sprouted actual sunflower hulls which are crunchy and delicious.
Most grocery stores have a selection of sprouting seeds near the produce department.
There are some fun sprouting mixtures available on Amazon.com too.
Growing Sprouts: How To
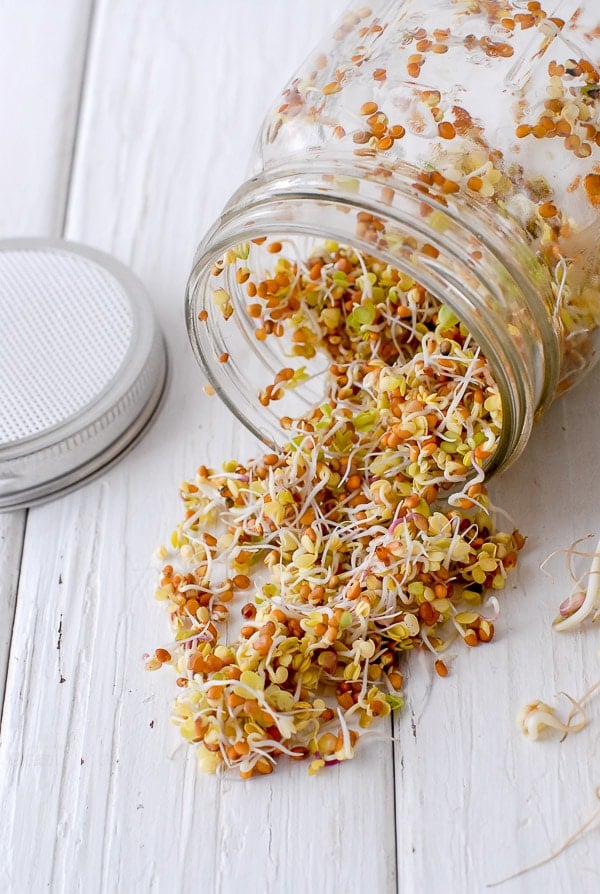
All seeds have different sprouting time frames that range from 2 days to a full week.
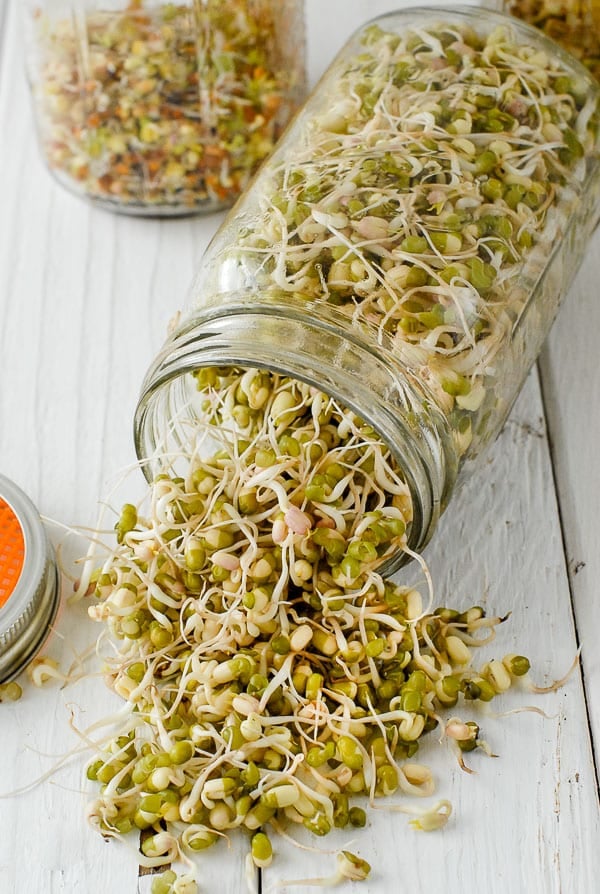
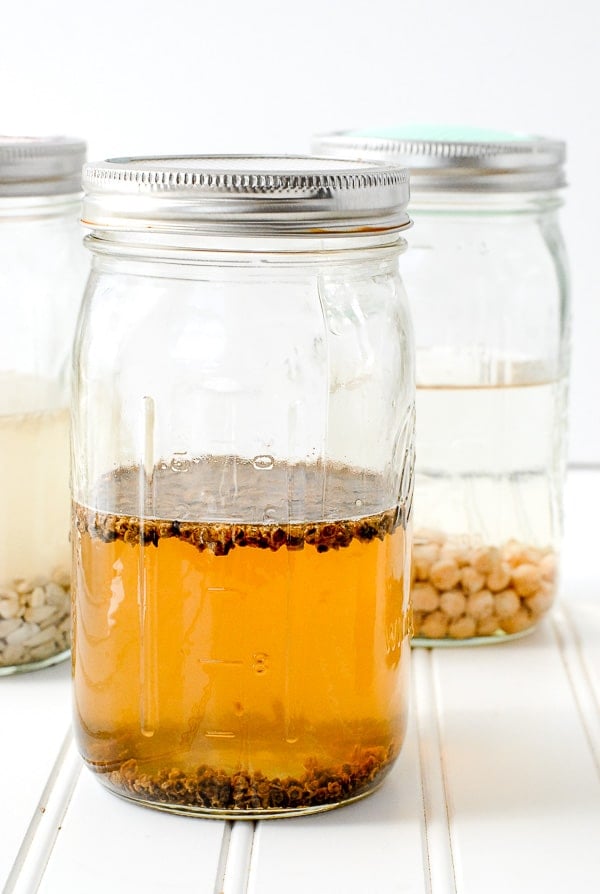
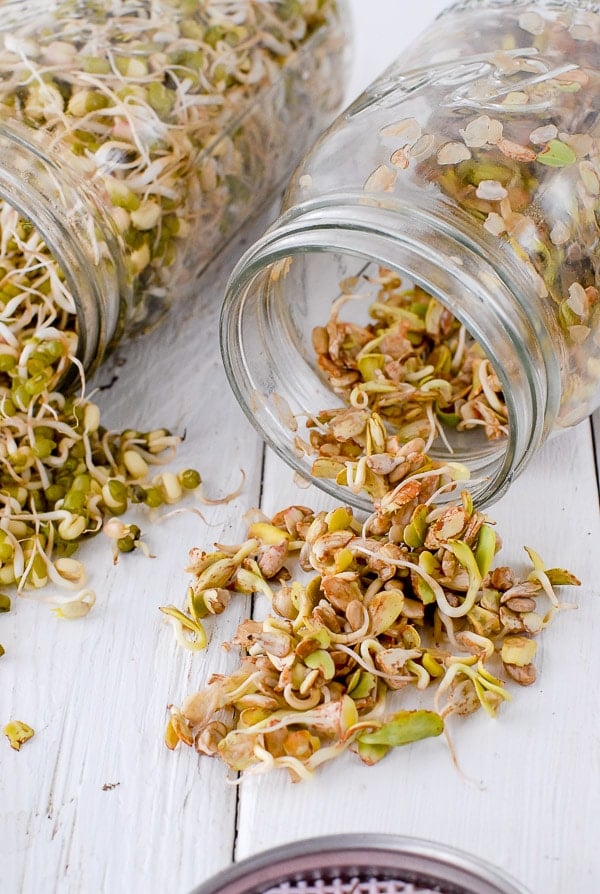
In a test sprouting I did for this post the mung beans began to sprout in about 2 days and had filled the Mason jar within 4 days.
The other sprouts ranged to be close to that or a few days longer.
Buying Supplies to Make Homemade Sprouting Jars – a Fast and Easy Sprouting Solution
Buying Screen Lids for Mason Jars
Since the original posting of this tutorial, screen lids have become available for purchase to convert Mason jars into sprouting jars if you prefer not to create your own through the original tutorial below.
There is a wide variety of them available online (widest range of options) or at stores carrying Mason jar supplies (craft stores, hardware stores etc.).
Some of my favorites I’ve found online on Amazon.com:
Note: a link to quart size Mason jars may be found with the Homemade Sprouting Jar tutorial below. Be sure if purchasing screen lid inserts that you select the right size, wide mouth or regular, for the Mason Jars you’ll be using. I suggest using wide mouth quart Mason jars for best air circulation and easy drainage.
- plastic screen lids for wide mouth Mason jars,
- metal screens for wide mouth jars
- special small screen lids for alfalfa seed sprouting
- regular mason jar sprouting screen
How to Make Homemade Sprouting Jars – Step by Step Guide:
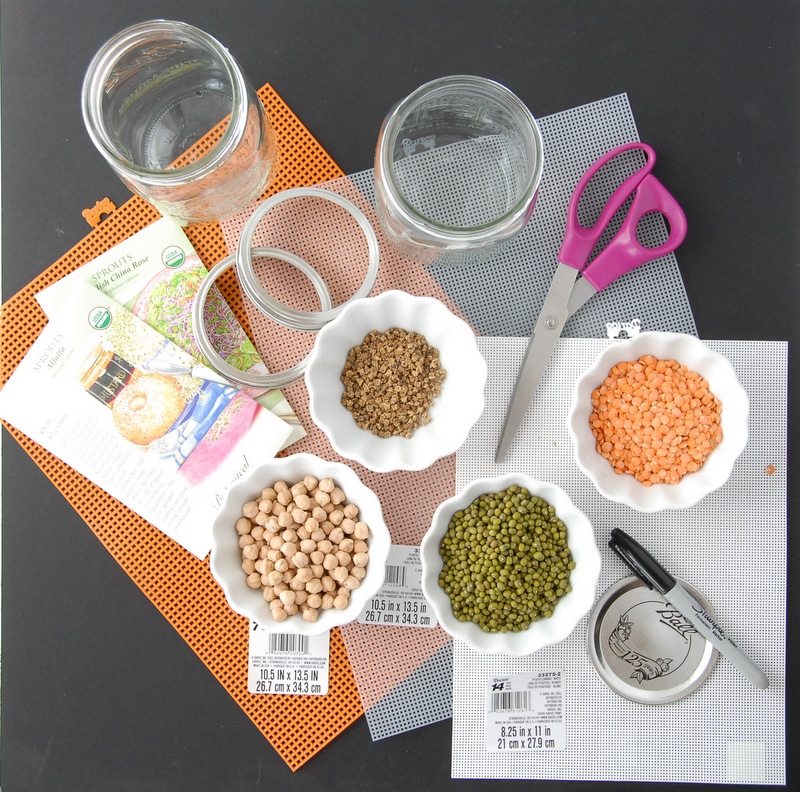
Supplies:
- Quart-size Mason Jars: wide mouth Mason jars or regular mouth Mason jars
- Sharpie or other marker
- Plastic needlework canvas
- Scissors
- Dried seeds or beans used for sprouting
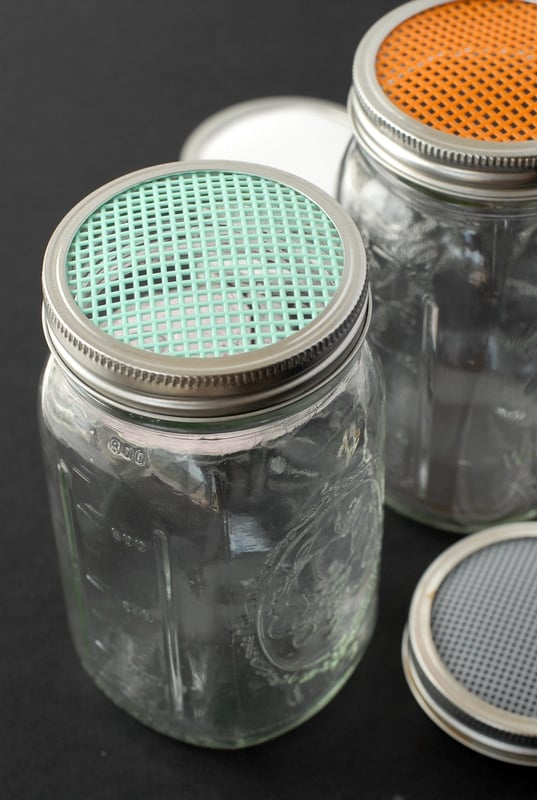
SUPPLIES to make Homemade Sprouting Jars and for sprouting:
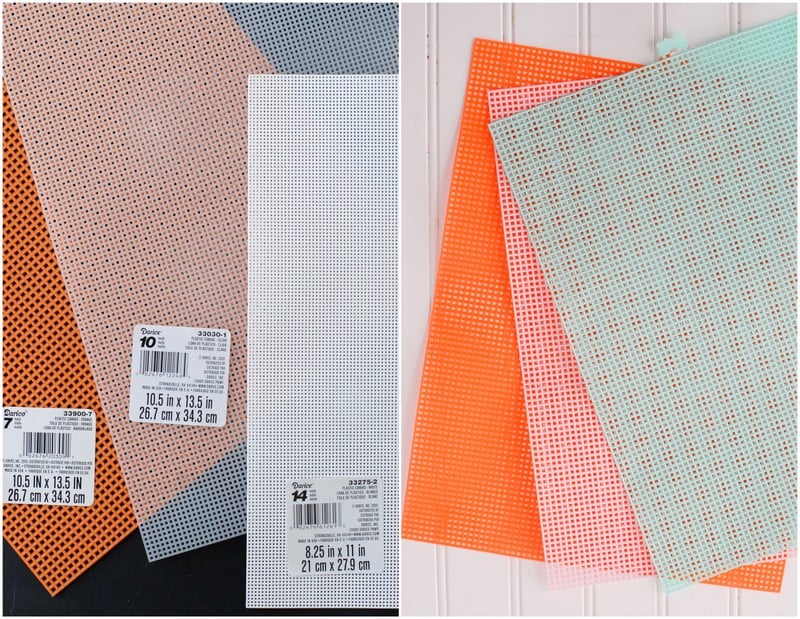
Plastic Needlwork Canvas for Sprouting Jar Lid inserts
Plastic needlework canvas used to create a screened airflow for sprouting jars may be purchased at hobby and craft stores.
These colorful sheets cost $0.59 each providing a sprouting jar can be created for less than $2.00/jar.
The canvas comes in many colors and sizes as noted by the variations on the left.
STEP 1: Trace the lid of the jar onto the plastic canvas. Consider using varied canvas sized to allow sprouting of even very small seeds. Cheesecloth also may be substituted when sprouting very small seeds.
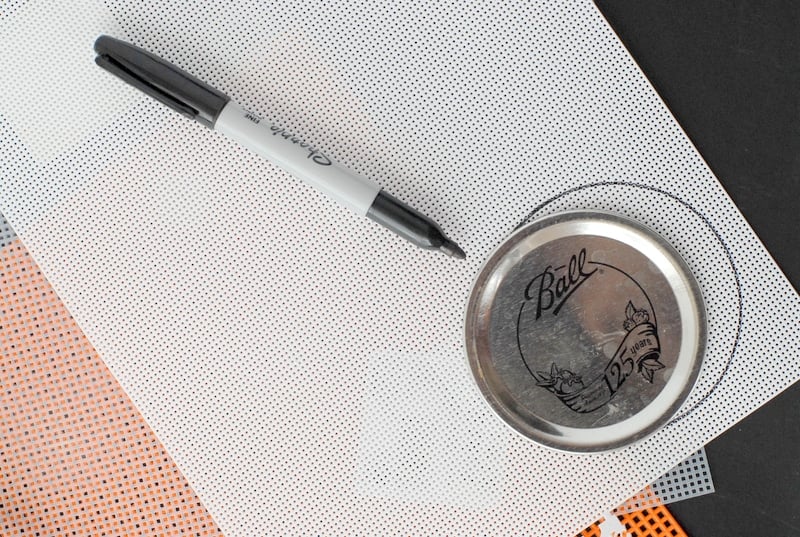
STEP 2: Cut out traced canvas circles(s). Insert them into the Mason jar lid ring (do not insert the metal inner circle into the lid ring; only the canvas circle). Screw lid onto quart Mason jar.

Completed Homemade Sprouting Jars:
Growing Sprouts – Step by Step:
Before starting: sanitize any sprouting equipment. Jars should be boiled in clean water for 10 minutes as well as any metal parts (do not boil homemade plastic screen lid inserts). Wash the plastic screen lids inserts with hots water and soap; dry fully.
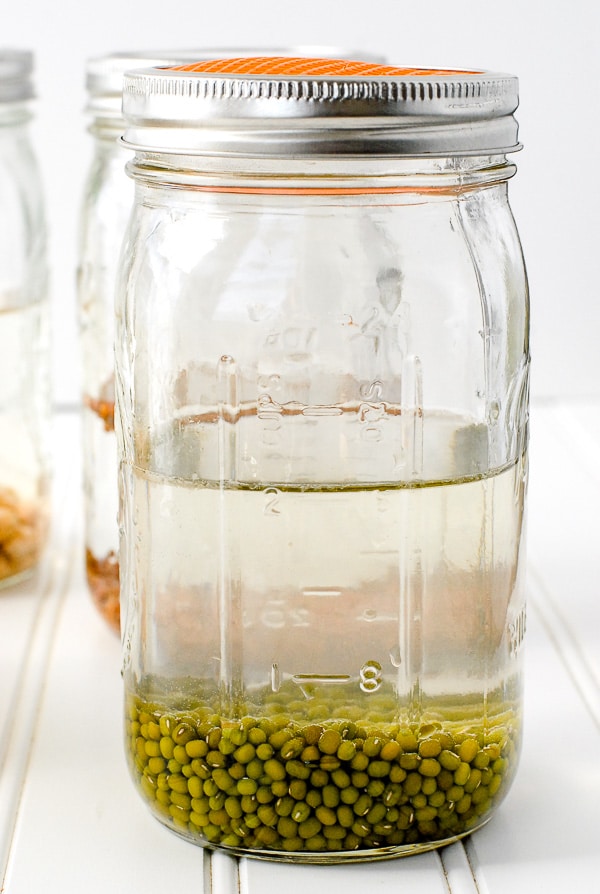
STEP 1: Once you have prepared your sprouting jars, place 2 tablespoons to ½ cup of sprouting seeds in a given jar depending on how large a crop you wish to have.
I used ½ cup of mung beans which created a quart of sprouts; maybe a bit much for a starter batch. You can experiment with the amounts until you decide what works for you.
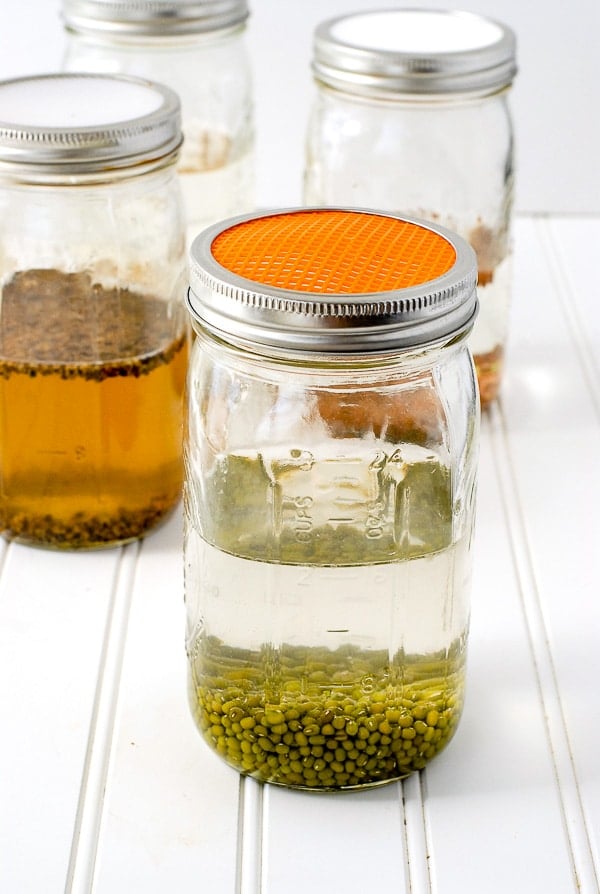
STEP 2: Seal the jar with the screen lid. Fill the jar with clean or filtered water to cover the seeds plus an inch. Allow them to sit in a cool spot, out of direct sunlight overnight.
STEP 3: The following morning, remove any floating seeds or beans and drain the water through the screen top. Rinse again thoroughly with clean cool water and drain. Place the jar on its side in a cool spot out of direct sunlight.
STEP 4: Rinse the seeds at least twice daily (3-4 times is recommended) by filling the jar to cover the seeds, swish the water around to rinse all the sprouts; drain through the screen top and replace on its side until the sprouts have grown to the size desired.
STEP 5: Once the sprouts are finished, remove them from the jar, and dry using a salad spinner or paper towels. Place in a plastic bag or sealed container in the refrigerator to use. Sprouts should stay fresh for up to a week.
Are Homegrown Sprouts Safe to Eat?
Following the original publication of this guide information regarding food safety has been released cautioning about the consumption of both commercially grown and homegrown sprouts.
These concerns are regarding unsantitized sprouting seeds or sprouting conditions creating exposure E Coli or Salmonella risk.
As with any food safety, there are some key practices to follow when growing sprouts at home (and this guide has been updated to reflect them):
- Buy good quality seeds specifically designated for sprouting (preferably noted as being pathogen-free) from a reliable source
- Sanitize all sprouting equipment before beginning
- Use only clean or filtered water
- Be diligent in daily rinsing of sprouts. It was previously suggested twice daily was adequate; now rinsing 3- 4 times daily is recommended
- Drain ALL water from the sprouting jar after rinsing each time
- Sprout in a cool place (warmer temperatures encourage bacteria growth; it can still be present in cool temperatures too but is a less condusive environment)
- When sprouts are complete, dry fully using a salad spinner or draining on paper towels
- Store in a clean plastic bag or container and eat within a few days
- Discard any foul smelling or appearing sprouts; do not eat them
Recipe

Growing Sprouts
Equipment
Ingredients
- 2 tablespoons to 1/2 cup sprouting Seeds or Beans purchase seeds or beans specifically designated for sprouting purposes
- Water for rinsing sprouts
Instructions
Before Starting
- Before starting: sanitize any sprouting equipment. Jars should be boiled in clean water for 10 minutes as well as any metal parts (do not boil homemade plastic screen lid inserts).
- Wash the screen lids inserts with hots water and soap; dry fully.
Growing Sprouts
- Once you have prepared your sprouting jars, place 2 tablespoons to ½ cup of sprouting seeds in a given jar depending on how large a crop you wish to have.
- Seal the jar with the screen lid. Fill the jar with clean or filtered water to cover the seeds plus an inch. Allow them to sit in a cool spot, out of direct sunlight overnight.
- The following morning, remove any floating seeds or beans and drain the water through the screen top.
- Rinse again thoroughly with clean cool water and drain.
- Place the jar on its side in a cool spot out of direct sunlight.
- Rinse the seeds at least twice daily (3-4 times is recommended) by filling the jar to cover the seeds (with clean or filtered water), swish the water around to rinse all the sprouts; drain all the water through the screen top and replace on its side until the sprouts have grown to the size desired. Timing will vary based on seeds.
- Once the sprouts are finished, remove them from the jar, and dry using a salad spinner or paper towels.
- Place in a plastic bag or sealed container in the refrigerator to use. Sprouts should stay fresh for up to a week. NOTE: never eat sprouts that do not appear or smell fresh.
Video
Notes
- The Total Time will vary depending on seeds or beans being sprouted (the time will be on the package).
- Nutrition Information is a guide only
- Review and follow food safety guidelines in the blog post
Nutrition
Originally published: June 24, 2013
Linda says
Get 101 in sprouting. I want to know how to pre sanitize seeds? I was thinking salt water soak, but I don’t know? Please Let me know. Thank You, Linda
Toni Dash says
I do not have expertise about pre-sanitizing seeds Linda, I’m sorry. I’m sure there is information on the internet about it. Those I’ve read use much stronger chemicals to do it.
LAura says
I used steel mesh on my jars for sprouting and never had a problem, I am considering trying the canvas lids dont think I will worry about e coli a good rinse every day and they should be fine benefits should outweigh the risk if any isnt there a risk attached to everything even breathing, what do you do? Take a chance.
Jacob says
I am sure there is, but I have not seen one in retail
Nevertheless as manufacturers have to have they kitchen wear be of such standards, material in all shapes and sizes is out there
Jacob says
My only concern is the plastic needlework canvas, is there a BPA free alternative?
Even though they have minimal direct contact with sprouts they are not food graded and will degenerate over time faster than sturdy (food graded) plastic which will potentially mix with the sprouts.
Toni Dash says
I hear you Jacob. I think everyone has their own individuals concerns. As you noted from the cautionary note, there are many who do not believe sprouting at all without bleaching the seeds first should be done; at home or for store purchase. I guess we all have to decide what we are most comfortable with. Is there food grade mesh?
Sofia says
I just bought some fenugreek seeds for sprouting. On the packet it says “if not properly disinfected, all seeds have the possibility of carrying E. Coli bacteria or other foodborne pathogens. Please disinfect the seed prior to sprouting by soaking in a 2% bleach solution (1 tsp bleach to 1 cup hot tap water) for 15 minutes. Rinse thoroughly.”
I would love your feedback on this!
Toni Dash says
Sophia my apologies on the delayed response! After reading your comment I checked some of my unopened seed packets from Botanical Interests and indeed they have the same warning. I also researched some on the internet and there are several articles about the concern in this area, with seemingly valid grounds and explanations. I don’t love either the idea of soaking my food in bleach OR contracting E Coli poisoning so plan to research further and would suggest you do the same. Thanks to this I will insert a prompt in the post.
Gary says
I just wanted to recommend that you take a look at grape seed extract for cleansing the seeds or sprouts and I think that might take care of the possibility of E. coli that was the topic. Hope this is a helpful suggestion…thanks for your article it was very informative and seems like sprouting is not so difficult to get started with, just takes a little time throughout the day to rinse them off but seem like most sprouts get started by the second or third day out…
Toni Dash says
Gary thanks so much for your comment and sharing the link about grape seed extract. I look forward to reading the link.
I know home sprouting has been done for years, safely, so it’s interesting to me that the exposure of contaminants has now called for more attention. I’ve read about concerns with store-purchased sprouts as well. I wonder if it has to do with the seed quality (GMO’s?), conditions of sprouting (which are probably the same as historically) or what lies at the core of the issue as causality. Thanks for offering a more savory cleaning idea!
Amy says
That is a super cool suggestion! I used to have grape seed oil on-hand for cleaning my sprouts too!
Toni Dash says
I love hearing that Amy, thank you. I’ve never cleaned my sprout seeds but times change and maybe the quality of seeds is not what it used to be. I’m not sure I could bring myself to bleach them so I appreciate this.
Matthew M says
AceHardware for both jars and screens. I got a pack of (12) 32 ounce Mason Jars for 12 dollars then I asked about screens/screen repair kits. The guy at my local store was really nice and just gave me scraps from their bulk rolls of screen for free, nylon and metal. The pore size is about the same as the smallest pore size for plastic knitting canvas or just a bit smaller. 12 sprouting jars for $12.
Toni Dash says
Fantastic Matthew! I remember my mom using metal screen when I was a child but I like the idea of nylon or the plastic I used feeling you’d avoid rusting and it would clean better. Your last sentence made me feel you’ve come up with a great xmas gift idea for friends! Affordable, unexpected and fun. Through in a packet of seeds and some instructions and you are good to go.
samW says
i wanna copy of this fun book
Cindy G. says
I also shared the giveaway on Facebook!
Cindy G. says
And, I just joined your e-mail list! I will probably be adding you to my blog reader soon, too 🙂
Cindy G. says
I just “Liked” you on Facebook! And, I bookmarked 3 of the recipes already!
Cindy G. says
I would love a copy of this fun book! The idea to use plastic canvas as a screen for the sprout jar is brilliant. I have to admit, I still have the sprout jar I got as a kid (in the 70’s) made by Corning. I’ve been itching to grow some sprouts, but wanted to try a bunch of varieties, so using mason jars is a perfect way to do it. Thanks so much for sharing this project!