I realize this blog post may be a defining moment in our relationship. Perhaps you’ll love this recipe; and if not, you’ll probably be repulsed by it. Some of you may send me a gentle note suggesting finding a good therapist would be a great use of my time, or ponder whether I experienced violent episodes as a child. I assure you, I just love the creepy side of Halloween in dessert form.
Ok, and I love something else. The Walking Dead. Wait, wait, WAIT! Before you close your browser, hear me out. A year or so ago, I’d begun to see TV ads for the series and like you, was completely grossed out. How on earth a TV series could be founded on the undead stumbling around like they’d just finished an all-night bender, with flesh and limbs dangling willy nilly, was beyond me. It felt flat, gratuitous and uninteresting.
I began to get little nudges from my then so-dying-to-grow-up 11 year old son about a friend who’d watched the entire first season on Netflix and said it was really good. I generally don’t take the TV show recommendations (or any entertainment related recommendations for that matter) from 11 year old boys, but being a fair-minded mom I said I’d watch it first and then ring in on my opinion about him watching it.
The first episode was horrifying as soon as the Zombies showed up, with their throaty gurgling, milky eyes and disgusting physical presence; I wanted to run. It didn’t matter to me that is was the apocalypse; if I were to continue to watch them I needed them all to wash their hair.
However, a curious thing began to happen. By the third episode I had become fascinated by the predicament and was mentally trying it all on for size. What if I was in the Zombie apocalypse? Would I have the smarts and the reflexes to stay alive? Would I have the fortitude to stab these flesh-eating former humans in the noggin to stop them in their tracks? Where would I go? What would I eat? What would life be like without my cell phone? How long could I wear the same outfit before I considered taking my own life? I was in; hook, line and sinker.
I completely bought in to all the characters, and there are many, all fantastically well-developed. The good are good and the bad are unbearably wicked; the kind of evil that makes you yell at your TV to warn others about their presence. Close calls become a heart-stopping internal plea to spare that character for fear of a next season in the void of their presence. The plot takes twists and turns leaving me gobsmacked, never in a million years imagining what would happen next.
And, I suppose in a living example of why children shouldn’t play violent video games, I became visually desensitized. I transcended the offense from the zombies’ appearance and their deaths (however still I really would love everyone on the show to wash their hair much more often). What began as a face covering tell-me-when-its-over type reaction has transformed into a fascination with the special effects and prosthetics on the show (which I believe take hours to construct).
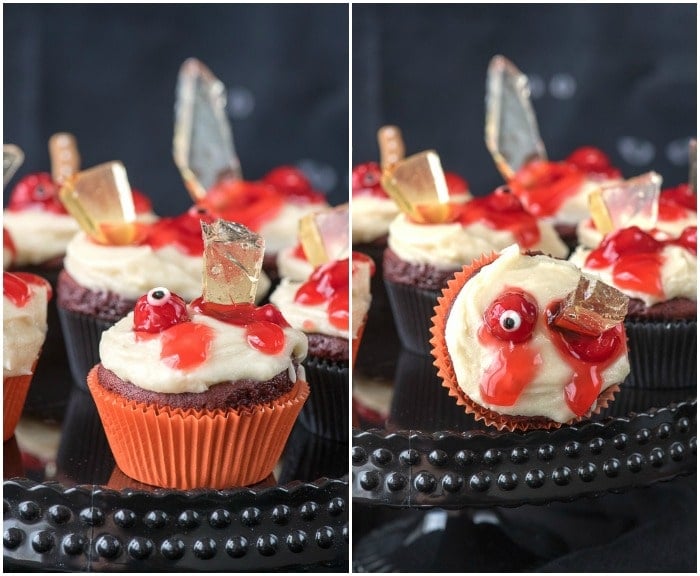
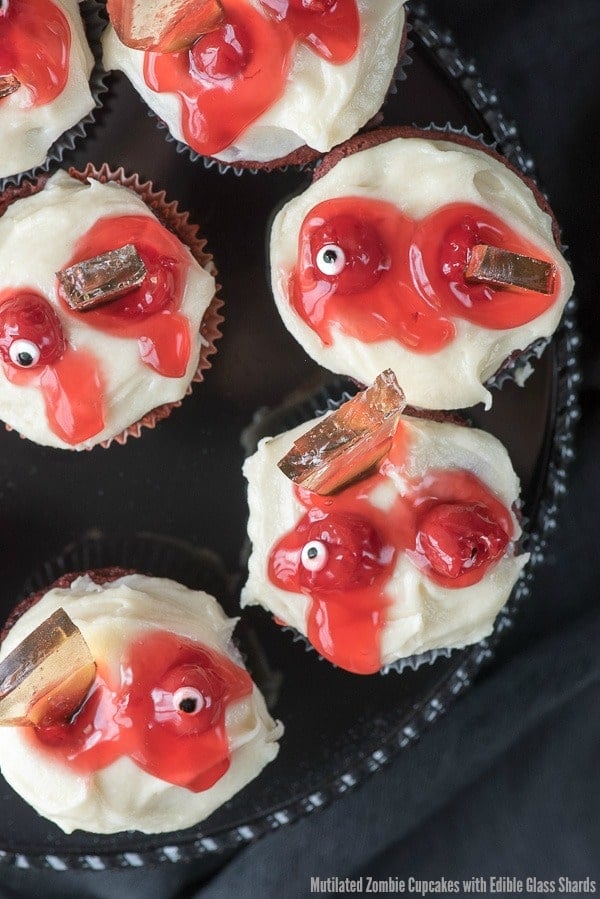
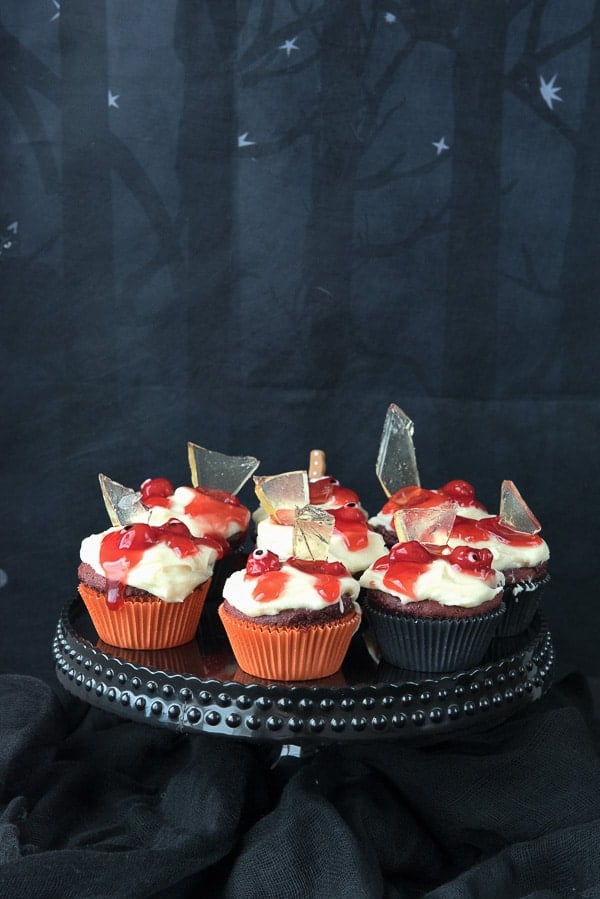
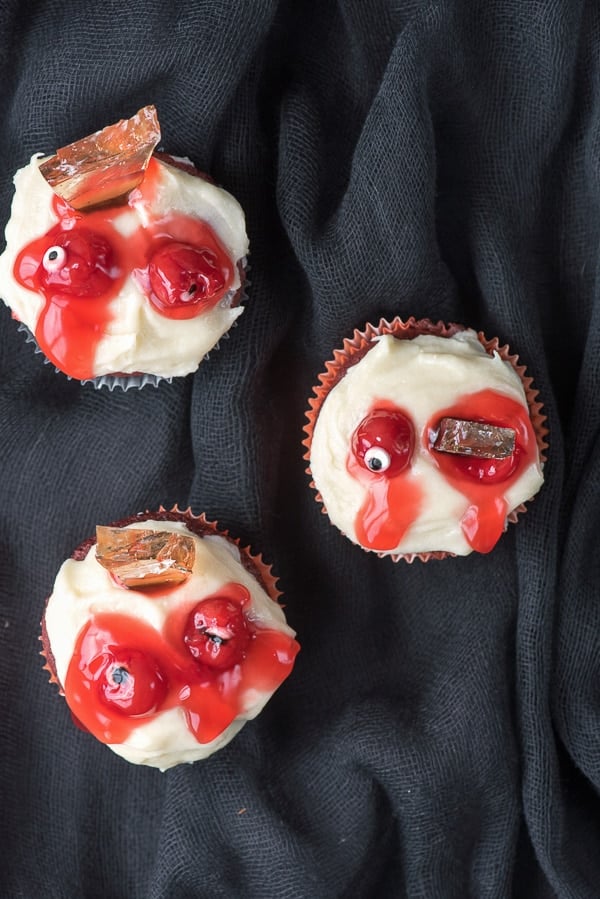
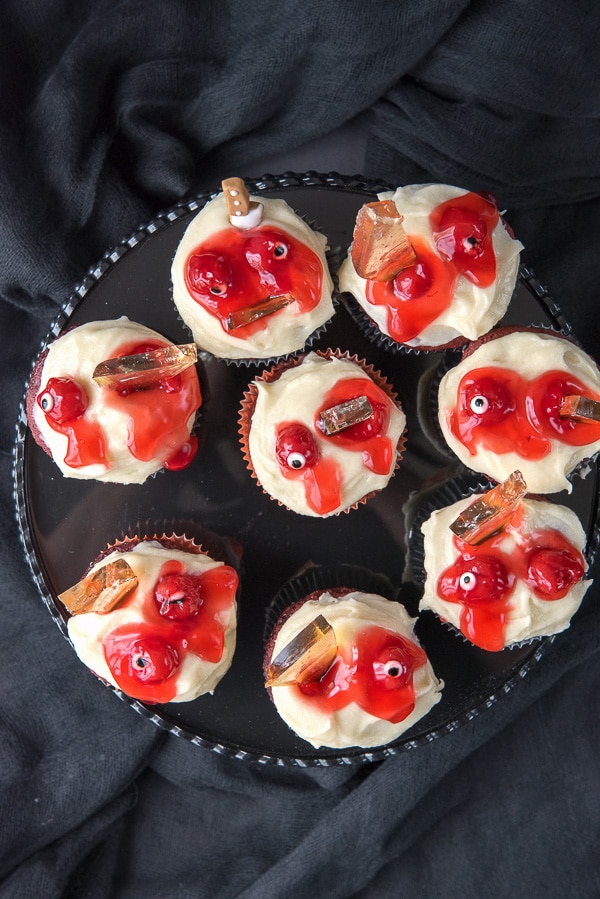
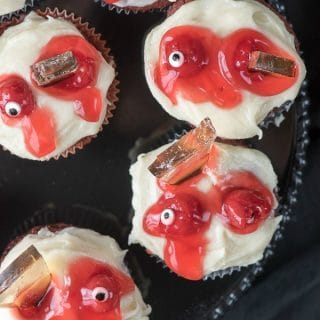
So thanks to the proximity of Halloween AND the season premiere of the new season of The Walking Dead this Sunday, I cooked up a batch of Mutilated Zombie Cupcakes. Red Velvet cupcakes (gluten-free) with Cream Cheese Frosting topped with gooey zombie eyes (thanks to a can of cherry pie filling) and edible (cherry-flavored) glass shards stabbing them in the face. Creepy, I know, but I love them.
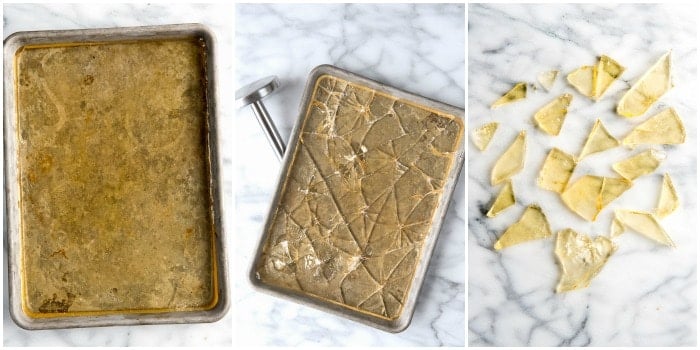
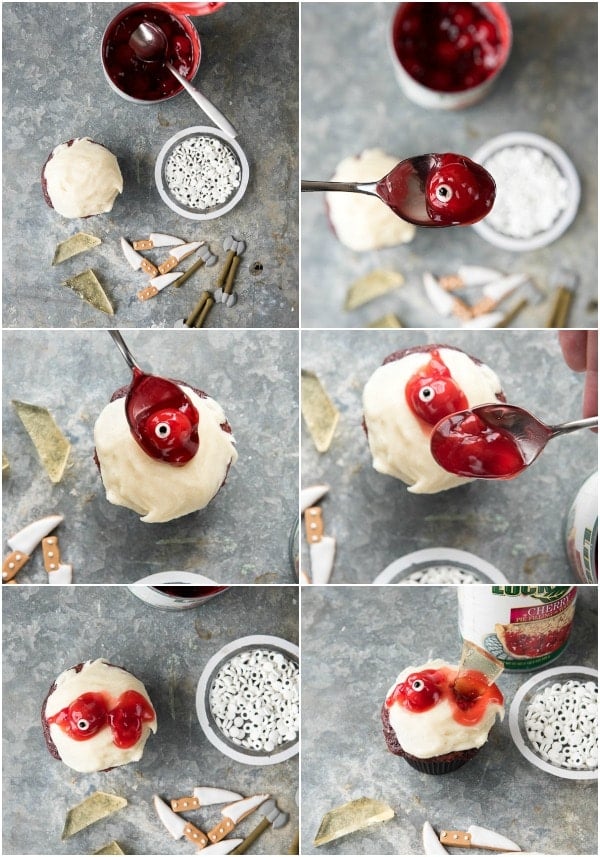
The gore is so easy to make. Using cherry pie filling, solo cherries covered with the red gel of the filling, are inserted with a candy eye. For those who aren’t keen on prim and proper cupcakes, this recipe is for you. The messier the better, me thinketh. A drizzle of more filling giving a glossy bleeding effect is finished off with a stab of the glass (which also is so easy to make). The artistry of it is all in your hands!
Of course if this is all too much for you, I completely understand. Instead I’d suggest the Graveyard Cupcakes (cute and tame), or maybe the Double Dipped S’mores Apples on a Stick (pretty, unexpected and festive). Spider Egg Pudding gives a nod to the creepy side of Halloween food without the gore. There are many options in our Halloween recipe section…..but I’d bet you know someone who would love these too!
These ooey, gooey, gory cupcakes are perfect for Halloween or any zombie-lovers celebrations. The from-scratch cupcakes are gluten-free red velvet. Red velvet is essentially a type of chocolate cupcake died a deep red.
If a gluten-eater I’d suggest substituting your favorite gluten red velvet recipe though it would be hard to discern these to be gluten-free from the great flavor and texture.
Making the edible glass shards is easy and I suggest doing it the day before creating the cupcakes to make cupcake baking and assembly shorter. If making everything at once I suggest making the edible glass and as it cools, bake the cupcakes and as they cool prepare the frosting.
Should you feel you don’t have time to do everything from scratch, a cake mix and even purchased frosting can be substituted, leaving only the candy glass and zombie decoration to be done. The total time will vary depending on how long it takes for the candy glass to set (usually it sets within and hour, temperature and humidity depending) and the cupcake cooking time.
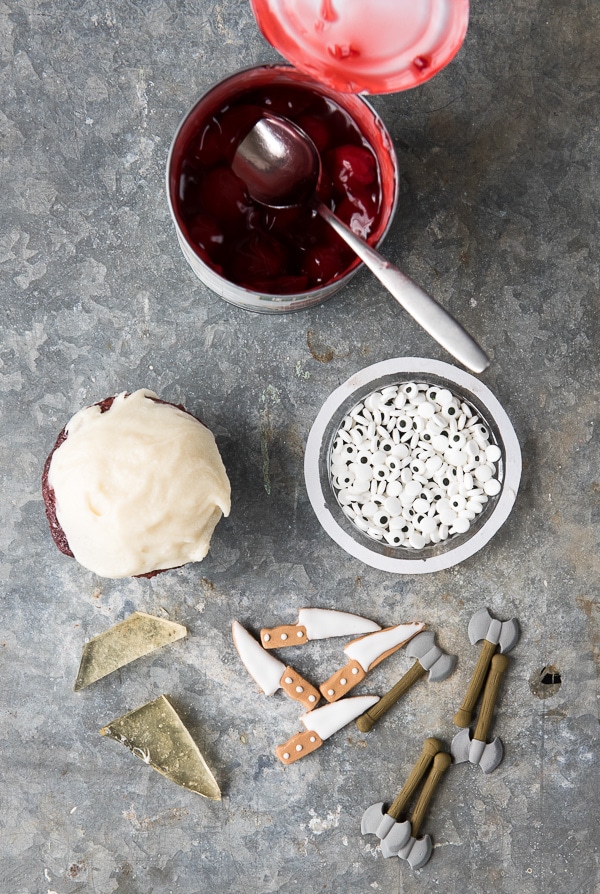
The small candy eyes, edible knives and axes are all made by Wilton and readily available online or where baking and cake decorating supplies are sold (I purchased them at Michael’s Crafts)
Recipe
Mutilated Zombie Cupcakes with Edible Glass Shards
Ingredients
Ingredients for Edible Glass Shards:
- 3 cups Granulated White Sugar
- 1 cup Water
- 1 cup Light Corn Syrup
- 1 tablespoon Cherry-Extract (or any flavor you prefer)
- Supplies: Candy thermometer
Ingredients for Red Velvet Cupcakes (gluten-free):
- 1/2 cup Semi-Sweet Chocolate Chips
- 1/3 Unsweetened Dutch-process Cocoa Powder
- 1 ¼ cups Gluten-Free Flour Blend (I used King Arthur’s Gluten-Free Blend)
- ¼ teaspoons Baking Powder
- ½ teaspoon Baking Soda
- ½ teaspoon Kosher Salt
- ½ teaspoon Xanthan Gum
- 2 Eggs
- 1 teaspoon Vanilla Extract
- ¾ cups Granulated Sugar
- 1/2 cup Buttermilk , shaken
- ½ cup Sunflower Oil
- Red Food Coloring
Ingredients for Cream Cheese Frosting:
- 1/2 stick (4 tablespoons) Unsalted Butter, softened and at room temperature
- 8 ounces Cream Cheese , softened and at room temperature
- 1 teaspoon Vanilla Extract
- 1/8 teaspoon Kosher Salt
- 3 1/2 cups Confectioner's Sugar (TIP: sifting the sugar eliminates any hard sugar clumps from the frosting)
- 2 tablespoons Lemon Juice
Ingredients for Zombie cupcake topping:
- 1 can Cherry Pie Filling (must be pie filling for the gooey red gel)
- 1 package small Candy Eyes (note: they should be able to fit the hole in the cherry)
- Edible Glass Shards (recipe below)
- Optional: package of candy knives and/or axes
Instructions
Instructions for Edible Glass Shards:
- Butter a 9-inch by 12-inch baking sheet or dish and set aside. Note: this will create thick glass (about ¼ inch) as seen in the photos. Should you desire thinner glass, use a regular size cookie sheet instead.
- In a heavy, medium sauce pan combine the sugar, water and corn syrup. Heat over medium heat, stirring constantly until the sugar is dissolved.
- Affix the candy thermometer to the side of the sauce pan or if handheld insert periodically until the thermometer registers 300 degrees (hard crack). Remove mixture from heat and quickly stir in the flavoring.
- Pour and scrape the mixture into the prepared pan, carefully avoiding touching the mixture. Spread to evenly cover the bottom of the pan or baking sheet. Allow to fully harden.
- After the candy has fully hardened, use a heavy kitchen object (I used a meat tenderizing hammer) to strike the candy allowing it to form triangular ‘glass’. Turn the pan over onto a counter top to release the candy glass. TIP: I put a cutting board over the top of the pan and flip both the cutting board and pan over to release the ‘glass’ without a mess.
Instructions for Red Velvet Cupcakes:
- Preheat oven to 350 degrees. Line muffin tins with double cupcake liners. Tip: using 2 liners allows the outer liner to look new and the inner liner to absorb any fats from the baking.
- In a metal bowl over a saucepan of boiling water, melt the chocolate chips; stirring occasionally.
- In a medium mixing bowl, combine the flour, baking powder, baking soda, salt, xanthan gum, cocoa powder. Stir to fully combine.
- In a separate bowl or large liquid measuring cup combine the shaken buttermilk and oil.
- In the bowl of a mixer lightly beat together the eggs and vanilla extract. Add the sugar and beat to combine.
- Spoon the melted chocolate into the mixing bowl along with some of the flour. Running the mixer on medium speed allow the mixture to combine. Slowly pour some of the liquid mixture into the mixing bowl allowing it to incorporate; continue to alternate the remaining flour and liquid, ending with flour. Add the red food coloring to create a deep red tone. Mix until just combined; do not overmix.
- Fill the cupcake liners 2/3 full and smooth the top of the batter (the batter is airy and will hold the shape of the top of the batter when baked). Bake for 13-17 minutes, until toothpick comes out clean. Allow to cool in the muffin tin for 10 minutes, then removed from the muffin tin and placed on a cooling rack until fully cooled.
Instructions for Cream Cheese Frosting:
- Using a mixer, cream the butter on medium-high speed until fluffy (1-2 minutes). Add the cream cheese, vanilla and salt; continue to mix on medium-high until combined and smooth.
- Add 1 cup of sugar and beat on low speed (increase speed after the sugar is incorporated) into frosting, followed by 1 tablespoon of the lemon juice. Repeat, alternating the sugar and lemon juice, until they have been incorporated, finishing with the 1/2 cup of sugar.
- Frost cupcakes when they are completely cool. Frosting can be covered and placed in the refrigerator while the cupcakes cool or to stiffen before frosting if desired.
Instructions for the Zombie cupcake decoration (note the photo collage above):
- Using a dining spoon, scoop a cherry from the pie filling can. Gently insert a candy eye into one of the two holes in the cherry. It should sit on the edge of the cherry so it is visible.
- Gently place the cherry eye and gel onto the cupcake. Spoon another cherry with gel where a second eye would be were this a face.
- Dip the end of the candy glass shard into the pie filling and insert it through the second cherry. Drizzle more cherry pie filling gel for a bloody effect if desired.
Ann Bacciaglia says
I love the look of these cupcakes. I will have to make these for the kids Halloween party. I am sure they will be a huge hit with the kids.
Jeanine says
Yum! These look fabulous and delicious. My kids would get a huge kick out of these!
Theresa says
Those are so gruesomely good looking! We are having a Halloween party tomorrow and I wish I saw this sooner. We’ll definitely have to do this next year!
Seattle Travel Blogger says
Haha! These are fabulous and perfect for Halloween. I love that the glass shards are edible, too!
Marina John says
Wow, I’ve never seen anything like those before. That’s really creative!
Liz Mays says
Oh this is such a creepy and fun recipe! Those cupcakes look horribly delicious!
Pam says
These are so fun! Perfect for our annual Halloween get together that we have at my friend’s house!
MJ L says
These cupcakes are awesome! Would be fabulous for a halloween party or a zombie party!!
Robin (Masshole Mommy) says
I am totally making these for my kids Halloween party! What an awesome idea.
Anne-Marie @ This Mama Cooks! says
Oh these are amazing and much better than Carol’s Walking Dead Cookies, which I made and were awful. Every evening when I take Nellie out for her “bedtime pit stop” I’m always on the lookout for zombies…or Daryl. Hopefully Daryl.
Toni Dash says
Definitely Daryl (LOL!)