
I'm feeling very sheepish about this blog post. It really was never intended to be.
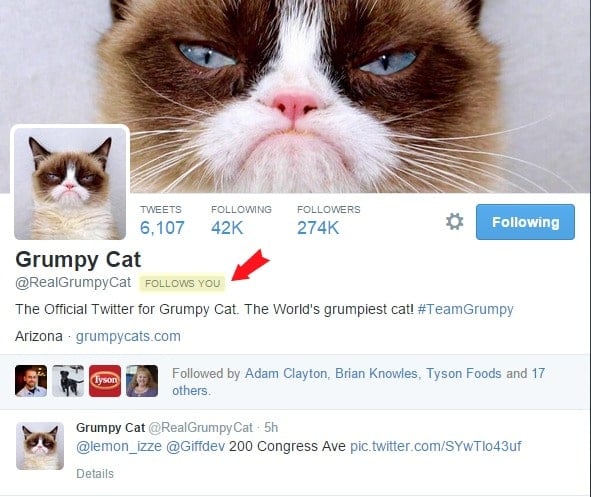
Last month my son turned 12 and suffice it to say he's obsessed with Grumpy Cat. In the event you've missed Grumpy Cat (and maybe the viral odyssey of whether 'the dress' is blue and black or white and gold), whose real name is Tardar Sauce, she is a petite Siamesey looking cat sporting an under bite and feline dwarfism, leaving her with a permanent scowl. In most cases we'd feel pity for the poor dear but Grumpy Cat is said to be worth $100 million (though her ex-waitress owner claims it's less), has over 7 million 'likes' on her Facebook page and can be seen everywhere from the Wall Street Journal to the premiere of the Disney movie Cinderella, complete with a mini set of Mickey Mouse ears on. Her dour expression originally went viral when her owner crafted her photo into memes with such joyous quotes as ‘I had fun once; it was awful’. The rest is history.
I generally make my kids' birthday cakes which began from us being gluten-free, however has become (mostly in son's case) out of necessity from their requests. Though I secretly hoped something mainstream like chocolate cake with chocolate frosting might be on the menu this year, I was NOT surprised that his choice was a Grumpy Cat cake. *sigh*
Though I do bake, my cake decorating skills are still in the nubile stages. I was able to craft a likeness of Lumpy Space Princess from Adventure Time one year but of course she's a purple amorphous creature so my challenge was to create believable lumps. Grumpy Cat is another story with her telltale face and fur. I began to plot, crafting ideas from various cake decorating shows I've watched on TV. In the midst of this my son popped up with a video from a You Tube show called 'Nerdy Nummies'. The hostess decorates all sorts of cakes and 'surprise', Grumpy Cat was one. She is worth the watch herself being the most quirky, darling person I've seen cooking in a long time.
Suffice it to say I used some of my own tactics and adapted some from the video to create a most well-loved Grumpy Cat Birthday Cake. Probably the biggest surprise has been that it was not only my son who was delighted. I've received so many emails asking how I made the cake and about specific details I'm sharing that today. And though my son loved the cake, I think even more exciting for him was that after I posted a shot of it on social media, Grumpy Cat started following me on Twitter.
Grumpy Cat’s birthday is April 4th so sharing this cake in her honor seemed appropos!
Recipe
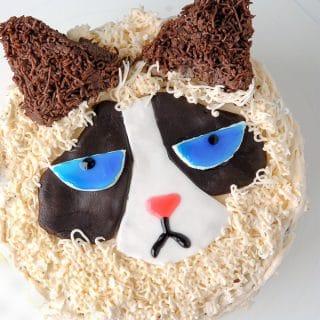
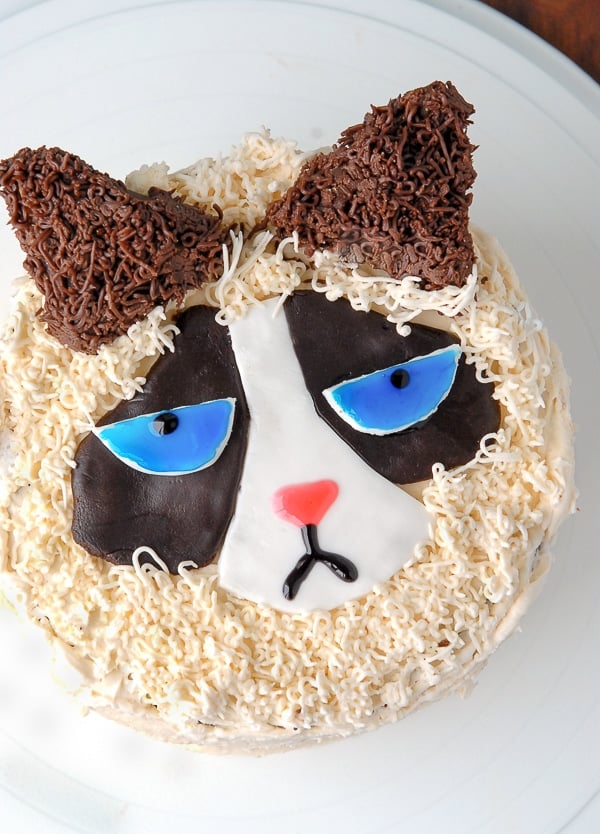
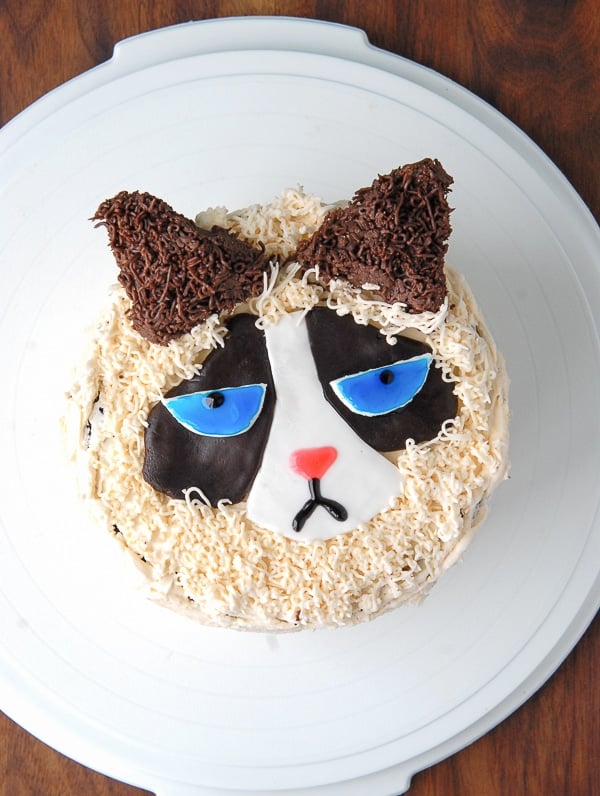
Grumpy Cat Cake
Ingredients
- 6- inch diameter by 2-inch high cake pans
- Parchment paper
- Non-stick cooking spray
- A favorite chocolate cake mix or recipe which produces 2 8-inch cake rounds (I used Pamela’s Products Gluten-Free Chocolate Cake mix)
- 2 large , soft Sugar Cookies (gluten-free or regular based on your needs)
- 1 ½ batches Royal Icing from scratch or from a mix (I used Wilton’s Royal Icing Mix – 2 packages)
- 16 ounce Chocolate Frosting from scratch (1 batch), a mix or from a container (I used one 16-ounce container of Wilton’s Chocolate Decorator Icing)
- Wilton Icing Color in ‘Ivory’
- White Fondant (for the middle of the face and mouth area, and eye background)
- Chocolate Fondant (for the background of the eyes)
- Wilton Decorating Gel (0.75 ounce tubes) in Pink, Black and Royal Blue
- An image of Grumpy Cat either on a computer or printed out for reference
- Grass frosting tip 233 (Wilton)
- Pastry bags
Instructions
- Preheat the oven to the temperature appropriate for the cake you are baking. Place one of the cake pans on the parchment paper and trace two circles of parchment; cut them out. Using non-stick baking spray, spray the inside of the cake pans and place the parchment circles on the bottom of each pan, smoothing it out so it adheres. Spray the top of the parchment with baking spray.
- Prepare the cake mix and divide it evenly between the prepared cake pans. Bake as instructed by your recipe or mix. When done, remove and allow to cool for 15 minutes on a cooling rack. Then gently turn over and remove the cake layer from the pan. Place on the cooling rack, remove the parchment paper and allow to cool fully.
- Making the Ears While the cake is cooking, cut out a triangle from each cookie 2 inches long on each side. Prepare a piping bag with the grass tip and add some of the chocolate frosting to the piping bag. Gently pipe ‘fur’ on the front of the triangle by placing the tip end on the cookie, squeezing and pulling straight up (here is grass/fur frosting instructions with photos). Repeat this to cover the entire top of the cookie. Continue to cover the sides leaving about ½ inch on each side of one of the corners unfrosted (this is to handle the ear without disturbing the other frosting; it will be completed once on the cake). Set aside to dry/harden.
- Once the cake has cooled, trim the tops of the layer if needed to create a flat surface. Place the bottom layer on a cardboard cake round or serving dish. Add a layer of the chocolate frosting to the top of the first layer and place the second layer on top of it.
- Prepare the Royal Icing. Due to the size of the grass piping tip the consistency may need to be a bit softer than traditional royal icing. I added almost double the water called for in the Wilton mix. Prepare the icing as directed and add more water, a teaspoon at a time, until the consistency is stiff but not so thick it cannot be squeezed through the piping tip. Add the Ivory icing color a small amount (e.g. dip a tooth pick in the icing and add it to the icing mixture; a little goes a long way!) and beat into the icing, adding more color a very small amount at a time until desired color is achieved.
- Using a frosting spatula, spread a thin layer of frosting on the top of the cake; the ‘fur’ will cover the cake top so it is just providing a foundation for the fur frosting to stick to. Frost the sides of the cake thoroughly as they will be exposed.
- Set up a new piping bag with the grass tip and add some of the tan frosting to the bag. Using the same technique as frosting the ears, pipe the fur around the outside edge of the cake top. Make a second circle inside the first. Roll the top of the piping bag closed to prohibit the frosting from drying out and set aside to complete the frosting after the face is assembled.
- Making the Face: Roll out the white fondant to ¼ inch thick and cut out the bridge of the nose and the mouth area using the Grumpy Cat photo and the cake photos as a guide. Also cut out two half ovals (lengthwise) for the background of the eyes.
- Roll out the chocolate fondant to ¼ inch thick and cut out the teardrop shapes for the background of the eye area. It should align with the sides of the large white fondant piece.
- Spread some frosting in the middle of the cake top to allow the fondant to adhere to the cake. Gently transfer the white nose/mouth area to the center of the cake. Place each tear drop chocolate piece on either side of the top of the white fondant and gently press into place on the cake.
- Put a small amount of frosting on the back of each white half oval to ‘glue’ them to the chocolate fondant pieces. Press gently into place.
- Using the blue Decorating Gel, color in each half oval to make the blue eyes. Using the pink Decorating Gel, make a triangular nose. Using the black Decorating Gel, draw a line down from the bottom of the nose and two 45 degree lines from each side of the bottom of the line to form Grumpy Cat’s scowl. Make a black dot of gel at the top middle of the blue eyes for pupils.
- Attaching and finishing the ears. Handling the ears gently, add frosting to the back side of the ears and position them onto the cake. They will be finished after the face.
- Using the rest of the ivory frosting in the piping bag and the grass tip, fill in all the areas between the ears and facial features so the face is furry.
- Using the grass tip and remaining chocolate frosting in a fresh piping bag, add fur to the ear areas and touch up any areas needed.
- Refrigerate the cake to allow all details to set fully; at least an hour.
Mary's mom says
My kids would love this cake!
Malinda says
Hi, this looks amazing. My daughter is picky about frosting. Is this doable with frosting other than royal?
Thanks a bunch.
Toni Dash says
I have only made it this way Malinda. I used Royal Icing due to its stiffness which keeps Grumpy Cat’s furr, well, ‘furry’ for lack of a better word. If you experiment do let me know how it turns out!
Susanne Donaldson says
My 11 year old daughter and I followed your decorating tips and made a grumpy cat cake for her birthday party today – thank you very much!
Susanne and Sadie
Toni Dash says
Most importantly, Happy Birthday to Sadie!!! I’m so glad you made the cake! Anyone who loves Grumpy Cat will surely be thrilled! I hope your party guests love it. Thanks so much for leaving your comment Susanne!
MARIA DE LOURDES ARAUJO says
OH!! Ki LINDO ESSE GATINHO!!!
aMEI DE PAIXÃO ESSES DRINKS
OBRIGADO POR ESSAS MARAVILHOSAS RECEITAS É VIVENDO É APRENDENDO COM GRANDES EXPERIENTES NESSA ART.
Nutmeg Nanny says
Gah! This whole cake is amazing! I would totally take a slice…or two 🙂
Toni Dash says
….or three, in my case!
Eimear says
Aww this is so sweet, I want to try making something like this. Nice work!
Toni Dash says
I hope you will Eimear! It’s worth the time for the end result.
Anne-Marie @ This Mama Cooks! On a Diet says
Just looking at this cake makes me less grumpy. I love that you shared it on your blog, Toni.
Toni Dash says
Thank you! I was surprised at the number of devotees this little cat has, that want to make her into a cake!