
Jello recipes aren't just for kids. This Star Spangled Layered Finger Jello recipe is a red white and blue dessert great for all ages!
Updated June 28, 2018
I'm sort of a sucker for red, white and blue recipes when it comes to July 4thcelebrating. I love a great grilling menu but patriotic colors make me cheery and are great to punctuate the holiday spirit.
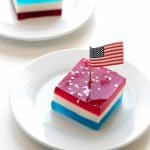
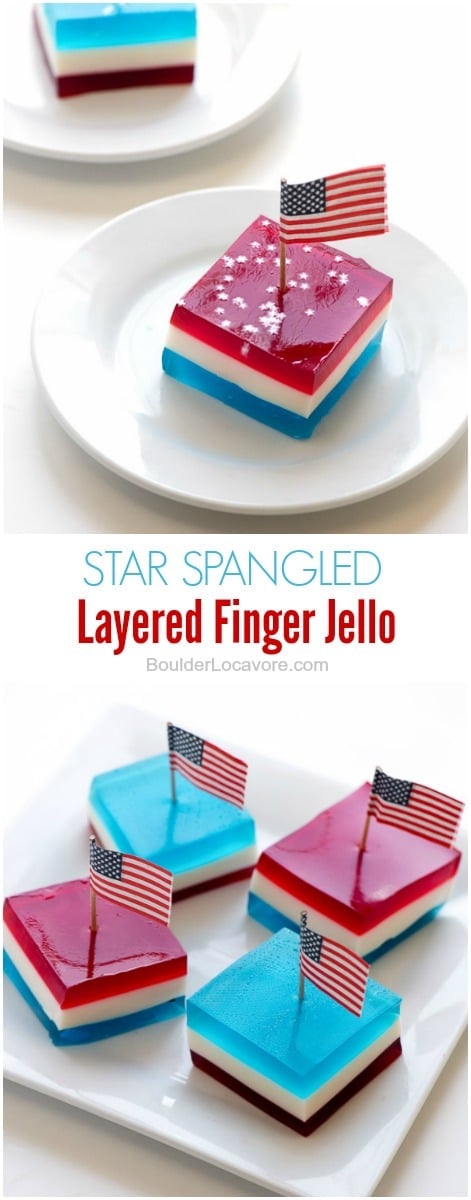
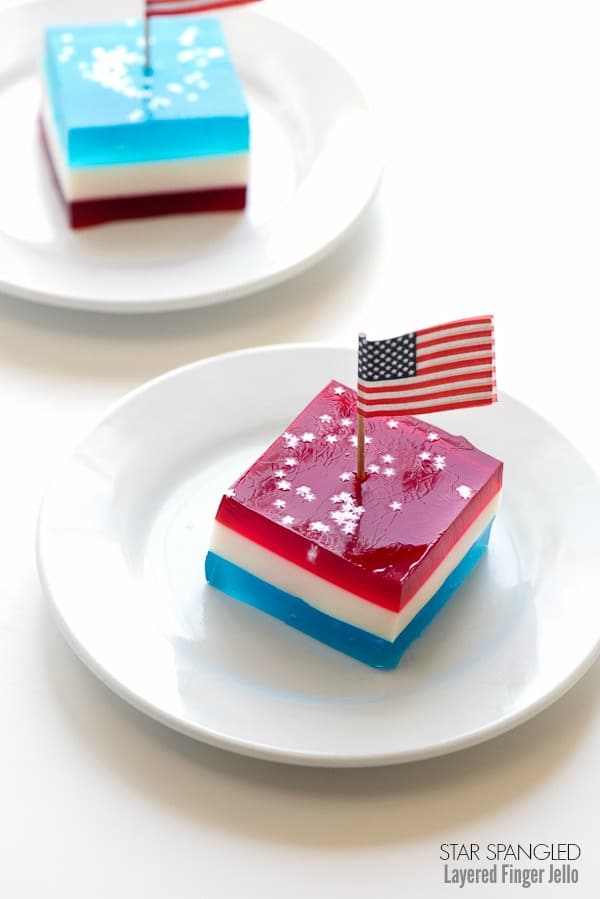
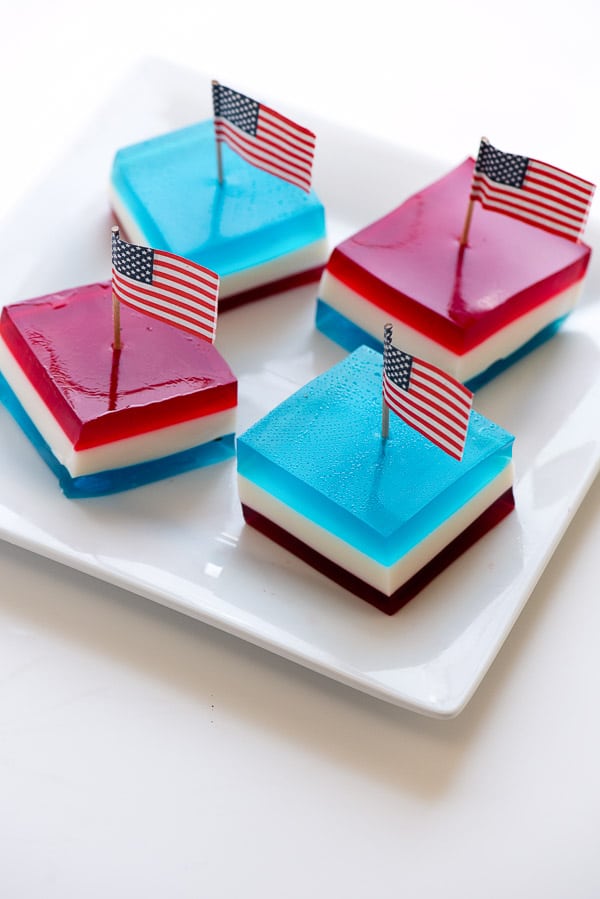
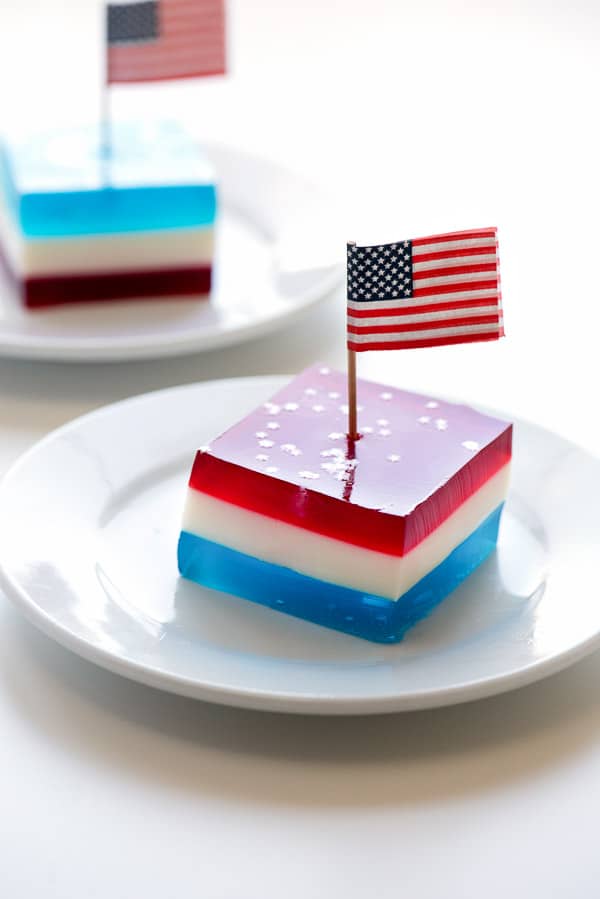
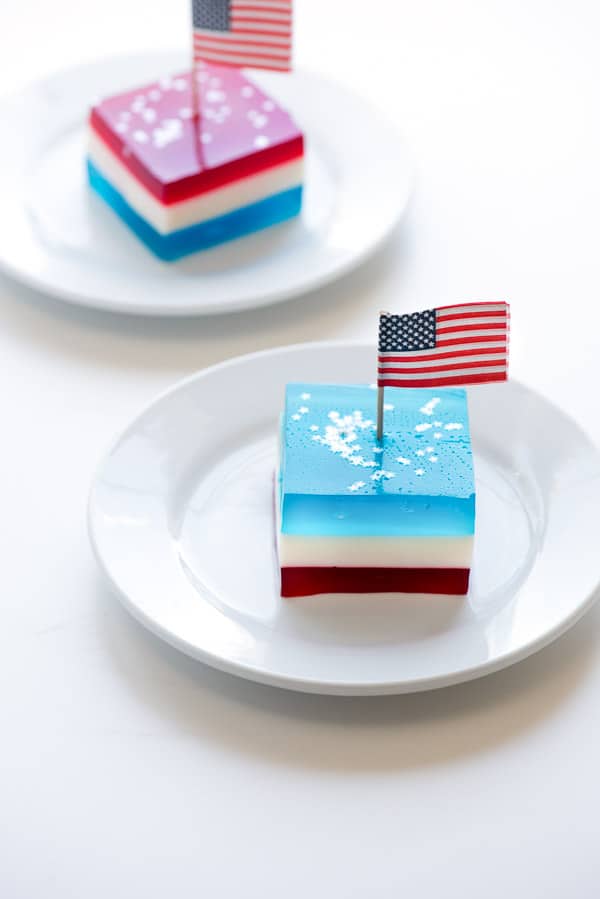
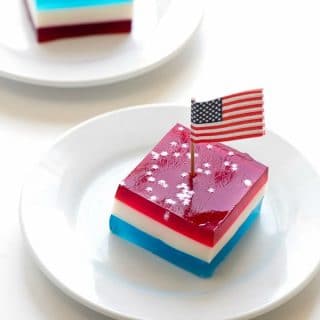
Today I have a fun addition to your holiday and summer menus: a Star Spangled Layered Finger Jello recipe! This red white and blue finger jello recipe may be served cut into small squares or rectangles or adorned with miniature edible stars (making the Star Spangled Layered Finger Jello) as shown and cupcake topped that fit the holiday.
The red white and blue dessert jello can be easily picked up to be eaten or eaten with a fork. It is light, cool, fun addition to your party menu and I'm sure your guests will agree!
What Is Finger Jello?
Finger jello, as the name suggests, can be eaten with your fingers. It has extra gelatin added to give it a firmer texture. It can be picked up and eaten without a mess!
How to Make Finger Jello: Is it Difficult to Make?
Finger jello is very easy to make. Making this jello recipe is similar to making regular jello; super easy. It has an extra step of adding unflavored gelatin which makes it firmer.
The steps are simple though there is a waiting period in between adding the layers to allow them to fully set before adding the next layer to keep the colors separate.
How to make White Jello
Sweetened condensed milk, unflavored gelatin and water are all that is needed to make white (delicious) jello! The instructions are in the recipe below.
Is this Finger Jello recipe Gluten-Free?
Yes! It is made with regular jello mix (red and blue), unflavored gelatin, water and sweetened condensed milk.
How Long Does it Take to Make Star Spangled Layered Finger Jello
Making layered jello is easy but does take time. Each layer has to be poured and chilled until it fully sets before adding the next layer. The second and third layer must cool before adding to the prior layer to ensure the colors don't mix.
The active time of the recipe is short. Three sessions of about 10 minutes spaced between cooling and chilling time. I allocated 7 hours though it might become firm more quickly.
How Long will Finger Jello last?
Kept covered and refrigerated this layered finger jello recipe lasts from 7-10 days.
Over time jello recipes can lose their flavor a bit, can release liquid and take on flavors from the refrigerator if not tightly sealed. It's always best to eat jello desserts when they are freshly made.
How to Store Finger Jello
Tightly covered in the refrigerator.
NOTE: do not cover the jello with plastic wrap before it has been completed and chilled until firm. If covered before all the layers have chilled, condensation can develop and drip onto the surface of the jello leaving marks.
How to Get Finger Jello out of the Pan
The pan is sprayed with non-stick cooking spray before the jello recipe begins. Running a knife around the outside, making the slices and lifting out with a pie server works great.
Expert TIP: spray the knife with non-stick spray before cutting the jello recipe to make cutting smoother.
Cutting Finger Jello recipes into Different Shapes
Cutting into squares or rectangles is just the start! You can use cookie cutters to make fun shapes like stars too!
TIP: spray the inside of the cookie cutter with non-stick spray before cutting shapes for a cleaner cut.
How to Make Star Spangled Layered Finger Jello - Worth the Wait!
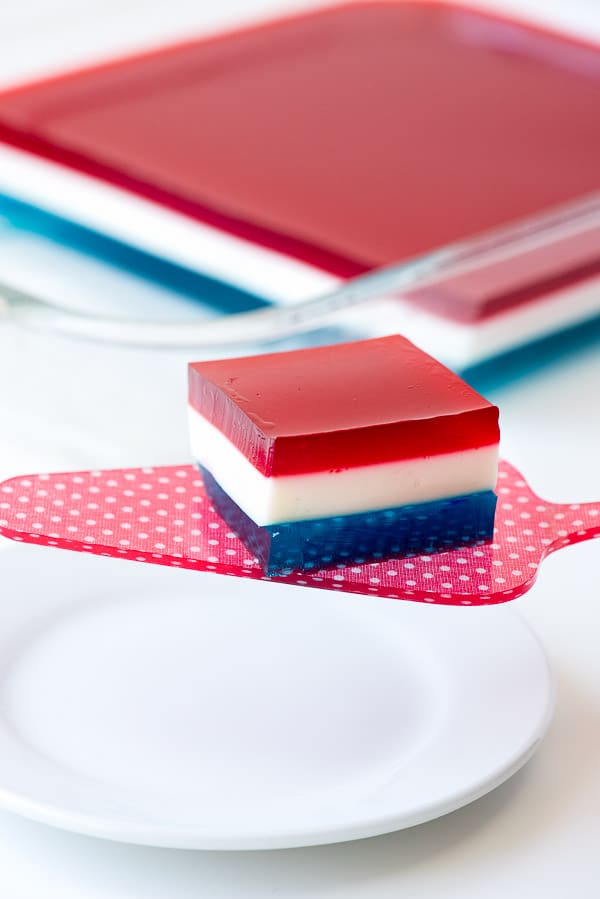
I love the colors of this jello recipe especially with the light coming through the layers. The ruby red is cherry flavor and the ocean blue is berry. The middle sweet creamy white layer is made with sweetened condensed milk.
The recipe is very easy to make though there is waiting time involved for the layers to fully set and to ensure the distinct layers. I found some tricks along my testing batches that are included in the recipe.
A 13-inch by 9-inch baking pan is prepared with non-stick spray. Blue jello is heated with water to dissolve. In parallel two packets of unflavored gelatin are combined with water to dissolve.
Once the jello has dissolved it is removed from the heat. The unflavored gelatin and some cold water are added. The blue jello is poured into the prepared pan and chilled until firm.
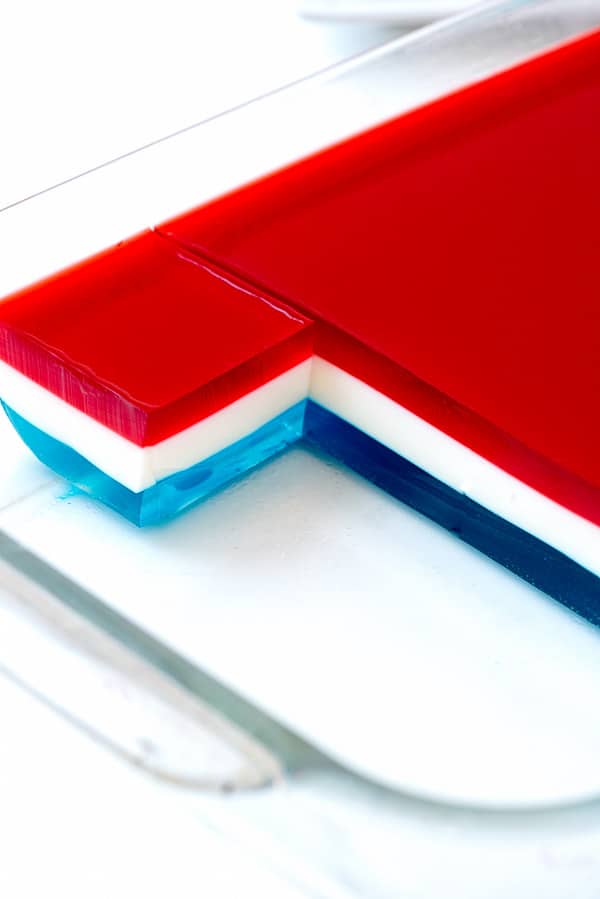
The white jello is made with unflavored gelatin, sweetened condensed milk and both cold and boiling water. It cools to room temperature (to not blend with the blue jello), poured on the first layer and chilled until firm.
The top, red layer, is made the same as the blue jello layer. Once cooled to room temperature it's added and the layered finger jello is chilled until firm or overnight.
Need a great suggestion for July 4th fireworks? This list of Best U.S. Cities for Fourth of July Fireworks will help you find the best options locally and nationally!
Please SUBSCRIBE and FOLLOW ME on FACEBOOK , TWITTER , INSTAGRAM and PINTEREST !
How to Make Start Spangled Layered Finger Jello- Step by Step:
Recipe
Star Spangled Layered Finger Jello
Ingredients
- 1 6-ounce package Berry Blue Jello
- 1 14-ounce can Sweetened Condensed Milk
- 1 6-ounce package Cherry Jello
- 6 1-Tablespoon packets Unflavored Gelatin
- Optional: Wilton Edible Stars , patriotic cupcake toppers
Instructions
- Prepare a 13 by 9-inch baking dish by spraying with non-stick spray and wipe around the bottom and side of the pan with a paper towel to coat evenly.
Layer 1/Bottom (blue layer):
- Dissolve 2 packages unflavored gelatin in 1 cup of cold water. Set aside.
- In a small saucepan bring 1 cup of water to a boil; add the Berry Blue Jello. Return to a boil, stirring to dissolve the jello and remove from heat.
- Add the gelatin mixture and ½ cup cold water to the saucepan and stir to fully combine and dissolve any solids.
- Pour into the prepared pan and place in the refrigerator on a level surface to ensure even layering. Allow to set.
Layer 2 (white jello):
- In a small mixing bowl combine ½ cup cold water and 2 packets of gelatin; stir. Set aside.
- In a large mixing bowl combine the sweetened condensed milk and 1 cup boiling water. Stir to combine.
- Add the gelatin and an additional ½ cup of boiling water. Allow to cool to room temperature (15-20 minute approximately). Note: if this layer is poured onto the first layer prior to cooling it will release some of the jello into the white layer.
- Once cooled, pour onto the first layer of blue jello and allow to set in the refrigerator (again on a level surface).
Layer 3/Top (red jello):
- Dissolve 2 packages unflavored gelatin in 1 cup of cold water. Set aside.
- In a small saucepan bring 1 cup of water to a boil; add the Cherry Jello. Return to a boil, stirring to dissolve the jello and remove from heat.
- Add the gelatin mixture and ½ cup cold water to the saucepan and stir to fully combine and dissolve any solids.
- Allow to cool to room temperature pour onto the second layer of white jello. Allow to fully set for a few hours or overnight (on a level surface).
Cutting the Layered Finger Jello:
- Spray a sharp knife with non-stick spray and cut the jello into squares or rectangles (spraying with non-stick spray allows smooth cutting); 6 horizontal rows each cut evenly into 5 pieces. Use a metal spatula to life jello out of the pan. Sprinkle with edible stars just before serving.
- Store any extra jello in the pan, covered with plastic wrap in the refrigerator.
Notes
- Be sure the pan with the jello is on a flat in the refrigerator to ensure the layers are straight and even.
- Do NOT cover the pan with plastic wrap until it has completely set. Adding plastic wrap over the individual layers will cause condensation as the jello layer cools and will drip on top of the layer.
- Before slicing, coat a sharp knife with non-stick spray for easier slicing.
- The majority of the total time is for cooling.
Shauna says
Made this with two layers of red jello and cut with maple-leaf cookie cutter for Canada Day! 🇨🇦🍁
Sara Welch says
This is such a fun and festive treat to celebrate the 4th of July! So excited to serve these this year; looks too good to pass up, indeed!
Elizabeth says
This is such a fun recipe to make with kids! Perfect for serving at our Memorial Day picnic this weekend.
Jen says
This was so fun and festive!! Really perfect for patriotic celebrations!
Shadi says
I Just tried this recipe and my family loved it. It was so easy and the flavors were fantastic.