
Summer is supposed to be foot-loose-and-fancy-free however I find leaving things to chance doesn’t always arrive at that carefree mode we all associate with summer. I’m finding myself doing lots of reflecting this summer.
My daughter will be entering her junior year in high school. We’ve had plenty of warnings from parents with older children that the junior year is a beast. Between college tests, large projects, and in my daughter’s case she’s pursuing an IB diploma, her choice, which challenges students with accelerated work and compulsory volunteer hours.
As parents we are often so focused on the daily tactics and the deliverables, it’s only at the end of the school year when we raise our heads realizing we are one year closer to our kids going to college. Quite candidly it’s no different for those without kids. Time gets away from all of us.
As daunting as these life transitions can be I feel they are a gift to help prioritize and focus on what is important. The answer to that reflection is different for everyone but for me it’s a tap on the shoulder to remember to live life now. No regrets. I don’t want to look back and wish we would have done something or gone somewhere but just didn’t make it happen.

In this spirit, my cherished partner Silk, is prompting me to pursue my bucket list this year. My list is not a traditional list, though there definitely are some firsts on it. It’s a mix of catching up on things I’ve wanted to learn but haven’t made the time as well as seizing the day pursuits that for me make life feel more whole. I feel it’s no accident that Silk is the company giving birth to this project for they have run their company in the same vital manner since the beginning. Not satisfied with the status quo, seeking to expand, exploring and delivering plant-based options to make life better. They are contentious, thoughtful, adventurous and mindful; you can taste that in their products as well as observe it in their commitment to recycling, composting, non-GMO products and more.
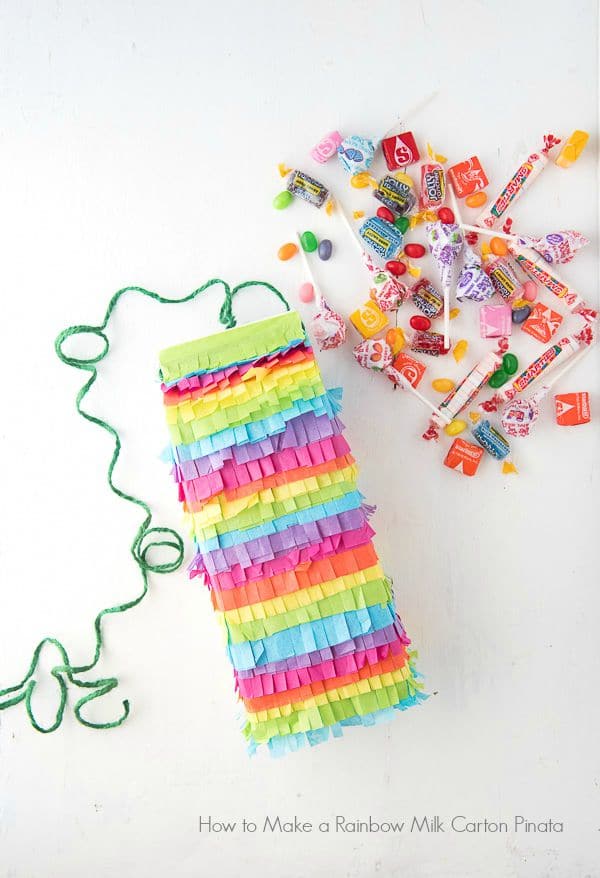
This month I’m focusing on bringing more whimsy into our days. I’ve always loved quirky aspects of life and welcome the relief from an unending chore list to dazzle with a bit of the unexpected. I have a completely fun recycle/upcycle project to share with you that captured my goal completely: How to Make a Rainbow Milk Carton Piñata.
I love engineering and when I get an idea about making something the path of figuring out how to do it thrills me. This was no exception. Before starting however I engaged my family in a prototype dry run of validating that a milk carton can indeed be opened as a piñata. As much as they enjoy taste testing the recipes I develop for Boulder Locavore, the chance to pull out a baseball bat to test a piñata trumped any tasty cakes I’ve made! The end answer was ‘yes’ a milk carton can behave as a piñata however will prove a challenge for smaller children. I’ll provide some suggestions of how to modify for tinier tots.
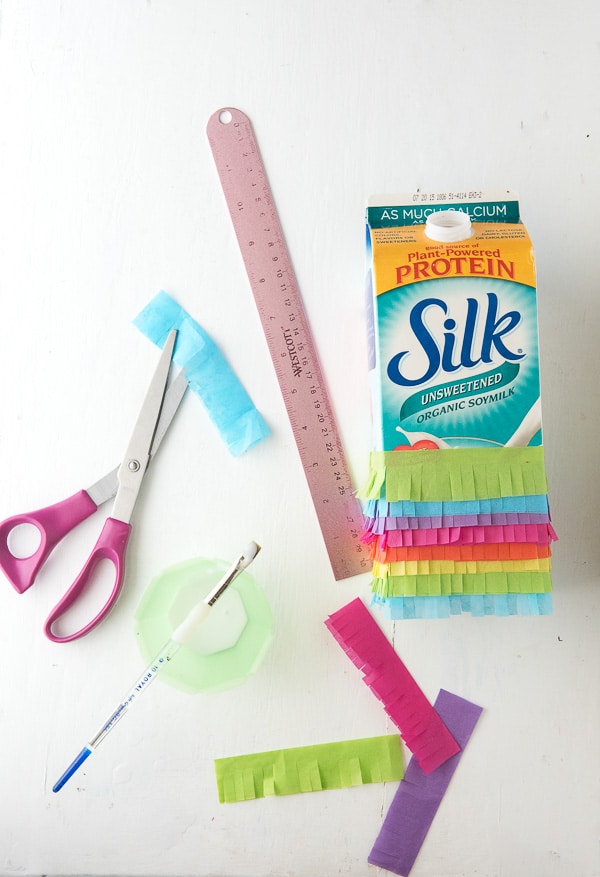
Supplies Needed
- 1 Half Gallon Milk Carton, rinsed fully and dried (reserve the top from the pouring spout)
- 1 sheet each Orange, Yellow, Green, Blue, Purple and Bright Pink Tissue Paper
- Scissors
- Ruler
- White Glue
- Small Paintbrush
- Twine (to hang the piñata)
- Phillips head Screwdriver (medium-large size)
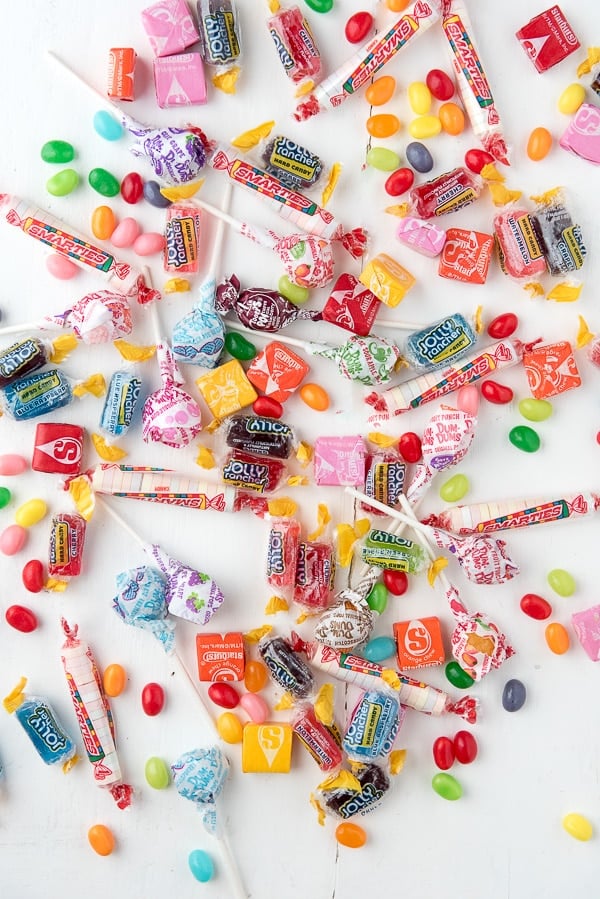
- Wrapped Candy that can be inserted through the pouring spout (I stuck with a rainbow theme with Starbursts, Jolly Ranchers, Smarties, Dum Dum suckers)
Step by Step Instructions
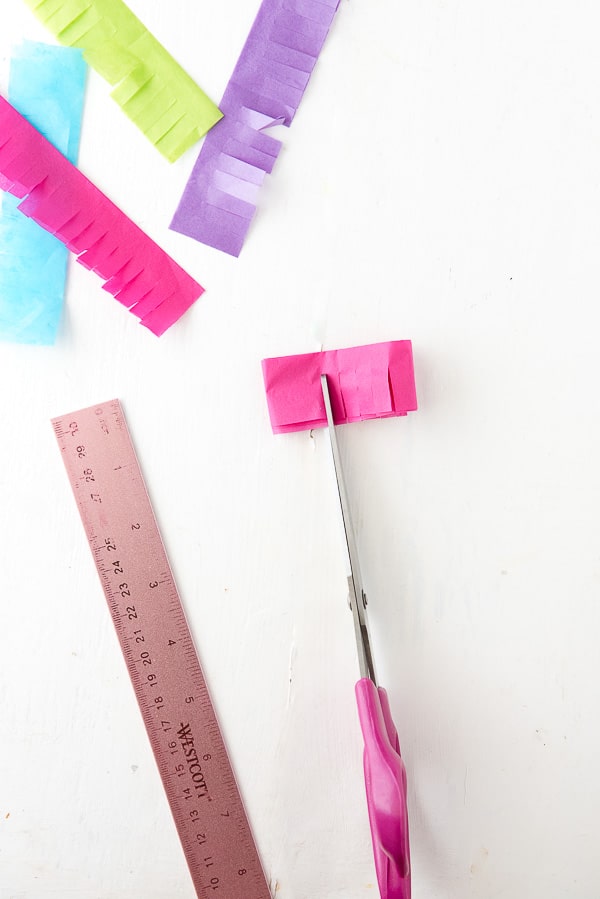
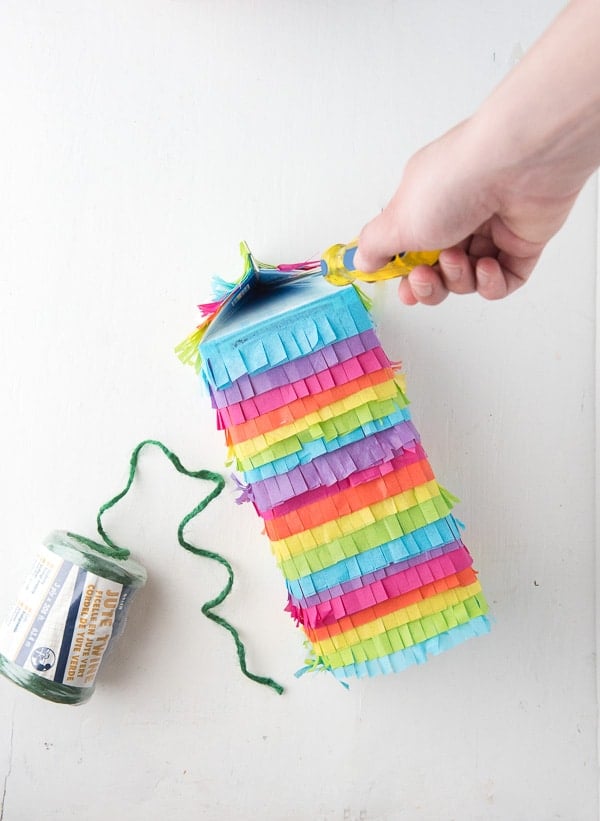
1. Cut strips of tissue paper 2-inches tall and the width of the tissue paper sheet. Fold the strip in half lengthwise making the strip 1-inch tall and double layered.
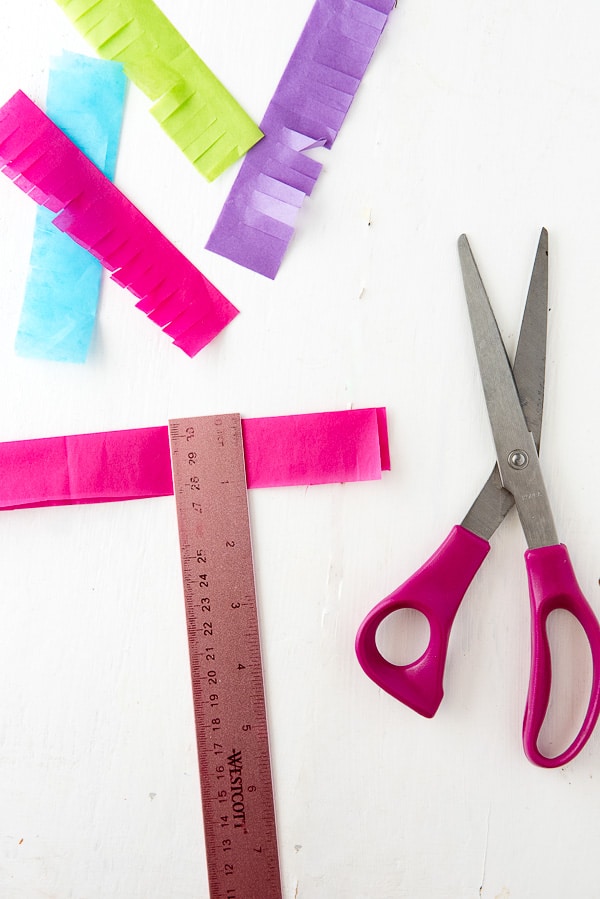
2. Creating the fringe: Here is a tip to make this much faster than cutting the fringe the length of the tissue paper!
Hold the ends of the tissue paper strip together, grasp the middle point and fold that over to the ends (without creasing). Repeat this again, and once more so the long strip is now only a few inches long (see the photo below).
Using the scissors, make a cut 3/4-inch long from the non-folded side of the strip, leaving a 1/4-inch from the fold to the top of the cut. Space cuts about ¼-inch apart. After the cuts are made unfold the tissue paper strip to its full width, leaving it folded down the center length.
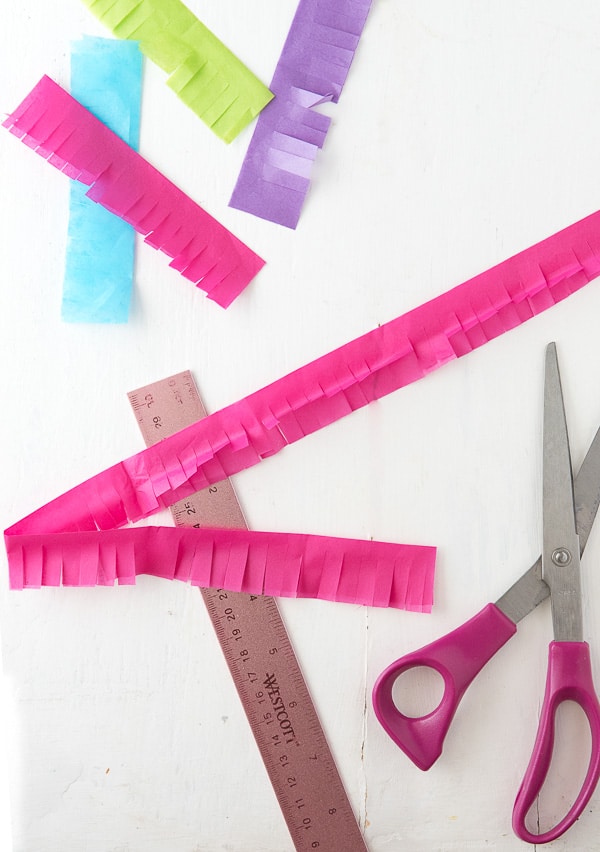
3. Beginning at a side seam of the milk carton, paint a very light line of glue along the bottom seam of the milk carton. Align the end of the tissue paper strip to the side seam of the milk carton and place the uncut ¼-inch top of the strip on the glue. Gently press down.
Repeat for the remaining three sides of the milk carton. When all four sides are covered, use the scissors to cut off any excess tissue paper (reserve any excess for doing the top).
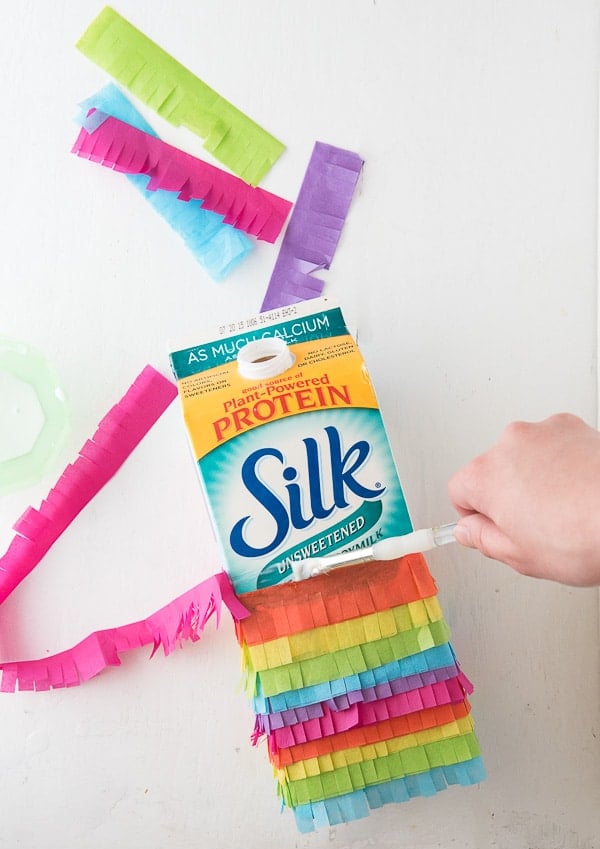
4. Repeat this process placing the 1/4 –inch uncut top of the next tissue paper strip directly above the first strip. This allows the fringe to hang over the first strip leaving about ¼-inch exposed. Continue in this manner until the entire milk carton is covered.
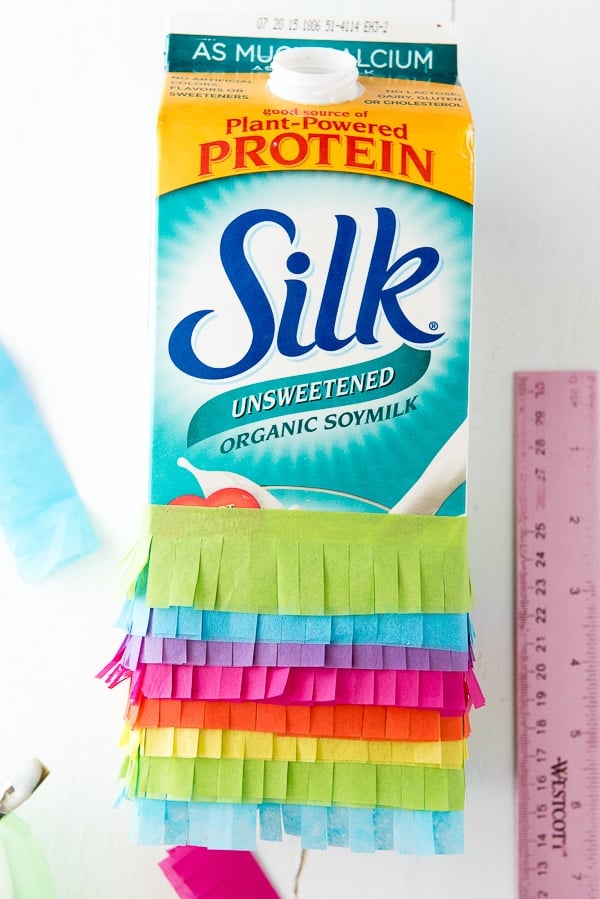
5. Cover the slanted top of the milk carton in the same manner, trimming the strips to not overhang the edges. When working around the pouring spout, cutting two smaller strips works best. When the milk carton is fully covered, allow it to dry before completing.
6. To hang the piñata use the screwdriver and poke a hole in the indented portion of the milk carton top. Refer to the photo below. The screwdriver will exit in the same spot on the opposite side. Move the screwdriver around to make the hole large enough to insert twine (the twine can be pushed through with the screwdriver). Pull the twine through and tie it around the top of the milk carton.
7. Fill the piñata with candy through the pouring spout and screw on the lid.
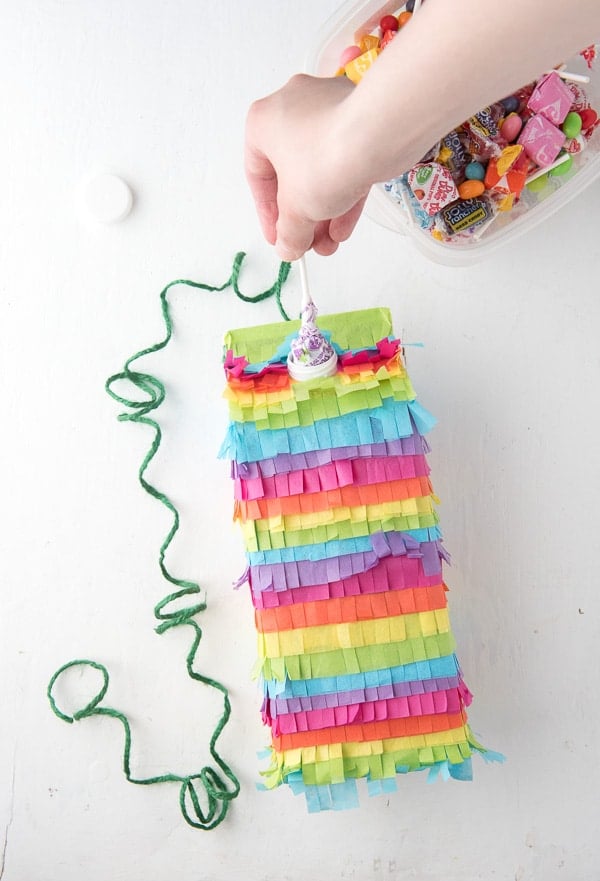
8. Hang the piñata from a tree branch or other raised area (we lowered ours off a deck over the driveway ensuring the bat would not hit anything). Strike the piñata until the candy is released. For smaller children I would suggest cutting horizontal slits under the tissue paper with a box cutter to weaken the milk carton or creating a trap door in the bottom secured with masking tape or painters tape to hold the door shut. Strands of crepe paper could be attached to the bottom and kids could pull those to open the piñata too.
This conversation was originally sponsored by Silk. The opinions and text are all mine.
Latoicha says
This is such a cool and creative craft for a birthday party. Thanks for sharing.
Chris Scheuer says
I want to be a kid at your house. You make things so fun!
Katie Reed says
I love frugal ideas to repurpose things that would otherwise be trash. I think this is such a cute idea and I know my boys will love swinging at a pinata!
Debbie L says
Very cute – Isa would love making this for her party. Pinned to my Party board.
Marina John says
This is adorable looking! What an awesome project.
Ora Lee Gurr says
This is a fun piñata how-to. I’m always looking for artwork to hang from the fence or tree branches, and this colorful bit of art will be perfect. We are the last small farm on a country road, so we have people drive by to turn around and head back to the main road now and then plus the regular mail service. One of the nicest things about doing projects like this with older kids is when they go off to college they can share with classmates that have younger brothers or sisters, or even kids of their own.
Stefanie says
This is so awesome … and sooooooo clever!