
I have always believed the most valuable gift you can give of yourself is your time. It's fleeting, there is never enough of it. I for one carry a lengthy list of chores on a daily basis. I have my critical path deliverables of the day and the longer terms 'have to get this done' list. I find it a challenge to relax fully when my list is too long, always feeling I should get more done before goofing around (and that is anything not on my list).
Here's the reality as I see it: that list will never be done. For everything that comes off, two or three go back on. So as much as I'd love to live in a spotless home, with a pristine yard, get up in the morning wondering what I'll do with my empty day, I treasure the madness that fills my day and would always opt for a spontaneous outing with my kids in the summer.
My house will always be available to clean but my kids won't always be available to spend time with. Just my 2 cents.

For this month's entry on my Bucket List project with partner Silk, maker of delicious plant-based milks, I am putting the list away and I'm taking time to just spend some time with my kids.
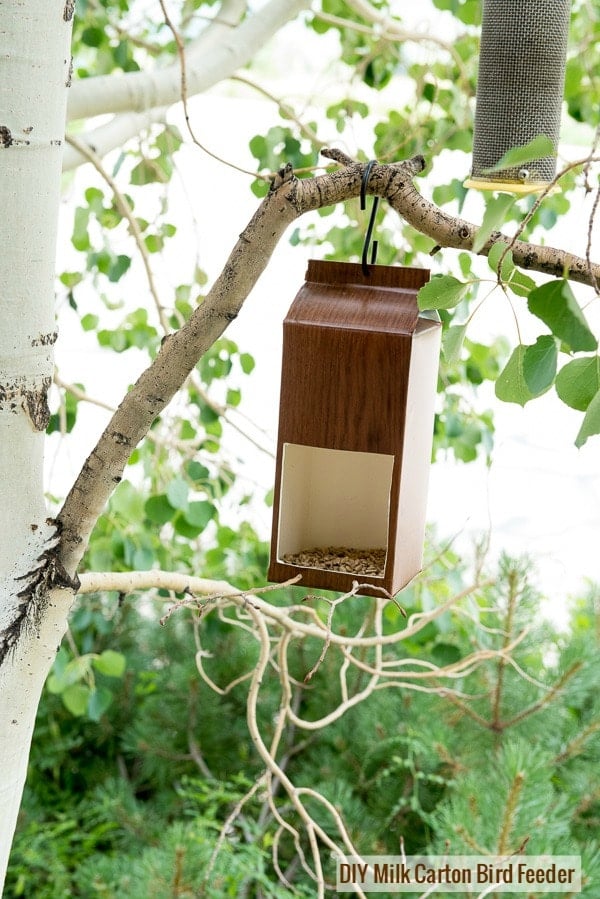
We have decided to do a fun art project (something else we never work into our schedules anymore); we are making Homemade Milk Carton Bird Feeders. We are avid recyclers by nature so also love a chance to give something, like a simple milk carton, a new life.
We've been filling our store bought bird feeders for the past two month as birds are nesting and thought it would be fun to add to our collection with our finished Silk containers.
My kids are older so are capable with the tools used in this project but if doing this with little ones, parents should be manning the box cutter and any sharp scissors.
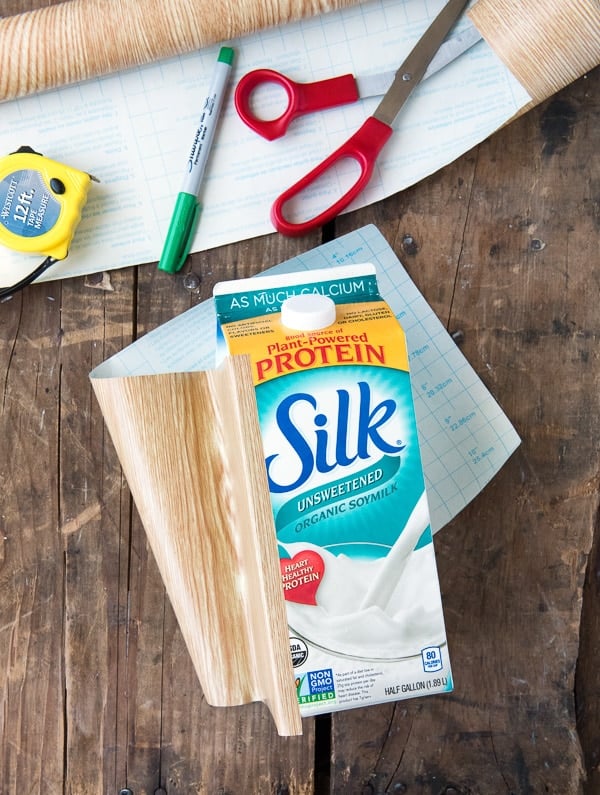
The project is simple only requiring some adhesive contact paper (also known as vinyl adhesive) available at most hardware stores or online, a few sticks for birds to perch, and 'S' hook (used for hanging plants available at hardware or garden stores) and other odds and ends from the tool kit; and of course some bird seed.
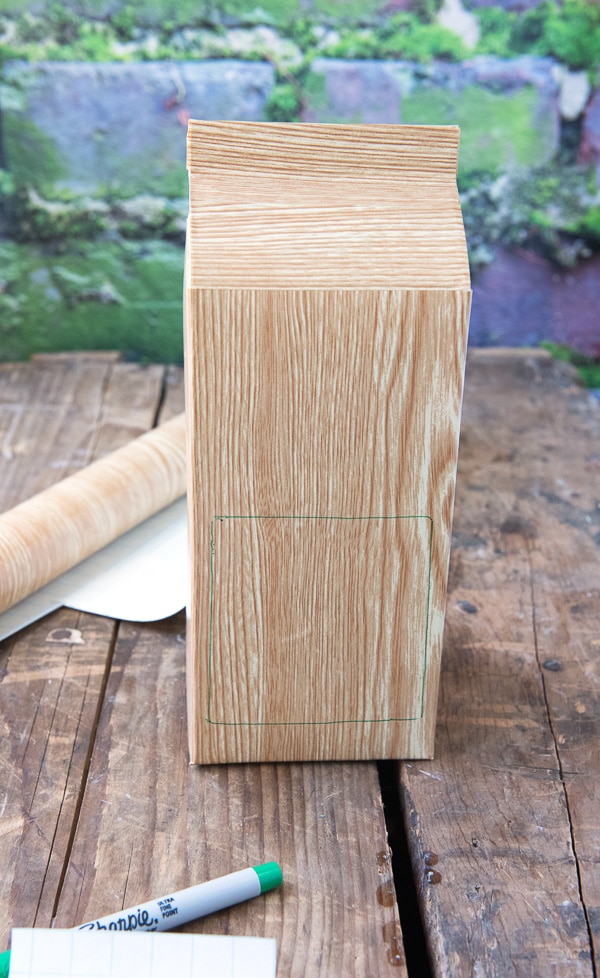
Any types of contact paper pattern may be used. We found a wood pattern we liked to keep the bird feeder more natural looking to the environment where it will be hung.

Supply Needed
- Full size Milk Cartons; inside washed with a tiny bit of dish soap, rinsed well and fully dry
- Vinyl Adhesive (aka Contact Paper)
- Sharpie marker
- Box Cutter
- Sharp Scissors
- Ruler, measuring tape or tape measure
- Phillips screwdriver
- S hook for hanging plants
- Twigs for bird perches
Step by Step Instructions
Measure around the base (the four sides) of the milk carton; record the measurement PLUS add a ½ inch. Measure from the seam of the milk carton (the crease between the bottom of the milk carton and slanted top) to the bottom; record measurement plus a ½ inch.
On the back side (non-decorative side) of the vinyl adhesive, draw a rectangle matching your measurements. The distance around will be the long side of the rectangle and the distance from the base to crease will be the width. NOTE: most vinyl adhesive has measurement increments on the paper which covers the adhesive making it easy to draw straight lines. If yours does not, use the ruler.
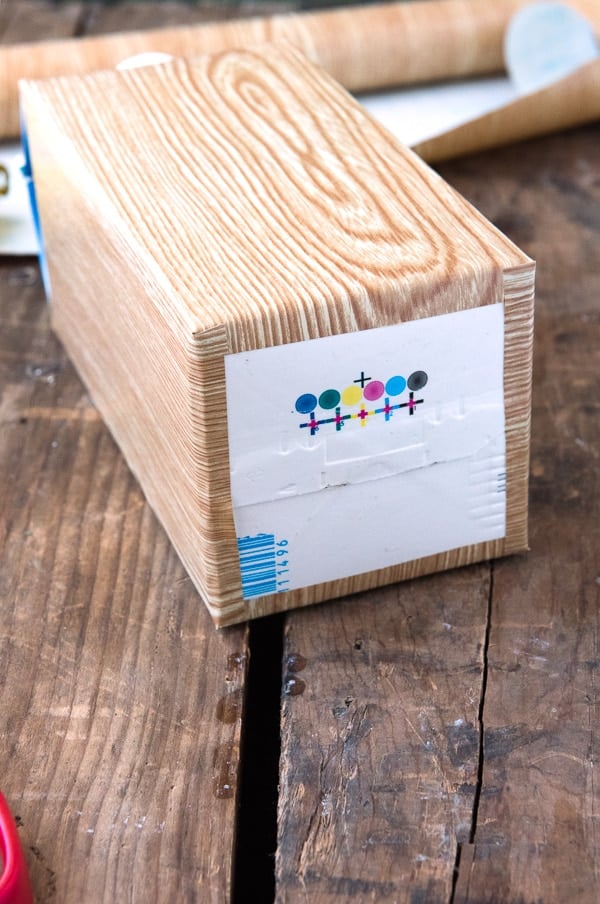
Unpeel only about 1 inch of the protective backing from the long side of the vinyl adhesive rectangle you've cut out. With the decorative side facing out, line up the unpeeled area so the top (long side) aligns with the crease where the milk carton begins to slant and ½ inch of the short side of the rectangle is just over one of the four 90-degree angles of the milk carton base (see photo). Press into place, working out any bubble with your fingers. NOTE: ½ inch will over extend the bottom of the carton and will be addressed once all the sides are covered.
Unpeel a few more inches of the backing and press the vinyl adhesive onto the milk carton, pressing out any bubble as you apply it. Continue this until the entire milk carton base is covered. NOTE: peeling only a few inches of the backing at a time prohibits the vinyl adhesive from sticking to itself and allows more control over the placement on the milk carton.
Using sharp scissors, make a cut from the bottom of the overhanging vinyl adhesive at the corners, only between the overhanging edge to the edge of the milk carton. Repeat this for all four corners. After making the cuts, fold over the vinyl adhesive and press onto the bottom of the carton.
You will again measure out another rectangle of adhesive to cover the top of the milk carton. Record the width of the top of the milk carton.
To measure the seam-to-seam distance using a pliable sewing measuring tape works best. If unavailable, you can use a piece of string, holding the end to the milk carton seam and guiding the string flush with the slant of the top, up and over the very top and to the opposite seam; mark or cut the string at the second seam.
Stretch out the string against a ruler for the length measurement of the top of the milk carton. Cut out a rectangle by marking the measurements on the back side of the vinyl adhesive.
Cutting around a round opening of a milk carton: The easiest way I've found to cut around the milk carton opening (if a round opening with a cap) is to map it's location on the paper side of the adhesive before applying.
Take a measurement from the nearest seam (where the edge of the vinyl adhesive rectangle will sit on the milk carton) to the middle bottom edge of the opening. Make a mark on the paper side of the rectangle of the measurement from the edge of the rectangle to the bottom of the opening.
Be sure it's positioned where the opening is (e.g. in the middle of the milk carton width or wherever it is on the milk carton you are using). Using a quarter or the lid to the opening as a guide, center the quarter on top of the line you've drawn and draw around the quarter. Cut out the small line and around the circle.
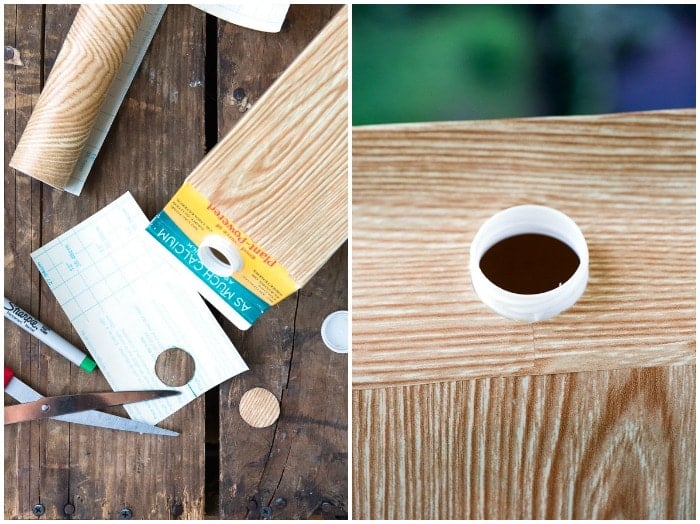
Starting on the non-opening side of the milk carton top, peel away about an inch of the paper backing on the short rectangle side and align it on the width of the milk carton. Press in place squeezing out any bubbles with your fingers. Continue until the rectangle is affixed to the milk carton, being sure to align the cuts below the opening so none of the milk carton is exposed.
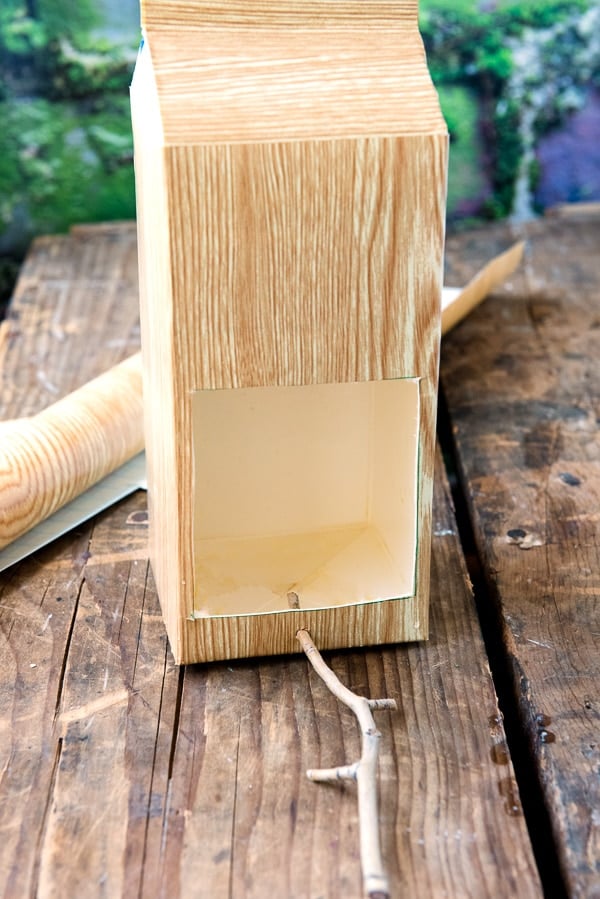
Cutting a feeding hole or holes. Using a Sharpie, draw a 3 1/4 inch by 3 1/4 inch square centered on the side of the milk carton for the feeder opening with the bottom edge starting ¾ inches from the bottom of the milk carton (this allows space for a twig perch to be installed below the feeder opening). Using a box cutter, cut out the square. Multiple feeding openings may be cut on different sides of the milk carton however to maintain the structure of the milk carton intact, 1-2 holes work best.
Adding twig perches. Below the feeding hole make a mark where you will insert one or two small twig perches. Using the box cutter, make a small hole through the milk carton. If needed the hole may be made bigger using a micro screwdriver or simply by pushing the end of the twig into the cut. NOTE: in order to ensure the twig will stay in place not making the hold too big is important.
Adding the hanging S hook. Make a small mark in the middle of the top of the milk carton (refer to photos). Using a box cutter, make a small slit through the mark. Using a Philips screwdriver enlarge the hole to allow one end (the smaller end if the hook is larger on one side) to be inserted.
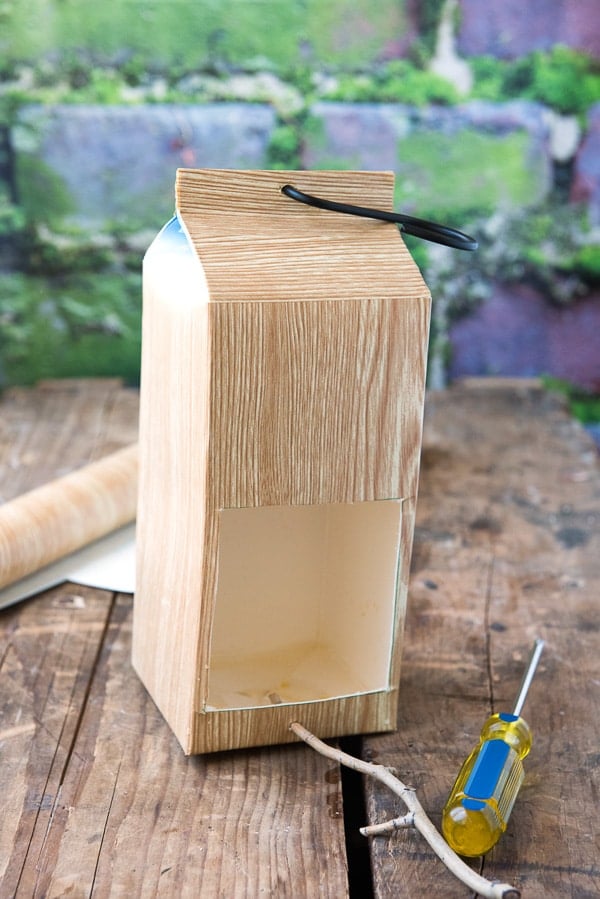
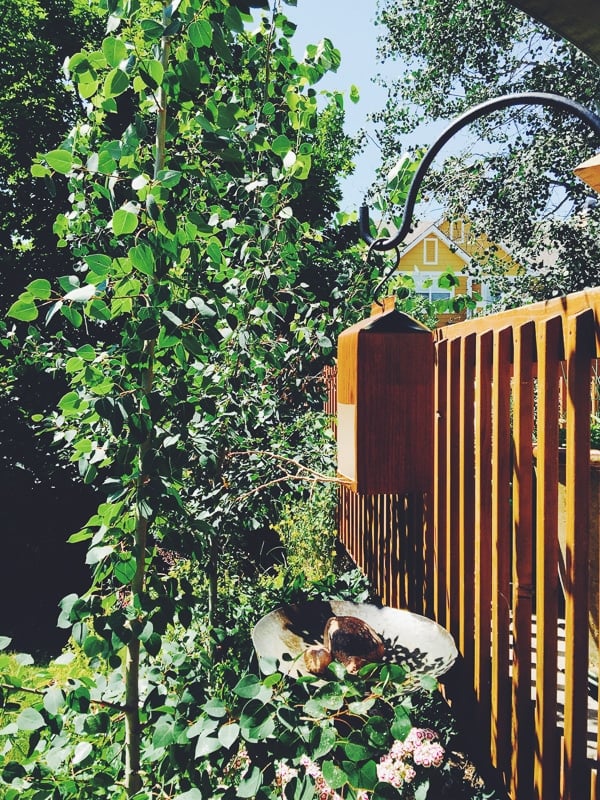
Add some bird seed to the milk carton (local bird centers or pet stores can advise what types of birds are in your area and recommend feed) and hang in the protection of a tree or on a free-standing bird feeder hook.
A note on last month's Bucket List Project post: I shared last month my commitment to launch into a skill I've wanted to learn more about for a long time; grilling. Ironically just after I'd shared my post an opportunity arose for me to attend a prestige Barbecue University conducted by Steven Raichlen, author, TV personality and grilling expert. I attended the class and walked away even more excited about mastering this skill, having met many fantastic new people in the process. The moral of that story for me? When you commit to what you are passionate about opportunities you never imagined rise up to meet you! Don’t sit on a Bucket List, get out and live it today!
This conversation is sponsored by Silk. The opinions and text are all mine.
Debbie says
Love this. We used to make bird feeders out of cartons when I was growing up
Christie says
I love the wood panel feel to your birdhouse! My kids would love doing this upcycle together!
Sabrina @ Dinner, then Dessert says
What a fun project and I love that your transformed the outside of the box to match the environment!
Beth@FrugalFroggie says
What a fun idea. A great inexpensive craft to do with your kids.
Ora Lee Gurr says
DIY milk carton bird feeders are going to be all the rage with these great instructions. It turned out so cute. The birds and I have an agreement. They stay away from the fruit trees and I’ll let them hang around the rest of the acreage. There’s a shady area in the back where I can hang a few of these. The twigs are a brilliant touch.
Theresa says
That’s a great craft idea! I am going to see if my girls want to try making one this week. Great summer fun activity for them!
Veronica says
That is really cool! How long does it hold up in the rain?
Toni Dash says
Ironically Veronica since I made them we’ve had some intense windy, rainy storms at night. The feeder has been battered around but has survived well! Between the waxed coating of the milk carton and vinyl adhesive I think it will stand up to rain well. Of course over time I’m sure it will sustain some wear!
Amber C. says
What an awesome idea!! I can’t wait to make one of these with my son!
Marcie W. says
This is such a cute idea and a great way to be kind to nature. I think the wood grain contact paper you used really sets the tone.
Chris Scheuer says
As a mom of grown up kids, I have to say you’re totally correct Toni. They will grow up way too fast and there’ll be a day when they won’t want to do projects like this any more. So yes, treasure every minute, they are so precious! This would be such a fun project to do with my grandkids, pinning!