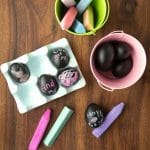
Chalkboard Easter Eggs
This method of creating Easter Eggs is different and fun, allowing opportunity for budding artists, fun messages for egg hunters, place card names and mistakes to be easily wiped off and redone.
It is recommended to NOT eat these eggs due to the paint on the outside. They can be kept at room temperature for a few days since they will not be eaten, however if they will be made farther in advance of Easter, keep them in an egg carton in the refrigerator prior to decorating.
Calories
Ingredients
- Hard-boiled Eggs (my favorite method below), cooled to room temperature
- 1 can Chalkboard Spray Paint (I used Krylon Chalkboard Paint purchased from Michael’s Crafts however it can be found wherever paint is sold and online)
- An old shoe box or show box lid
- Box cutter
- A quarter
- Black marker
- Newspaper or tarp to cover painting area
- Chalk to decorate the eggs (we found a type of Crayola chalk in the art section of a craft store that was brilliant in color and with a pointed tip for easy drawing and writing)
Instructions
- Favorite hard-boiled egg method: Add the eggs to a pot and fill with cold water (if the eggs are cold) or room temperature water (if the eggs have been sitting out) to cover the eggs plus 2 inches. There should be room for the eggs to move a bit; they should not been packed in together.
- Bring the water to a boil, and continue to boil for 20 minutes (it does not need to be a rolling boil that might knock the eggs against each other).
- If you plan to eat the hardboiled eggs (I do not recommend eating these eggs not knowing about the paint reaction with the inside of the egg), put the pot in the sink underneath the faucet and run a slow amount of cold water into the pan. Continue to run the water until the hot water has been replaced by cold (but slowly so the eggs won’t crack). Let the eggs sit in the cool water for about 20 minutes to fully cool before decorating. The cold water bath helps make the eggs peel more easily too.
- If you do not plan to eat the eggs, the eggs may be left in the cooking water to cool naturally or removed and left at room temperature to cool.
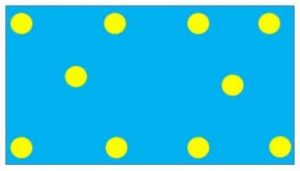
- Preparing the painting box. This method works well as it allows a small amount of the egg to sit in the box to keep it stable during painting but also makes the delineation between the painting unnoticeable when the eggs is flipped and painted on the opposite end. Using the quarter, trace around it with the black marker, starting in the corner of the box or box lid. Allow approximately 4 inches between each circle for plenty of painting room. Here is an example pattern based on a standard 12-inch by 7-inch shoebox; modify as needed for your box or lid size:

- Using the box cutter cut out the circles.
- Put out the newspaper or tarp to protect the area where you’ll be painting and put the prepared box with holes in the center of the area. Place eggs gently on the holes in the box.
- Prime the chalkboard paint as instructed on the canister (usually shaking the can for a recommended period of time). Making short sweeping strokes 6-8 inches away (or the distance suggested on the paint canister) cover the exposed area of the eggs, shaking the can in-between painting bursts. Do not overcoat or there will be drips. The eggs will be coated twice on each side; any missed spots can be painted on an upcoming layer. Allow to dry fully (depending on the weather conditions usually a few hours or consult the paint canister).
- Second coat Prime the paint canister and once again make sweeping burst of paint onto the egg, shaking in between. Look for any spots missed on the first painting, toward the base of the egg for instance. Allow to dry fully.
- Flip the eggs over and paint over the spot left in short bursts, shaking the canister in between. Allow to dry and repeat. It works better to do it in two coats to fully cover the egg rather than one heavy coat which will produce dripping. Allow the eggs to dry fully and then decorate with chalk!