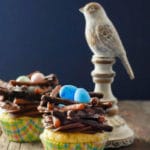
Chocolate Bird’s Nest Cupcakes {gluten-free}
A perfect celebration of spring or Easter, these chocolate bird's nest cupcakes will delight young and old! They may be made gluten-free or regular based on ingredients used. The nest a bit of time and patience to assemble but the reaction to the end result makes that completely worth it!The recipe uses both dark and milk chocolate to add different colors to the nests. One type of chocolate may be used for the entire nest instead.The Recipe Time is for creating the nests and affixing them to prepared cupcakes (see NOTES for breakdown). Time does not include baking cupcakes.
Servings 12 cupcakes
Calories 368kcal
Ingredients
- 12 homemade or purchased Vanilla Cupcakes (with ½ teaspoon natural/organic Orange flavor and ½ teaspoon orange zest added if homemade) (I used Pamela’s gluten-free Classic Vanilla Cake mix)
- 1 batch/container Chocolate frosting (I used Pamela’s Dark Chocolate Frosting mix)
- 144 Stick pretzels (gluten-free or gluten) or chow mien noodles (gluten) (each nest uses 12 pretzels; have some extras on hand)
- 2 3.2-ounce Milk Chocolate bar chopped
- 2 3.2-ounce Dark Chocolate bar chopped
- Supplies: see supply list in blog post
Instructions
MAKING THE BIRD NESTS
CHOCOLATE COATING THE PRETZELS:
- In a double boiler or metal bowl above gently boiling pan of water, add chocolate to melt; melt each the dark and milk chocolate separately if using both. NOTE: Chocolate can also be melted in the microwave using the 'melt' function.
- As chocolate is melting, line baking sheets with wax paper (dipped pretzels will be placed to harden).
- Place pretzels in melted chocolate. With a slotted spoon gently spoon chocolate over the pretzels to coat.
- Scoop some pretzels with the slotted spoon and gently shake the spoon over the melted chocolate to allow excess chocolate to drip back into the bowl of chocolate. Place coated pretzels on the wax paper with room in between so they will harden individually.
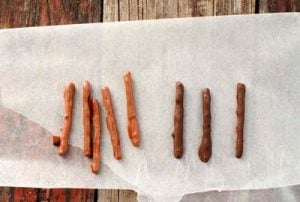
- Keep remaining melted chocolate in double boiler or pan of water (turn heat off). It will be used again for ‘glue’ and repair when attaching the coated pretzels to make the nest.
- Place the baking sheet of pretzels into the refrigerator to speed hardening. Check after 10-15 minutes to see if they are hardened; remove or allow to sit longer as needed.
ASSEMBLING THE NESTS:
- NOTE: The nest is formed from three squares, each made of 4 pretzels. If you choose to use the 2 different types of chocolate you may incorporate the coated pretzels as desired (for color effect).
MAKING A CHOCOLATE PRETZEL SQUARE:
- Place one pretzel vertically on wax paper on a baking sheet.
- Select a second pretzel to cross over the first pretzel, close to the end of the first pretzel. Dip the unused craft paintbrush into the color chocolate matching the chocolate coating the second pretzel. Place a drop of the chocolate on the backside of the second pretzel where the two pretzels will attach. Place second pretzel on first pretzel, gently press down to make full contact.
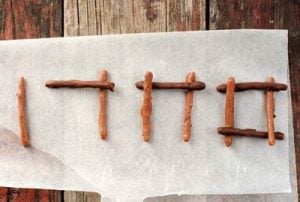
- Allow it to dry for a few minutes before proceeding to layer on the third and fourth pretzel in the same manner. NOTE: I put one end of the pretzel over the pretzel before, and underneath the following pretzel to give more dimension (see photo). Place tray of squares into the refrigerator to harden (check after 15 minutes).
- Chocolate coating repair (if needed):If the chocolate has thinned out where you handled any of the pretzels paint a thin layer of chocolate over the spot to even it out.
BUILDING THE NESTS WITH CHOCOLATE PRETZEL SQUARES:
- When the squares are hard and firmly attached, place one square on wax paper in a baking sheet. Take a second square and using the same ‘gluing’ method as in Step 8, dip the craft paintbrush in the chocolate to paint the spots on the back side of a second square to be placed at the angle shown in the photo.
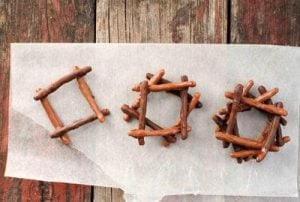
- Place the second layer on all the nests and allow to sit and harden for a few minutes (this allows them to stabilize to add the final layer).
- Place the third and final layer on the two layered nests in the same manner, orienting the third layer in the same position as the first layer. This gives the most stability in the end.
- Place in the refrigerator to harden fully; about 20 minutes. You may do any repair chocolate painting if desired.
- Note: if wishing to do the nest and cupcake assembly on different days, be sure to cover the coated pretzels or nests with plastic wrap to prevent oxidizing (getting a bit of a powdery look).
ASSEMBLING NEST CUPCAKES:
- Frost the cupcakes. Gently place a nest in the middle of the top of a cupcake. Gently press downward to lodge the nest securely in the frosting. Add candy eggs and serve!
Notes
The time required to make the cupcakes is more intensive while making the nests due to the in between chilling times. I suggest making the cupcakes and while they are cooling to begin making the nests. The nests take about 25 minutes for coating the pretzels and the first chill; 15-20 minutes for assembly of the squares, dependng on how many you are making, plus 15 minutes chilling time; and about 20 minutes to assemble the final nests. This is all dependent on how many you are constructing and how easily you find the construction process to be.
Nutrition
Calories: 368kcal | Carbohydrates: 47g | Protein: 5g | Fat: 17g | Saturated Fat: 8g | Cholesterol: 1mg | Sodium: 298mg | Potassium: 259mg | Fiber: 3g | Sugar: 22g | Vitamin A: 35IU | Vitamin C: 0.1mg | Calcium: 79mg | Iron: 4.6mg