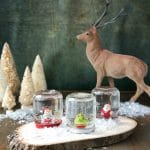
DIY How to Make Holiday Snow Globes
Before I had made snow globes I would never have guessed how easy and inexpensive they are to make. They can be made with any size jar or little scene inside. They last for years without discoloring or leaking when made by this method too.
Calories
Ingredients
- Homemade Snow Globes
- Jars with metal lids (I used baby food jars; choose jars to fit your snow globe ‘scene’ items)
- Resin or plastic items to fit inside the snow globe
- Spray paint for metal lids
- Epoxy
- Fine grain sand paper
- Glycerin (inexpensive and available by asking at a Pharmacy)
- Distilled Water
- Glitter or plastic confetti
Instructions
- Ensure the jars and lids are clean. Spray paint the outside of the metal lids in any color you choose. Set aside to dry fully before starting the snow globe.
- Using the fine grade sandpaper, lightly sand the spot where the resin/plastic item will be glued to the inside of the painted jar lid. This helps the epoxy to adhere best. Wipe away any dust from the sanding.
- Prepare the epoxy per package instructions. Coat the bottom of the resin/plastic item with prepared epoxy and place onto sanded spot on inside of jar lid. Press to firmly adhere. Allow to dry fully per the time instructed on the epoxy instructions.
- Once lid has dried, fill the jar with distilled water (do not over fill or water will spill out when lid with the item is installed).
- Add a few drops of glycerin into the jar (amount depending on jar size); add the desired amount of glitter, screw on lid and shake to test the effect. Glycerin causes the glitter to float and not immediately settle. Too little glycerin will not suspend the glitter to float and too much will cause the glitter to form clumps.
- Once you have the desired effect, dry the threaded area on the outside of the top of the jar and the inside threaded area of the lid so they close snugly. Seal and enjoy!